React16源码之React Fiber架构
React16源码之React Fiber架构
本文源码是2018年8月10日拉取的React仓库master分支上的代码
React源码分析内容非常多,本文专注在以下两个问题:
- JSX -> ? -> DOM
- React Component 的生命周期函数是怎么被调用的?
在开始源码分析之前,首先先简单介绍一下React的一些基础概念
基础概念
React定位是一个构建用户界面的JavaScript类库,使用JavaScript开发UI组件,支持多种方式渲染组件,输出用户界面。
React常见的三种应用类型:
- React Web 应用
- React Native 应用
- React服务端渲染
这三种应用分别对应三种不同的渲染方式:
- Web DOM 渲染
- 客户端原生 View 渲染
- 服务端字符串渲染
下面,以 React Web应用 为例,介绍下React三个主要组成部分:
- React基础模块(这个模块定义了React的基础API及组件相关内容。对应我们开发页面时引入的 'react' 模块)
- 渲染模块(这个模块对于不同类型的应用,采用不同的渲染方式。对应我们开发页面时引入的 'react-dom' 模块)
- Reconciliation 模块(又叫 协调模块,这个模块是上面两个模块的基础,也是本文分享的重点,主要负责任务协调、生命周期函数管理等)

在开始 Reconciliation 模块之前,先简单介绍各个模块:
React基础模块
const React = {
  Children: {...},

  createRef,
  Component,
  PureComponent,

  createContext,
  forwardRef,

  Fragment: REACT_FRAGMENT_TYPE,
  StrictMode: REACT_STRICT_MODE_TYPE,
  unstable_AsyncMode: REACT_ASYNC_MODE_TYPE,
  unstable_Profiler: REACT_PROFILER_TYPE,

  createElement,
  cloneElement,
  createFactory,
  isValidElement,

  version: ReactVersion,

  __SECRET_INTERNALS_DO_NOT_USE_OR_YOU_WILL_BE_FIRED: ReactSharedInternals,
};
从上面的源码可以看到,React基础模块只包括了基础的API和组件相关的定义。如:createRef、Component等。
其中可以重点关注的两点:
1、React.creatElement
在平时的开发中,我们使用的JSX语法,所以我们并没有直接接触到 React.creatElement 方法
大家都知道,JSX语法会被babel编译成调用 React.creatElement 方法,如下:

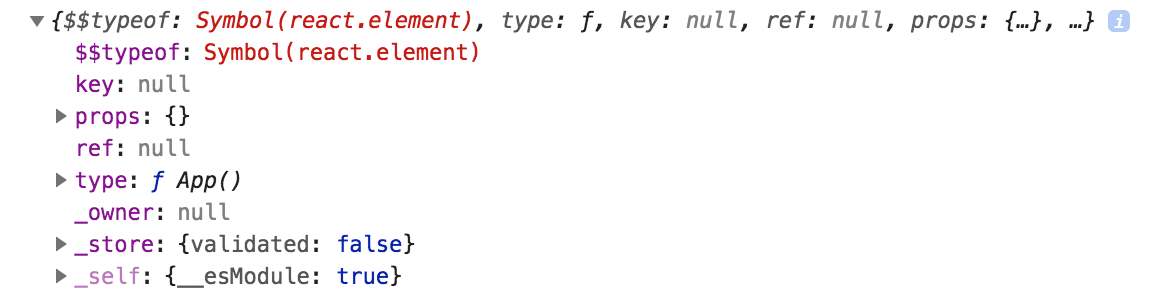
而 React.creatElement 最终返回的是 React Element,数据结构如下:
{
    $$typeof: REACT_ELEMENT_TYPE,
    type: type,
    key: key,
    ref: ref,
    props: props,
    _owner: owner,
}
可以在页面中把 <App/> 打印出来,如下:
2、React.component
组件是我们开发使用最多的,我们可以简单的看下源码:
function Component(props, context, updater) {
  this.props = props;
  this.context = context;
  // If a component has string refs, we will assign a different object later.
  this.refs = emptyObject;
  // We initialize the default updater but the real one gets injected by the
  // renderer.
  this.updater = updater || ReactNoopUpdateQueue;
}
Component.prototype.isReactComponent = {};
Component.prototype.setState = function(partialState, callback) {
  this.updater.enqueueSetState(this, partialState, callback, 'setState');
};
Component.prototype.forceUpdate = function(callback) {
  this.updater.enqueueForceUpdate(this, callback, 'forceUpdate');
};
从Component的定义上可以看到,我们常用的 setState 方法是调用了 updater.enqueueSetState,以 react-dom 为例,此 updater 对象会调用该组件构造函数时(这块会在后面的生命周期函数调用中讲到),赋值为classComponentUpdater,源码如下:
const classComponentUpdater = {
  isMounted,
  enqueueSetState(inst, payload, callback) {
    ...
  },
  enqueueReplaceState(inst, payload, callback) {
    ...
  },
  enqueueForceUpdate(inst, callback) {
    ...
  },
};
可以知道,组件中调用 setState 其实是调用的 classComponentUpdater.enqueueSetState 方法,这里就是开始 setState 的入口
至此,就简单的介绍了React基础模块,下面开始介绍渲染模块:react-dom
渲染模块:react-dom
const ReactDOM: Object = {
  createPortal,
  findDOMNode(
    componentOrElement: Element | ?React$Component<any, any>,
  ): null | Element | Text {
    ...
  },
  hydrate(element: React$Node, container: DOMContainer, callback: ?Function) {
    return legacyRenderSubtreeIntoContainer(null, element, container, true, callback,);
  },

  render(element: React$Element<any>, container: DOMContainer, callback: ?Function,) {
    return legacyRenderSubtreeIntoContainer(null, element, container, false, callback,);
  },
  ...
};
这里我们可以关注下 render 方法,所有 react web应用入口都会调用 ReactDOM.render(),本文也会从 ReactDOM.render() 开始进行源码的分析
在进行源码分析之前,先介绍下本文的核心:Reconciliation模块
Reconciliation模块
Reconciliation模块又叫协调模块,而我们题目上说的 React Fiber 则是在这个模块中使用一种调度算法
React Fiber调度算法又叫 Fiber Reconciler,是 React 16 启用的一种新的调度算法,是对核心调度算法(Stack Reconciler)的重构
Stack Reconciler
React 16版本之前使用的 Stack Reconciler 调度算法,它通过递归的形式遍历 Virtual DOM,存在难以中断和恢复的问题,如果react更新任务运行时间过长,就会阻塞布局、动画等的运行,可能导致掉帧。它的调用栈如下:
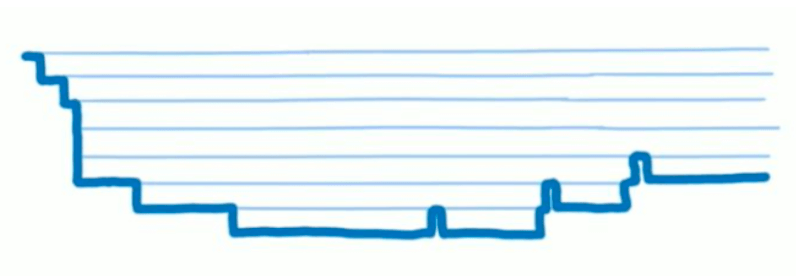
Fiber Reconciler
允许渲染过程分段完成,而不必须一次性完成,中间可以返回至主进程控制执行其他任务,它有如下新特性:
- 可拆分,可中断任务
- 可重用各分阶段任务,且可以设置优先级
- 可以在父子组件任务间前进后退切换任务
- render方法可以返回多元素(即可以返回数组)
- 支持异常边界处理异常
它的调用栈如下:

关于React新老调度算法的对比,大家可以看看:https://zhuanlan.zhihu.com/p/37095662
关于React Fiber概念的再详细的介绍,大家可以看看:http://www.ayqy.net/blog/dive-into-react-fiber/
以上,就对React的基本概念进行了介绍,接下来开始源码分析~
源码分析
React Fiber架构引入了新的数据结构:Fiber节点
Fiber
Fiber节点数据结构如下:
export type Fiber = {|
  // Tag identifying the type of fiber.
  tag: TypeOfWork,
  // Unique identifier of this child.
  key: null | string,
  // The function/class/module associated with this fiber.
  type: any,
  // The local state associated with this fiber.
  stateNode: any,
  // Remaining fields belong to Fiber
  return: Fiber | null,
  // Singly Linked List Tree Structure.
  child: Fiber | null,
  sibling: Fiber | null,
  index: number,
  // The ref last used to attach this node.
  ref: null | (((handle: mixed) => void) & {_stringRef: ?string}) | RefObject,
  // Input is the data coming into process this fiber. Arguments. Props.
  pendingProps: any, // This type will be more specific once we overload the tag.
  memoizedProps: any, // The props used to create the output.
  // A queue of state updates and callbacks.
  updateQueue: UpdateQueue<any> | null,
  // The state used to create the output
  memoizedState: any,
  // A linked-list of contexts that this fiber depends on
  firstContextDependency: ContextDependency<mixed> | null,
  mode: TypeOfMode,
  // Effect
  effectTag: TypeOfSideEffect,
  // Singly linked list fast path to the next fiber with side-effects.
  nextEffect: Fiber | null,
  firstEffect: Fiber | null,
  lastEffect: Fiber | null,

  expirationTime: ExpirationTime,
  childExpirationTime: ExpirationTime,

  alternate: Fiber | null,
  actualDuration?: number,
  actualStartTime?: number,
  selfBaseDuration?: number,
  treeBaseDuration?: number,
|};
Fiber树结构图(链表结构)如下:

源码函数调用流程
我们看张图:

React组件渲染分为两个阶段:reconciler、render。从图上可以看到:
- reconciler阶段是对Virtual DOM操作阶段,对应到新的调度算法中,就是找到需要更新的工作
- render阶段是渲染阶段,拿到更新工作,在不同应用中,使用不同的渲染方式进行渲染
在上面的基础概念介绍中有提到,react-dom模块负责react web应用的渲染工作,那么Reconciliation模块(协调模块)具体做了什么工作呢?
Reconciliation模块的工作可以分为两部分:
1、reconciliation
简单来说就是找到需要更新的工作,通过 Diff Fiber Tree 找出要做的更新工作,这是一个js计算过程,计算结果可以被缓存,计算过程可以被打断,也可以恢复执行
所以,上面介绍 Fiber Reconciler 调度算法时,有提到新算法具有可拆分、可中断任务的新特性,就是因为这部分的工作是一个纯js计算过程,所以是可以被缓存、被打断和恢复的
2、commit
提交更新并调用对应渲染模块(react-dom)进行渲染,为了防止页面抖动,该过程是同步且不能被打断
下面我们来看看这两个阶段具体的函数调用流程
reconciliation阶段
我们以 ReactDOM.render() 方法为入口,来看看reconciliation阶段的函数调用流程:
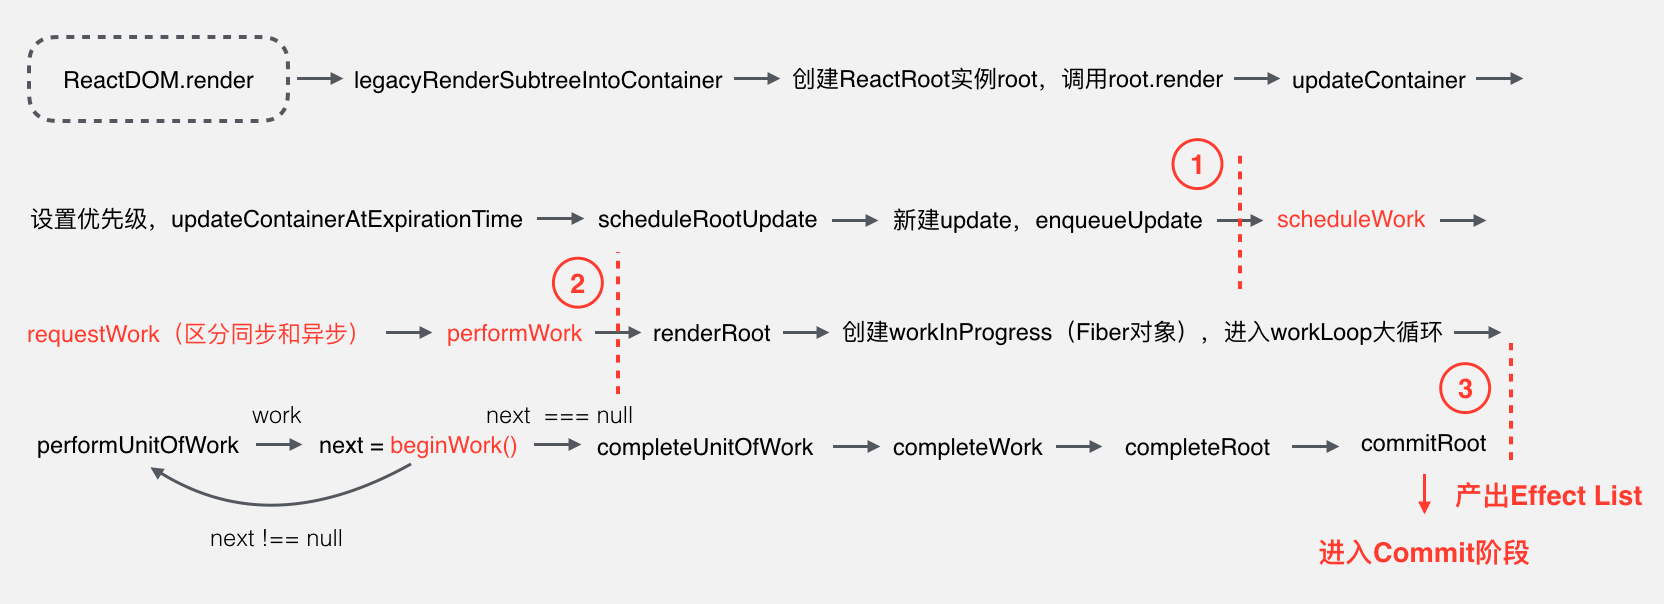
从图中可以看到,我把此阶段分为三部分,分别以红线划分。简单的概括下三部分的工作:
1、第一部分从 ReactDOM.render() 方法开始,把接收的React Element转换为Fiber节点,并为其设置优先级,记录update等。这部分主要是一些数据方面的准备工作。
2、第二部分主要是三个函数:scheduleWork、requestWork、performWork,即安排工作、申请工作、正式工作三部曲。React 16 新增的异步调用的功能则在这部分实现。
3、第三部分是一个大循环,遍历所有的Fiber节点,通过Diff算法计算所有更新工作,产出 EffectList 给到commit阶段使用。这部分的核心是 beginWork 函数。
第一部分
第一部分较为简单,这里就不详细介绍了,小伙伴们可自行阅读源码~
第二部分:任务协调
三部曲:scheduleWork、requestWork、performWork(安排工作、申请工作、正式工作)

在三部曲中的 requestWork函数中,会判断当前任务是同步还是异步(暂时React的异步调用功能还在开发中,未开放使用,本文后续内容是以同步任务为例),然后通过不同的方式调用任务。同步任务直接调用performWork函数立即执行,而异步任务则会在后面的某一时刻被执行,那么异步任务是怎么被调度的呢?
异步任务调度有两种方式,主要是通过该任务的优先级进行判断,主要有两种:
1、animation(动画):则会调用 requestAnimationFrame API 告诉浏览器,在下一次重绘之前调用该任务来更新动画
2、其他异步任务:则会调用 requestIdleCallback API 告诉浏览器,在浏览器空闲时期依次调用任务,这就可以让开发者在主事件循环中执行后台或低优先级的任务,而且不会对像动画和用户交互等关键的事件产生影响
以上两个API都是原生API,想深入了解的可以看看:requestAnimationFrame、requestIdleCallback
而原生requestIdleCallback存在兼容性问题,所以React本身开发了 ReactScheduler模块 来实现这个功能
后续会以同步任务为例,所以我们开始介绍第三部分的核心函数:beginWork
第三部分:beginWork
从上面的函数调用流程图可以看到,beginWork在大循环中被调用,返回当前节点的子节点。
function beginWork(
  current: Fiber | null,
  workInProgress: Fiber,
  renderExpirationTime: ExpirationTime,
): Fiber | null {
  const updateExpirationTime = workInProgress.expirationTime;
  if (!hasLegacyContextChanged() && (updateExpirationTime === NoWork || updateExpirationTime > renderExpirationTime)) {
    switch (workInProgress.tag) {
      case HostRoot:
        ...
      case HostComponent:
       ...
      case ClassComponent:
        pushLegacyContextProvider(workInProgress);
        break;
      case HostPortal:
        ...
      case ContextProvider:
        ...
      case Profiler:
        ...
    }
    return bailoutOnAlreadyFinishedWork(current, workInProgress, renderExpirationTime,);
  }

  // Before entering the begin phase, clear the expiration time.
  workInProgress.expirationTime = NoWork;

  switch (workInProgress.tag) {
    case IndeterminateComponent:
      return mountIndeterminateComponent(current, workInProgress, renderExpirationTime,);
    case FunctionalComponent:
      return updateFunctionalComponent(current, workInProgress, renderExpirationTime,);
    case ClassComponent:
      return updateClassComponent(current, workInProgress, renderExpirationTime,);
    case HostRoot:
      return updateHostRoot(current, workInProgress, renderExpirationTime);
    case HostComponent:
      return updateHostComponent(current, workInProgress, renderExpirationTime);
    case HostText:
      return updateHostText(current, workInProgress);
    case PlaceholderComponent:
      return updatePlaceholderComponent(current, workInProgress, renderExpirationTime,);
    case HostPortal:
      return updatePortalComponent(current, workInProgress, renderExpirationTime,);
    case ForwardRef:
      return updateForwardRef(current, workInProgress, renderExpirationTime);
    case Fragment:
      return updateFragment(current, workInProgress, renderExpirationTime);
    case Mode:
      return updateMode(current, workInProgress, renderExpirationTime);
    case Profiler:
      return updateProfiler(current, workInProgress, renderExpirationTime);
    case ContextProvider:
      return updateContextProvider(current, workInProgress, renderExpirationTime,);
    case ContextConsumer:
      return updateContextConsumer(current, workInProgress, renderExpirationTime,);
    default:
      ...
  }
}
首先,先介绍一下React Fiber架构的双缓冲技术:

从上图可以看到有两颗 Fiber Tree:current、workInProgress,它们之间是通过每个Fiber节点上的alternate属性联系在一起,可以查看源码ReactFiber.js中的 createWorkInProgress 方法,如下:
export function createWorkInProgress(
  current: Fiber,
  pendingProps: any,
  expirationTime: ExpirationTime,
): Fiber {
  let workInProgress = current.alternate;
  if (workInProgress === null) {
    workInProgress = createFiber(current.tag, pendingProps, current.key, current.mode,);
    ...
    workInProgress.alternate = current;
    current.alternate = workInProgress;
  } else {
    workInProgress.effectTag = NoEffect;
    workInProgress.nextEffect = null;
    workInProgress.firstEffect = null;
    workInProgress.lastEffect = null;
    ...
  }
  ...
  return workInProgress;
}
以上代码为简化之后的,可以发现,current与workInProgress互相持有引用。而从上图可以发现,所有更新都是在workInProgress上进行操作,等更新完毕之后,再把current指针指向workInProgress,从而丢弃旧的Fiber Tree
从beginWork源码来看,主要分为两部分,一部分是对Context的处理,一部分是根据fiber对象的tag类型,调用对应的update方法。在这里我们重点关注第二部分。而在第二部分中,我们以 ClassComponent类型 为例,讲讲 updateClassComponent函数 中做了什么呢?
主要有两部分:生命周期函数的调用及Diff算法
生命周期函数调用
流程图如下:

current为null,意味着当前的update是组件第一次渲染
1、调用 constructClassInstance 构造组件实例,主要是调用 constructor 构造函数,并注入classComponentUpdater(这块就是文章一开始介绍React Component时提到的updater注入)
2、mountClassInstance 则是调用 getDerivedStateFromProps 生命周期函数(v16) 及 UNSAFE_componentWillMount 生命周期函数
current不为null,调用 updateClassInstance 方法
1、如果新老props不一致,则会调用 UNSAFE_componentWillReceiveProps 生命周期函数
2、然后调用 shouldComponentUpdate 生命周期函数,获得shouldUpdate值,若未定义此生命周期函数,默认为true(是否重新渲染),如果shouldUpdate为true,则会调用 UNSAFE_componentWillUpdate 生命周期函数
最后调用 finishClassComponent 方法,那么 finishClassComponent函数 中做了什么呢?流程图如下:

如果 shouldUpdate 为false,表示不需要更新,直接返回
如果 shouldUpdate 为true,调用实例的 render 方法,返回新子节点
如果是首次渲染,调用 mountChildFibers 创建子节点的Fiber实例
否则,调用 reconcileChildFibers 对新老子节点进行Diff
执行到了这,updateClassComponent函数主要是执行了组件的生命周期函数,下面讲讲需要对新老子节点进行Diff时使用的Diff算法
Diff算法
reconcileChildFibers函数 中,源码如下:
function reconcileChildFibers(
    returnFiber: Fiber,
    currentFirstChild: Fiber | null,
    newChild: any,
    expirationTime: ExpirationTime,
    ): Fiber | null {
    const isUnkeyedTopLevelFragment = typeof newChild === 'object' && newChild !== null && newChild.type === REACT_FRAGMENT_TYPE && newChild.key === null;
    if (isUnkeyedTopLevelFragment) {
        newChild = newChild.props.children;
    }
    const isObject = typeof newChild === 'object' && newChild !== null;
    if (isObject) {
        switch (newChild.$$typeof) {
        case REACT_ELEMENT_TYPE:
            return placeSingleChild(
                reconcileSingleElement(returnFiber, currentFirstChild, newChild, expirationTime,),
            );
        case REACT_PORTAL_TYPE:
            return placeSingleChild(
                reconcileSinglePortal(returnFiber, currentFirstChild, newChild, expirationTime,),
            );
        }
    }
    if (typeof newChild === 'string' || typeof newChild === 'number') {
        return placeSingleChild(
            reconcileSingleTextNode(returnFiber, currentFirstChild, '' + newChild, expirationTime,),
        );
    }
    if (isArray(newChild)) {
        return reconcileChildrenArray(returnFiber, currentFirstChild, newChild, expirationTime,);
    }
    if (getIteratorFn(newChild)) {
        return reconcileChildrenIterator(returnFiber, currentFirstChild, newChild, expirationTime,);
    }
    if (isObject) {
        throwOnInvalidObjectType(returnFiber, newChild);
    }
    // Remaining cases are all treated as empty.
    return deleteRemainingChildren(returnFiber, currentFirstChild);
}
reconcileChildFibers函数中主要是根据newChild类型,调用不同的Diff算法:
1、单个元素,调用reconcileSingleElement
2、单个Portal元素,调用reconcileSinglePortal
3、string或者number,调用reconcileSingleTextNode
4、array(React 16 新特性),调用reconcileChildrenArray
前三种情况,在新子节点上添加 effectTag:Placement,标记为更新操作,而这些操作的标记,将用于commit阶段。下面以单个元素为例,讲讲具体的Diff算法
reconcileSingleElement函数源码如下:
function reconcileSingleElement(
    returnFiber: Fiber,
    currentFirstChild: Fiber | null,
    element: ReactElement,
    expirationTime: ExpirationTime,
    ): Fiber {
    const key = element.key;
    let child = currentFirstChild;
    while (child !== null) {
        // 判断key是否相等
        if (child.key === key) {
            if (child.tag === Fragment ? element.type === REACT_FRAGMENT_TYPE : child.type === element.type) {
                // key相等且type相等,删除旧子节点的兄弟节点,复用旧节点并返回
                deleteRemainingChildren(returnFiber, child.sibling);
                const existing = useFiber(child, element.type === REACT_FRAGMENT_TYPE ? element.props.children : element.props, expirationTime,);
                existing.ref = coerceRef(returnFiber, child, element);
                existing.return = returnFiber;
                return existing;
            } else {
                // key相等但type不相等,删除旧子节点及兄弟节点,跳出循环
                deleteRemainingChildren(returnFiber, child);
                break;
            }
        } else {
            // key不相等,删除此旧子节点,继续循环
            deleteChild(returnFiber, child);
        }
        // 继续遍历此旧子节点的兄弟节点
        child = child.sibling;
    }
    // 不能复用,则直接新建Fiber实例,并返回
    if (element.type === REACT_FRAGMENT_TYPE) {
        const created = createFiberFromFragment(element.props.children, returnFiber.mode, expirationTime,
        element.key,);
        created.return = returnFiber;
        return created;
    } else {
        const created = createFiberFromElement(element, returnFiber.mode, expirationTime,);
        created.ref = coerceRef(returnFiber, currentFirstChild, element);
        created.return = returnFiber;
        return created;
    }
}
具体过程在代码的注释中写的比较清楚,在这就不详细展开。不过我们可以看看 deleteChild(删除子节点)中,具体做了什么,源码如下:
function deleteChild(returnFiber: Fiber, childToDelete: Fiber): void {
    if (!shouldTrackSideEffects) {
        return;
    }
    const last = returnFiber.lastEffect;
    if (last !== null) {
        last.nextEffect = childToDelete;
        returnFiber.lastEffect = childToDelete;
    } else {
        returnFiber.firstEffect = returnFiber.lastEffect = childToDelete;
    }
    childToDelete.nextEffect = null;
    childToDelete.effectTag = Deletion;
}
可以看到,deleteChild 删除子节点并不是真的删除这个对象,而是通过 firstEffect、lastEffect、nextEffect 属性来维护一个 EffectList(链表结构),通过 effectTag 标记当前删除操作,这些信息都会在 commit 阶段使用到
以上,就是beginWork函数的整个过程,可以知道遍历完Fiber树之后,通过Diff算法,可以产出 EffectList,给commit阶段使用
commit阶段
函数调用流程图如下:

commit阶段做的事情是拿到reconciliation阶段产出的EffectList,即所有更新工作,提交这些更新工作并调用渲染模块(react-dom)渲染UI。
effectTag
在前面也提到,commit阶段会通过 effectTag标记 识别操作类型,所以我们先来看看 effectTag 有哪些类型:
// Don't change these two values. They're used by React Dev Tools.
export const NoEffect = /*              */ 0b00000000000;
export const PerformedWork = /*         */ 0b00000000001;
// You can change the rest (and add more).
export const Placement = /*             */ 0b00000000010;
export const Update = /*                */ 0b00000000100;
export const PlacementAndUpdate = /*    */ 0b00000000110;
export const Deletion = /*              */ 0b00000001000;
export const ContentReset = /*          */ 0b00000010000;
export const Callback = /*              */ 0b00000100000;
export const DidCapture = /*            */ 0b00001000000;
export const Ref = /*                   */ 0b00010000000;
export const Snapshot = /*              */ 0b00100000000;
// Update & Callback & Ref & Snapshot
export const LifecycleEffectMask = /*   */ 0b00110100100;
// Union of all host effects
export const HostEffectMask = /*        */ 0b00111111111;
export const Incomplete = /*            */ 0b01000000000;
export const ShouldCapture = /*         */ 0b10000000000;
可以看到:
1、effectTag类型是使用二进制位表示,可以多个叠加
2、通过位运算匹配effectTag类型
从上面的流程图,可以看到commit阶段有比较重要的三个函数:
1、commitBeforeMutationLifecycles
此函数主要是保存当前DOM的一个快照,执行 getSnapshotBeforeUpdate 生命周期函数
2、commitAllHostEffects
提交所有更新并渲染,源码如下:
function commitAllHostEffects() {
  while (nextEffect !== null) {
    recordEffect();
    const effectTag = nextEffect.effectTag;
    if (effectTag & ContentReset) {
      commitResetTextContent(nextEffect);
    }
    if (effectTag & Ref) {
      const current = nextEffect.alternate;
      if (current !== null) {
        commitDetachRef(current);
      }
    }
    let primaryEffectTag = effectTag & (Placement | Update | Deletion);
    switch (primaryEffectTag) {
      case Placement: {
        commitPlacement(nextEffect);
        nextEffect.effectTag &= ~Placement;
        break;
      }
      case PlacementAndUpdate: {
        commitPlacement(nextEffect);
        nextEffect.effectTag &= ~Placement;
        const current = nextEffect.alternate;
        commitWork(current, nextEffect);
        break;
      }
      case Update: {
        const current = nextEffect.alternate;
        commitWork(current, nextEffect);
        break;
      }
      case Deletion: {
        commitDeletion(nextEffect);
        break;
      }
    }
    nextEffect = nextEffect.nextEffect;
  }
}
从源码可以看到,此函数主要是遍历EffectList,根据effectTag,调用对应commit方法,进而调用react-dom提供的操作DOM的方法,渲染UI,操作DOM的方法有:
{
  getPublicInstance,
  supportsMutation,
  supportsPersistence,
  commitMount,
  commitUpdate,
  resetTextContent,
  commitTextUpdate,
  appendChild,
  appendChildToContainer,
  insertBefore,
  insertInContainerBefore,
  removeChild,
  removeChildFromContainer,
  replaceContainerChildren,
  createContainerChildSet,
}
注意,在调用删除操作的commit方法时,会执行 componentWillUnmount 生命周期函数
在这个方法中,基本完成了将更新提交并渲染UI的工作
3、commitAllLifeCycles
此函数主要是根据fiber节点类型,执行相应的处理,以 ClassComponent 为例,完成UI渲染之后,会执行后续的生命周期函数:
1、判断是否首次渲染,是则执行 componentDidMount 生命周期函数
2、否则,执行 componentDidUpdate 生命周期函数
以上就是commit阶段的全过程
至此,我们源码等的全过程也完成了,我们再总结一下整个函数调用流程:

总结
最后,我们回到一开始的那两个问题:
- JSX -> ? -> DOM
- React Component 的生命周期函数是怎么被调用的?
现在,是不是觉得整个过程都很清晰了呢~~~
附上,生命周期函数汇总表:

写在最后
以上就是我对React16源码的分享,希望能对有需要的小伙伴有帮助~~~
喜欢我的文章的小伙伴可以点star ⭐️
写的很棒!请教一个问题,fiber结构中的updatequeue的effectlist是不是闭环?
下面的appendUpdateToQueue函数没有形成闭环
function appendUpdateToQueue<State>(
  queue: UpdateQueue<State>,
  update: Update<State>,
) {
  // Append the update to the end of the list.
  if (queue.lastUpdate === null) {
    // Queue is empty
    queue.firstUpdate = queue.lastUpdate = update;
  } else {
    queue.lastUpdate.next = update;
    queue.lastUpdate = update;
  }
}
但是在commitHookEffectList方法中又有 const firstEffect = lastEffect.next;