blog
 blog copied to clipboard
前端模块化 - Webpack
前端模块化 - Webpack
"Node.js 从最一开始就支持模块化编程。然而,在 web,模块化的支持正缓慢到来。在 web 存在多种支持 JavaScript 模块化的工具,这些工具各有优势和限制。webpack 基于从这些系统获得的经验教训,并将_模块_的概念应用于项目中的任何文件。"
从 Webpack 4对模块化的面数来看,深知自己的历史任务深重,所以扛起了所有的前端几乎所有的模块化方案:
-
ES6的import与export语句 -
CommonJS的require与module.exports -
AMD的define与require语句 -
CMD的define -
css/less/sass中的@import语句
CommonJS
根据CommonJS规范,全局中可以直接取到exports、require、module这三个经典的变量。再加上运行环境为node,所以多加两个__filename与__dirname
- __filename
- __dirname
- CommonJS
Webpack根据以上的基本需要,将当前模块封装在一个块级作用域中,并将这些变量当做模块的全局变量传入。
(function(exports, require, module, __filename, __dirname){
  // YOUR MODULE CODE
});
无法 tree shaking
CommonJS规范下,代码是在运行时才确定依赖关系的,所以webpack在实现上也是依照规范去做。只能在打包编译的时候加入完整的模块到最后的bundle中,无法实现Tree Shaking.
ES6 Module
对于ES6 Module的编译过程静态化处理,Webpack也以文件为维度对模块进行划分,得到module1、module2、module3等,最后还有入口模块moduleEntry。
这里的设计思维,有点像是
Javascript的作用域链.
// moduleA.js
export const A = 'A value'
//  moduleB.js
export const B = 'B value'
// moduleC.js
export const C = 'C value'

// app.js
import { A } from './es6/moduleA'
import { B } from './es6/moduleB'
import { C } from './es6/moduleC'

console.log('==== entry.js ======')
console.log(A)
console.log(B)
我们把app.js作为打包入口,则会得到以下结构的代码
// 入口模块
(function (modules) {
    function webpackRequire(moduleId) {
        // ...
    }
    webpackRequire(1);
})([module1, module2, module3, moduleEntry]);
引入
Webpack编译后的代码中,使用__webpack_require__()方法进行模块的调度,相当于Node.js版实现中的require()方法。
/******/ 	// The require function
/******/ 	function __webpack_require__(moduleId) {
/******/
/******/ 		// 使用内存进行模块缓存
/******/ 		if(installedModules[moduleId]) {
/******/ 			return installedModules[moduleId].exports;
/******/ 		}
/******/ 		// 若没有命中缓存,则新创建一个 module 实例
/******/ 		var module = installedModules[moduleId] = {
/******/ 			i: moduleId,
/******/ 			l: false,
/******/ 			exports: {}
/******/ 		};
/******/
/******/ 		// 执行模块
/******/ 		modules[moduleId].call(module.exports, module, module.exports, __webpack_require__);
/******/
/******/ 		// Flag the module as loaded
/******/ 		module.l = true;
/******/
/******/ 		// 返回模块
/******/ 		return module.exports;
/******/ 	}
简单总结一下
-
使用了和内存进行模块单例缓存,类似于
Node.js实现中的require.cache与Module._cache(建议和这篇文章的“源码概览”部分一起食用) -
__webpack_require__参数为moduleId,该ID也为传入的模块数组下标的ID -
创建模块部分,相当于
Node.js实现中的这部分内容👉
 // /lib/internal/modules/cjs/loader.js#L912
const module = new Module(filename, parent);
- 模块执行部分,相当与 Node.js 实现版本中的这部分内容👉
 // /lib/internal/modules/cjs/loader.js#L1200
 result = compiledWrapper.call(thisValue, exports, require, module,
                                  filename, dirname);
异步加载
Webpack如何实现的异步加载,请参考这篇文章👉
导出
__webpack_require__.d(其实应该为__webpack_require__.define),函数用于导出模块,也就是实现export语句的基础方法,编译后的源码如下。
__webpack_require__.d = function (exports, name, getter) {
    /******/
    if (!__webpack_require__.o(exports, name)) {
      /******/
      Object.defineProperty(exports, name, { enumerable: true, get: getter })
      /******/
    }
    /******/
  }
我们在打包后的代码中,除了看到__webpack_require__.d方法的定义,也有对应的使用。蔽日我们引入了moduleA、moduleB、moduleC。
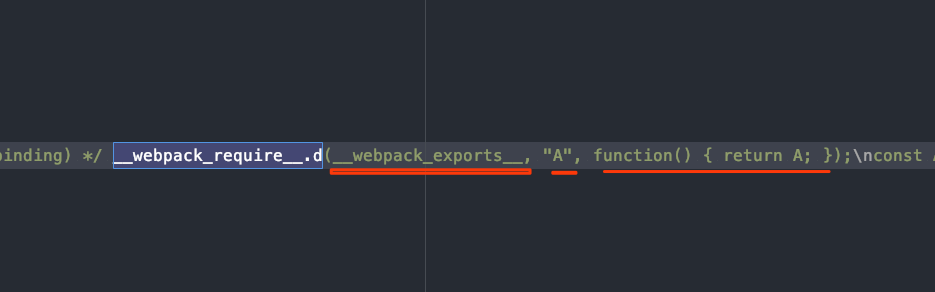
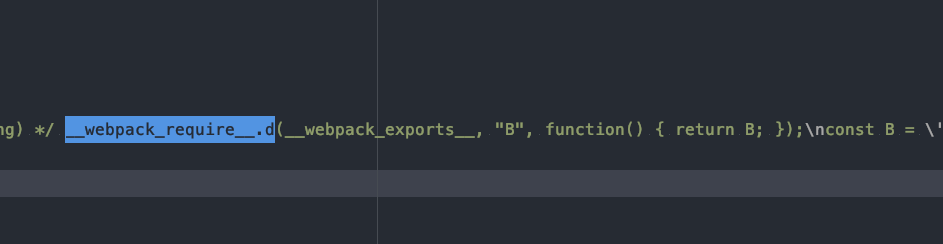
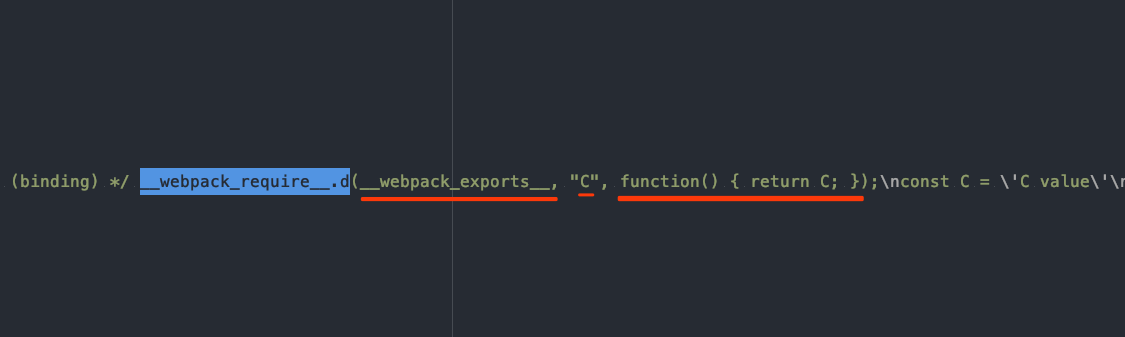
图中出现的__webpack_exports__则是表示暴露的整体对象,__webpack_require__.d负责给该对象添加属性。
混和兼容
打包后的代码中有这么一段代码如下,根据对应模块的类型,ES6 Module或者是CommonJS,进行不同的处理方式。
/******/
/******/ 	// getDefaultExport function for compatibility with non-harmony modules
/******/
__webpack_require__.n = function (module) {
    /******/
    var getter = module && module.__esModule ?
      /******/      function getDefault () {
        return module['default']
      } :
      /******/      function getModuleExports () {
        return module
      }
    /******/
    __webpack_require__.d(getter, 'a', getter)
    /******/
    return getter
    /******/
  }
AMD
webpack还实现了AMD规范,说明熟悉的AMD引入也是可行的。
// 使用AMD规范引入模块包
require(['./list', './edit'], function(list, edit){
    console.log(list)
     console.log(edit)
});
webpack 自带方法
require.ensure 能够确保 webpack 进行打包的时候,会将异步引入的包和主包分离
// ./list/index.js
console.log('i am the separated module')
module.exports = {
  abc: 123
}

// app.js
require.ensure([], function(require){
    const list = require('./list');
    console.log(list)
}, 'list');

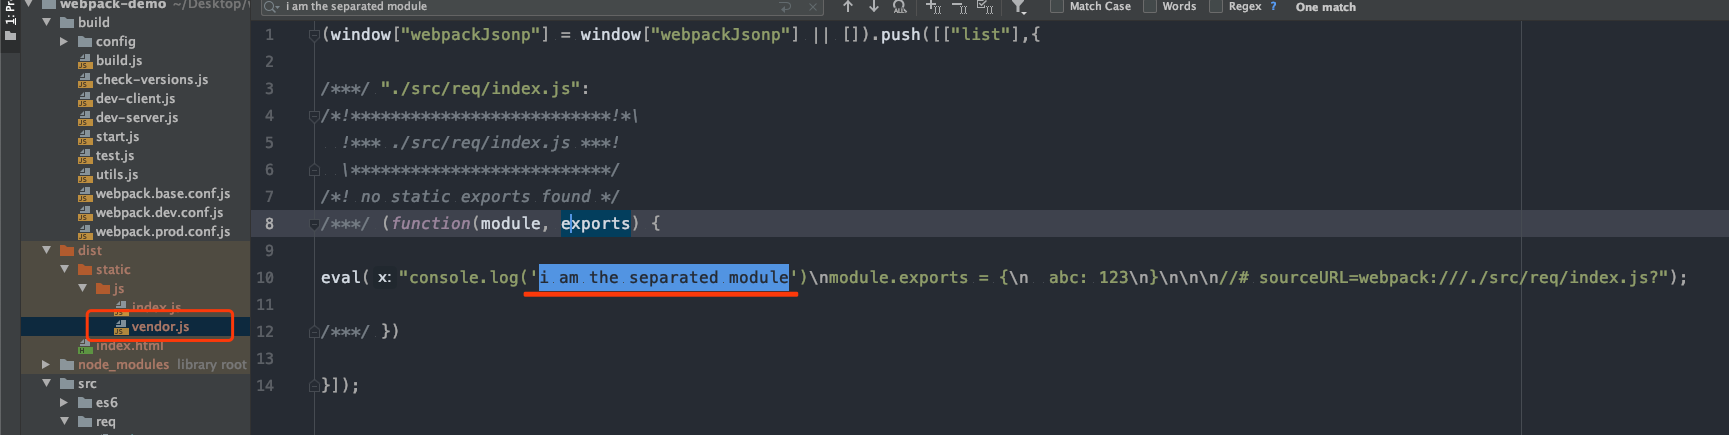
当然我们正在做 code spliting的时候一般会通过webpack.config.js来进行配置plugins或者optimization来实现
参考资料
[1] webpack 前端运行时的模块化设计与实现 - by Alien ZHOU
[2] webpack 输出文件分析 3 - 异步加载 - by Leon Zhang