blog
 blog copied to clipboard
前端模块化 - CommonJS
前端模块化 - CommonJS
CommonJS是一种JS模块规范。规范内容主要分为模块定义、模块引用与模块标志三个部分。Node.js的模块机制是其主要的实践。
模块定义
文件即模块
CommonJS 规定每一个文件就是一个模块,拥有自己的作用域。文件内的变量、函数、类都是私有的,其他文件不可以直接访问到,只有通过module.exports这个神魔之井进行访问。
module 对象
// 最简单的一个模块,使用node命令执行它,输出以下的内容
module.exports = {
    abc: 123
}
console.log(module)
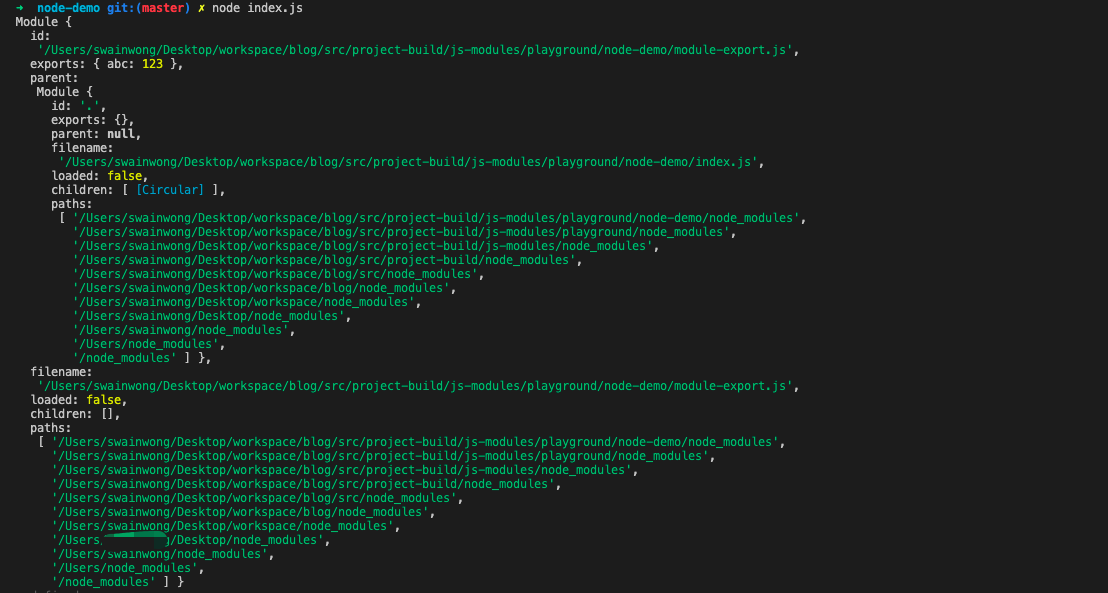
- module.id 模块的标志符
- module.loaded 标志模块是否已经完成加载
- module.children 表示其所依赖的其他模块
- module.parent 指向模块的父模块
- module.exports 表示对外暴露的
对象(👈注意这个用词) - module.filename 表示模块的文件名,带有绝对路径
module.exports 与 exports
先说结论,请您放弃使用
exports,严格使用module.exports进行模块暴露
事实上,在编译的过程中Node.js对获取的Javascript文件进行了头尾包装。在头尾分别添加了
(function (exports, require, module, __filename, __dirname) {/n) 和 \n})
也就是我们常常在webpack打包之后debugger的时候看到的
(function (exports, require, module, __filename, __dirname) {
  var math = require('math')
  exports.area = function (radius) {
    return Math.PI * radius * radius
  }
})
通过观察以上的产出的模块代码,不难得出以下结论:
-
exports对于一个模块内部来说,仅仅是一个函数形参。 -
相当于修改一个函数内部参数exports.abc = 123exports上的属性,并不会影响到外部参数。 - 但形参
module上的exports属性指向的确实,全局上的module的exports属性,而不是内部的形参exports。所以
这样的赋值才能够被外部所读取到。module.exports.abc = 123
模块引用
Node.js中有一个全局性方法require()用于同步加载模块
const module1 = require('./module.js')
module1.getName() // 'module1'
引用的是值的拷贝
CommonJS中模块加载机制,require函数引入的是输出模块中module.exports的值得拷贝。也就是说,内部值的变化,外界不再能够感知到。
// moduleA.js
var innerValue = 'innerValue'

setTimeout(() => {
    innerValue = 'innerValue has been changed'
}, 100)

function changeInnverValue () {
    innerValue = 'innerValue has been changed by function'
}

module.exports = {
    innerValue,
    changeInnverValue
}

// index.js
const moduleA = require('./moduleA')

console.log('before', moduleA.innerValue) // before innerValue

moduleA.changeInnverValue()

console.log('after', moduleA.innerValue) // after innerValue

setTimeout(() => {
    console.log('after timmer', moduleA.innerValue) // after timmer innerValue
}, 3000)
❓❓❓ 大家想想,既然
CommonJS是运行时加载,那么内部的变动的值如何才能够被取到呢?留言区见
一次运行,多次加载
一个模块可能会被多个其他模块所依赖,也就会被多次加载。但是每一次加载,获取到的都是第一次运行所加载到缓存中的值,
require.cache会指向已经加载的模块。
// module-imported
module.exports = {abc: 123}
// index.js
require('./module-imported')
require('./module-imported').tag = 'i have been imported'
const moduleImported = require('./module-imported')
console.log(moduleImported.tag) // 输出 'i have been imported'
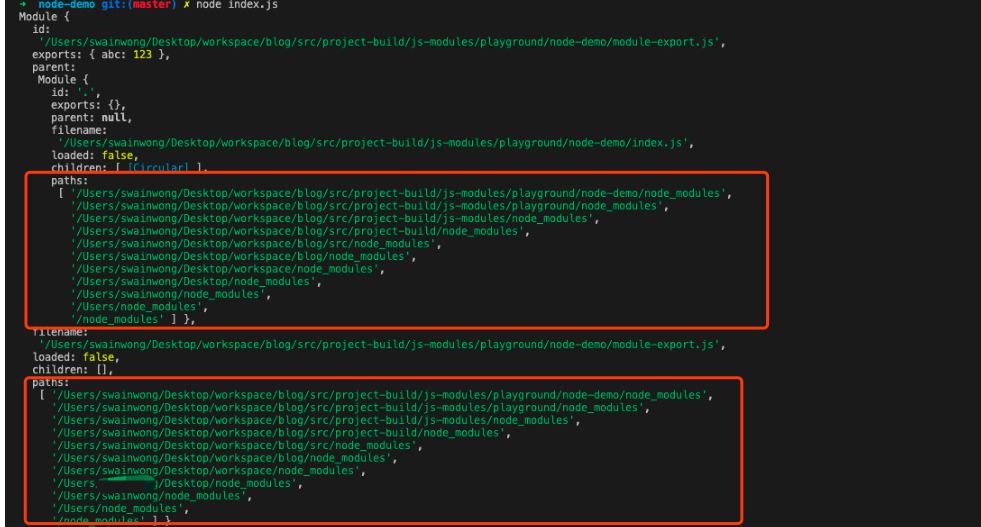
console.log(require.cache) // 输出如下图
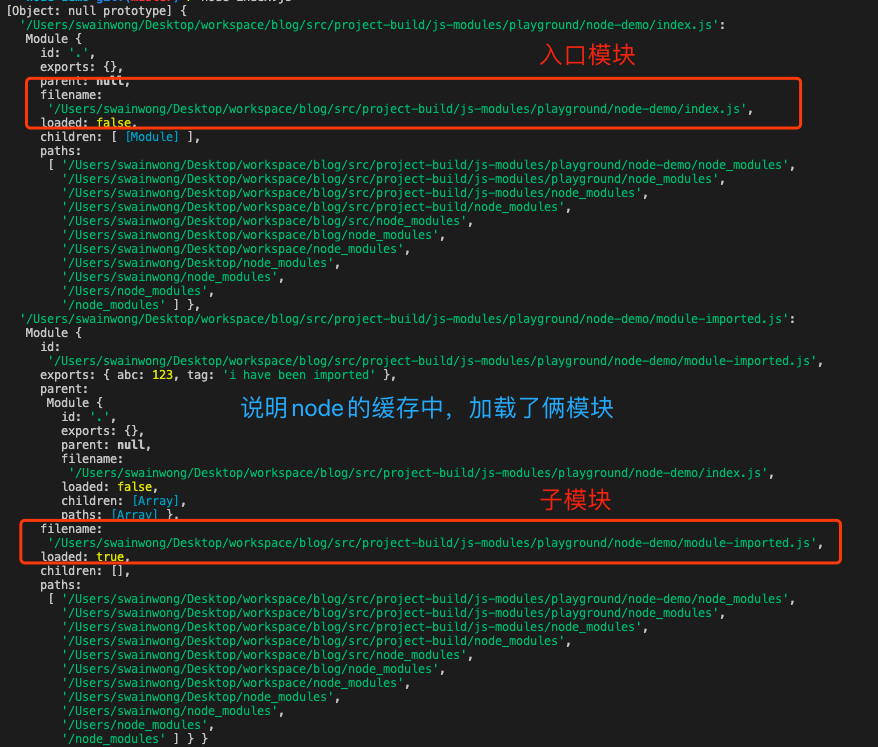
上面两个例子结合,可以说明对于同一个模块,node只会加载一次。后续的读取都是从缓存中读取出来。
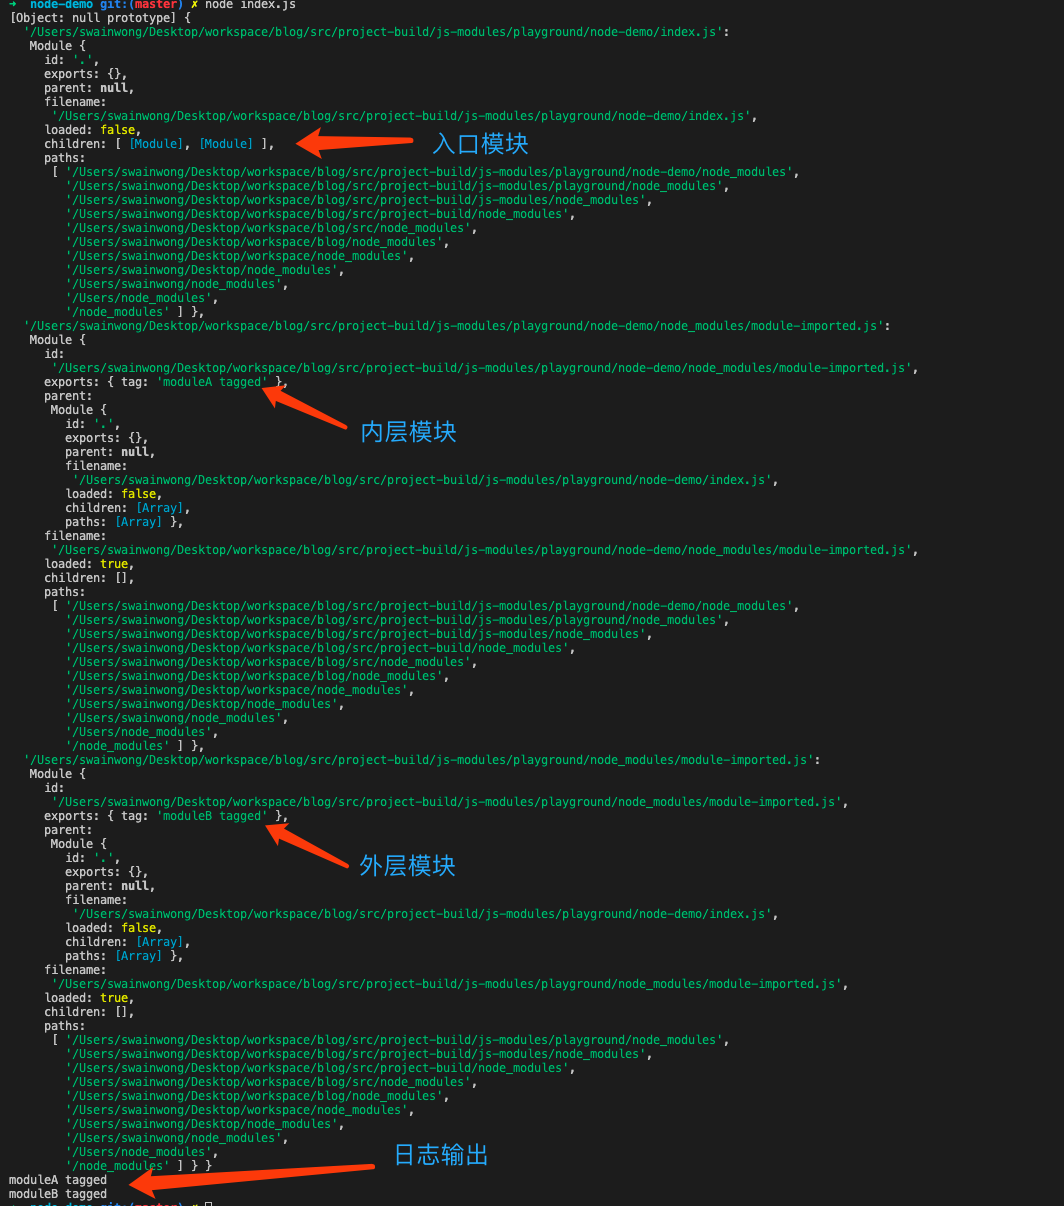
缓存机制补充
对于模块缓存机制,若是存在两个同名模块,存放于不同的路径,则那么require()方法仍然会重新加载该模块,而不会从缓存中读取出来。如以下例子。
|-- node_modules
    |-- module-importe.js #外层同名模块
|-- index.js  #入口文件
|-- node_modules
    |-- module-importe.js #内层同名模块
// index.js
const moduleA = require('module-imported')
const moduleB = require('../node_modules/module-imported')
moduleA.tag = 'moduleA tagged'
moduleB.tag = 'moduleB tagged'
console.log(require.cache)
console.log(moduleA.tag)
console.log(moduleB.tag)
module.exports = {
    name: 'index module'
}
模块标识
require()路径参数规则
- 必须是小驼峰命名方式的字符串
- 以'../'或者'./'开头的相对路径 或者 绝对路径
- 可以不书写
.js后缀名
require()路径解析规则
-
/开头表示绝对路径。 -
./或../表示相对路径。 - 除了以上两种情况,则表示加载的是核心模块。
- 自定义模块指的是非路径形式的文件模块。
路径分析(自定义模块)
我们同样使用上面的输出结果。可以看到路径是逐级向上寻找的过程。从当前目录下的node_modules一直寻找到根目录下的node_modules为止。逐级向上寻找的方式,FNer们是否似曾相识呢?(Javascript的原型链溯源👩🏫)
这种情况常见于我们项目开发中,引用的第三方模块包。
- 它们不属于核心模块包
- 不属于我们业务代码中自己封装的参数模块
文件拓展名
require()函数在解析标识符的时候,对于不指定文件拓展名的情况,Node.js按照.js、.node、.json文件的顺序补足拓展名后,再尝试进行加载。
目录与模块
// app.js
const abcModule = require('abcmodule')
--|-- app.js
  |-- node_modules
        |-- abcmodule
            |-- index.js
            |-- package.json
若在上述的逐级匹配寻找的过程中,匹配到了一个目录(如上图)。则会进把匹配到的目录当做一个模块包,首先寻找文件夹下的package.json文件(也就是模块包的配置文件)。
// 省略了一大堆其他属性
{
  "author": "",
  "bundleDependencies": false,
  "deprecated": false,
  "description": "",
  "license": "BSD-2-Clause",
  "main": "index.js",
  "name": "http",
  "scripts": {
    "test": "echo \"Error: no test specified\" && exit 1"
  },
  "version": "0.0.0"
}
package.json 中的 "main" 配置项则会被指定位模块的加载入口。
"main": "not-found.js"
若"main"指定的文件是不存在的,加载机制则会默认依次寻找当前目录下的index.js、index.node、inde.json 来作为文件模块的入口。
Node.js Module 部分源码概览
Module 构造函数
在Node.js源码中,也出现了模块定义的内应内容👉传送门。
// lib/internal/modules/cjs/loader.js #L192
function Module(id = '', parent) {
  this.id = id;
  this.path = path.dirname(id);
  this.exports = {};
  this.parent = parent;
  updateChildren(parent, this, false);
  this.filename = null;
  this.loaded = false;
  this.children = [];
}
module、exports、module、__dirname、__filename 从哪来?
先上Node.jsb部分源码。看过Webpack编译后代码的童鞋可能不会对下面的内容陌生,Node.js实现CommonJS的方式,也是将每个文件模块都封装在一个函数作用域中,然后将常用的module、exports、module、__dirname、__filename 一一作为参数传递到作用域中。
// /lib/internal/modules/cjs/loader.js#L192
let wrap = function(script) {
  return Module.wrapper[0] + script + Module.wrapper[1];
};

const wrapper = [
  '(function (exports, require, module, __filename, __dirname) { ',
  '\n});'
];
Node.js 模块化流程
① require 引入模块 入口👉 到 出口👉
Module.prototype.require = function(id) {
  validateString(id, 'id');
  if (id === '') {
    throw new ERR_INVALID_ARG_VALUE('id', id,
                                    'must be a non-empty string');
  }
  requireDepth++;
  try {
    return Module._load(id, this, /* isMain */ false);
  } finally {
    requireDepth--;
  }
};
② 调用Module._load()进行模块加载,传送门👉
// /lib/internal/modules/cjs/loader.js#L877
Module._load = function(request, parent, isMain) {
    // .....
    // /lib/internal/modules/cjs/loader.js#L912
    const module = new Module(filename, parent); // 新建 module 实例

    // /lib/internal/modules/cjs/loader.js#L912
    Module._cache[filename] = module; // 存入缓存
}
③ 根据文件不同类型,调用Module.extensions
调用处传送门👉
注意这里的实现方式使用的是 readFileSync 则说明我们需要同步地去读取文件。
// /lib/internal/modules/cjs/loader.js#L1049
Module._extensions[extension](this, filename);
各种文件的处理方式:
-
.js文件👉
// Native extension for .js Module._extensions['.js'] = function(module, filename) { if (filename.endsWith('.js')) { const pkg = readPackageScope(filename); // Function require shouldn't be used in ES modules. if (pkg && pkg.data && pkg.data.type === 'module') { const parentPath = module.parent && module.parent.filename; const packageJsonPath = path.resolve(pkg.path, 'package.json'); throw new ERR_REQUIRE_ESM(filename, parentPath, packageJsonPath); } } // 使用文件模块读取文件 const content = fs.readFileSync(filename, 'utf8'); // 编译文件内容 module._compile(content, filename); }; - .json文件👉
- .node文件👉
④ 编译执行js模块 传送门👉
// /lib/internal/modules/cjs/loader.js#L1154
Module.prototype._compile = function(content, filename) {
  // ...
  const compiledWrapper = wrapSafe(filename, content, this);
  return result;
};
// /lib/internal/modules/cjs/loader.js#L1104
function wrapSafe(filename, content, cjsModuleInstance) {
   // vm.runInThisContext 用于编译和执行JavaScript代码
   return vm.runInThisContext(wrapper, {
      filename,
      lineOffset: 0,
      displayErrors: true,
      importModuleDynamically: async (specifier) => {
        const loader = asyncESM.ESMLoader;
        return loader.import(specifier, normalizeReferrerURL(filename));
      },
    });
}
⑤ 返回module.exports 结果
// /lib/internal/modules/cjs/loader.js#L961
return module.exports;
参考资料
[1]CommonJS规范 - ruanyifeng
[2]《深入浅出Node.js》 - 朴灵
[3] Node.js - github
[4] webpack 前端运行时的模块化设计与实现 - by AlienZHOU
// lib.js
var number = 0;
function add() {
  number ++;
}
module.exports = {
  // 对外暴露 number 的时候,将其封装成一个取值器
  get number() {
    return number
  },
  add: add,
};

// app.js
const moduleLib = require('lib')
console.log(moduleLib.number) // 0
moduleLib.add()
console.log(moduleLib.number) // 1