plex-ssl
 plex-ssl copied to clipboard
A guide to using NGINX to secure Plex via SSL
#plex-ssl
A guide to using NGINX to secure Plex via SSL.
THIS IS CURRENTLY UNDER DEVELOPMENT BY JKIEL AND FMSTRAT. THIS IS EXPERIMENTAL AND HAS NOT YET BEEN TESTED THOUROUGHLY. THIS DISCLAIMER WILL BE REMOVED WHEN THE HOWTO AND CONFIGURATION FILES ARE UPDATED TO THEIR FINAL STATES AND TESTING IS COMPLETED.
If you decide to use this MITM method, and stop using it, Plex.tv will continue to try to connect to HTTPS, causing failures. If you wish to stop using the MITM, change the configuration to use HTTP, reconnect Plex Media Server to Plex.tv, and THEN discontinue using the MITM.
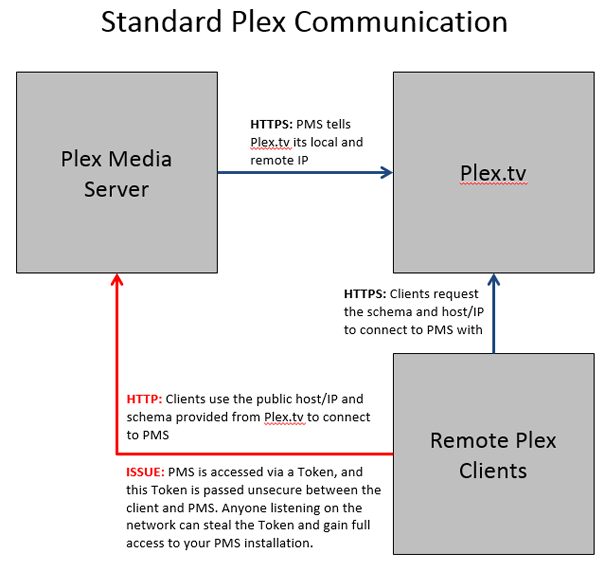
This guide is based on all the hard work by jkiel by tracing the HTTP/S requests between PMS, Plex.tv, and clients. His work, and this entire HOWTO, have been developed to overcome the security issue of the authorization token of Plex being passed unsecure over the internet, making it easy for anyone on a client's network to get full access to your server. We hope this is merely a temporary fix and that the Plex team will have a native solution relativly soon.
The post by Fmstrat detailing this vulnerability and a proof of concept exploiting it can be viewed by any PlexPass members in this thread.
This guide was developed for Ubuntu Server 14.04 LTS and CentOS and RHEL variants.
Please have a look over the Known Problems before you decide to use this.
#Tested Clients
Any Plex Web clients tested below were testing by going directly to the remote IP hostname, not to plex.tv.
| OS/Device | Client | Result | Notes |
|---|---|---|---|
| Android 4.x | Plex App | Pass | |
| iOS 7 | Plex Web on Chrome | Partial Pass | Websockets do not work, breaking some features |
| iOS 7 | Plex App | Fail | Works, but transmits token insecurly over http |
| OSX | Plex Web on Chrome | Partial Pass | Websockets do not work, breaking some features |
| RasPlex | PHT | Pass | |
| Windows | PHT | Pass | |
| Windows | Plex App | Fail | Works, but transmits token insecurly over http |
| Roku 3 | Plex App | Fail | Functions securely, but artwork fails, making browsing near impossible |
| Roku 3 | RarFlix | Fail | Functions securely, but artwork fails, making browsing near impossible |
#Before you begin: Certificates
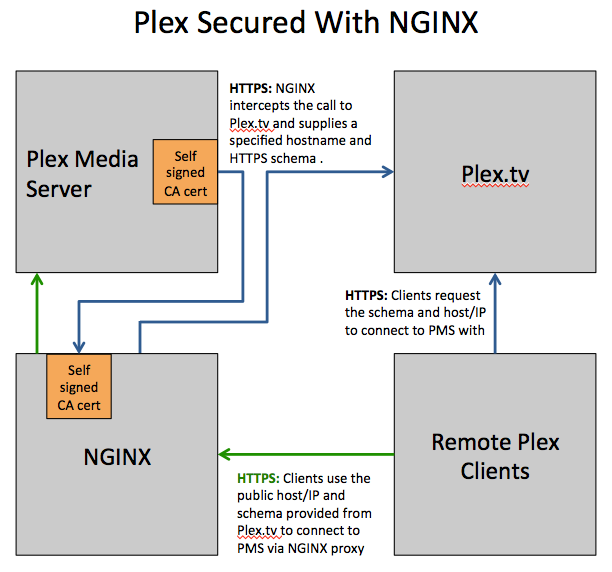
This method of securing Plex works by proxying connections between Plex Media Server and Plex.tv and between Plex Media Server and clients. It works by:
- Plex Media Server -> Plex.tv: Intercepting the call to Plex.tv that tells Plex.tv to inform clients of the machines IP address, and instead supplies a hostname and the schema of HTTPS. This way, Plex.tv tells clients to connect securely.
- Clients -> Plex Media Server: Proxying all traffic from the clients to Plex Media Server using SSL. It is required to use a proxy because we need to supply a validated certificate for our host, not the general plex.tv certificate that is included with Plex Media Server
For proxying between Plex Media Server and Plex.tv, we will create a self signed certificate, and add it to the trusted certificates for Plex Media Server.
For proxying between clients and Plex Media Server, we will require a "trusted" certificate in the form of a valid, purchased certificate from companies like RapidSSL, or a free certificate from companies like StartSSL. Free certificates do not generally work with all clients, but in testing, StartSSL certificates have been proven to function in the scenarios detailed in this guide. StartSSL.com is the only CA known to have free certificates that also have relativly broad browser support.
You must also own the domain name used to host your PMS. Free domains names from dyn.org, noip.com and the like will not work. Your email address won't be one of the administrative/authoritative ones listed in the WHOIS record for the domain.
#Ubuntu Server 14.04 LTS
The Ubuntu configuration guide assumes the following:
- You are running Ubuntu in a Virtual Machine (This is not required). If you are new to virtual machines, KVM is free, Open Source, and built into Ubuntu. Virtual Box is another free solution and Vmware Player 6.0.3 is a free version of the commercial VMWare solution. All are good places to start.
- That this is a fresh install of Ubuntu Server 14.04, with only the minimum packages installed
- No other services have been installed on Ubuntu, except openssh-server
Option 1: Use the configuration script
The below script assumes you will be using StartSSL or similar provider. If you already have a validated certificate, you will be asked during the script to use it or create a new one. If you wish to configure your system in a unique way beyond what the script handles, please follow the guide for Option 2: Manual configuration or follow the steps inside the configuration scripts manually.
Run the script
The configuration script supplied should do most of the hard work for you. In an Ubuntu terminal/ssh session, enter these three lines, then carefully follow the instructions:
~# cd ~
~# wget https://raw.githubusercontent.com/Fmstrat/plex-ssl/master/ubuntu/setup-ubuntu.sh
~# sudo bash setup-ubuntu.sh
During configuration, you will be prompted for information used to generate a Certificate Signing Request (CSR). It will ask for country, state, city, common name (your domain name), pass phrase, etc. Before filling this out, check with your chosen Certificate Authority (CA), to see what they require.
You'll be asked copy out a Certificate Signing Request (CSR) and paste it to your chosen CA. After your CA approves and returns a Signed Certificate, you will need to paste that Signed Certificate back to the script.
At the end, the script will return a self signed certificate that's used to proxy plex.tv. You can find the certs and keys used by the secure and mitm proxy on your ubuntu proxy server in /opt/plex-ssl/certs.
Integrate proxy certificate into Plex Media Server(s)
After you've completed every step of this configuration, your PMS server will route all traffic destined for plex.tv through the NGINX proxy. This will not succeed until the self signed certificate is installed on the local PMS server(s) that you're securing.
This involves two steps. Installing the certificate in PMS, and installing as a trusted certificate in the operating system PMS is running on.
#####Getting the certificate
You can copy the self signed certificate from the output of setup-ubuntu.sh and paste it into an empty file, or download the certificate from:
http://<NGINX IP>:8099/plex/certs/mitm.cer
#####Installing the certificate in PMS
To install the certificate in PMS, you will need to append the contents of the certificate to PMS's cacerts.pem file. We recomend that you make a copy of this file before modification. Also note that you will need to repeat this step after updating PMS to a new version.
The location of the file varies depending on your operating system, and where you chose to install PMS. Here are some common locations:
| Operating System | File Location |
|---|---|
| Windows | C:\Program Files (x86)\Plex\Plex Media Server\Resources\cacert.pem |
| Linux | /usr/lib/plexmediaserver/Resources/cacert.pem |
| OS X | /Applications/Plex Media Server/Resources/cacert.pem ?? |
| NAS | /usr/lib/plexmediaserver/Resources/cacert.pem ?? |
You will need administrative or root access to edit this file.
On Windows, you can right click Notepad, select Run as Administrator, then open the cacerts.pem file from Notepad. (Hint: You'll need to change Text Documents to All Files in order to see cacert.pem)
On Ubuntu, you can run the below as root:
~# sudo cp /usr/lib/plexmediaserver/Resources/cacert.pem /usr/lib/plexmediaserver/Resources/cacert.pem.orig
~# sudo cat mitm.cer >> /usr/lib/plexmediaserver/Resources/cacert.pem
#####Installing in PMS's host OS
You will need to complete this step if you would like to access plex.tv from your PMS server. If you do NOT wish to access https://plex.tv in browsers or commands (like wget) on the PMS system, this step is not necessary.
Use Kerio's guide to installing trusted root certificates to install the self signed certificate on your PMS server's OS.
Edit your hosts file
To trick PMS into connecting to your NGINX proxy, so NGINX can intrstruct plex.tv to route all traffic from remote clients securly back to NGINX and then on to PMS, we must make your PMS server(s) believe that the NGINX proxy is plex.tv. To learn how to edit your host file, you can reference this article.
For Ubuntu:
~# sudo vi /etc/hosts
And add:
192.168.3.207 plex.tv
(Replacing 192.168.3.207 with your NGINX IP address)
Setup your firewall
At the end of the setup-ubuntu.sh script, you will see an output like:
TCP external:30443 TO <NGINX IP>:30443 (NGINX will forward to <PMS IP>:32400)
You will see one line per PMS instance you have setup. These are the external port forwards you will need to create. If NGINX and PMS are installed on the same machine, the IPs will be the same, but you should forward from your router to the NGINX IP.
For instance, following the IP structure in this guide Use the following port forwarding options on your firewall.
- External port 30443 -> <NGINX HOST>:30443
You must close/remove/block any non HTTPS ports on your firewall and/or router that previously connected to your PMS server(s) over HTTP.
Set up Plex
Now, configure Plex:
- Visit: http://<PMS IP>:32400/web/index.html#!/settings/server
- Goto Connect, sign in to Plex
- Click SHOW ADVANCED
- Check Manually specify port
- Fill in 30443 (or whichever port was outputed in the script for each server)
- Check Require authentication on local networks
- Lastly, add media to your library
Enabling Local Network Authentication in your PMS server is VERY IMPORTANT. The secure reverse proxy will make PMS think that all traffic from the proxy is local.
Option 2: Manual configuration
You can look through the detailed instructions for CentOS and RHEL below to get an idea of what you'll need to do. Use 'sudo apt-get install nginx-extras' to install nginx with LUA.
#CentOS and RHEL variants
For the sake of this guide, the following settings are used:
- Internal PMS hostname: pms-vm
- Internal PMS IP: 192.168.3.207
- External hostname: my.externalhost.com
- External port: 33443
It is recommended you enable EPEL in CentOS. To do this, please visit this guide: http://www.tecmint.com/how-to-enable-epel-repository-for-rhel-centos-6-5/.
Unfortunately, CentOS does not have a preconfigured nginx with lua available, even in EPEL. To overcome this, we will use the openresty packages from http://openresty.org/. As a note, nginx could be installed on a seperate machine, and is not required to be on the same machine as PMS.
Download and install Plex
Use the following commands to download and install Plex. You can get the URL for the latest version of Plex from https://plex.tv/downloads
[root@pms-vm ~]# wget http://downloads.plexapp.com/plex-media-server/0.9.9.14.531-7eef8c6/plexmediaserver-0.9.9.14.531-7eef8c6.x86_64.rpm
[root@pms-vm ~]# rpm -Uvh plexmediaserver-0.9.9.14.531-7eef8c6.x86_64.rpm
[root@pms-vm ~]# service plexmediaserver start
[root@pms-vm ~]# chkconfig plexmediaserver on
Now, configure Plex:
- Visit: http://pms-vm:32400/web/index.html#!/settings/server
- Goto Connect, sign in to Plex
- Click SHOW ADVANCED
- Check Manually specify port
- Fill in 33443
- Check Require authentication on local networks
- Lastly, add media to your library
Enabling Local Network Authentication in your PMS server is VERY IMPORTANT. The secure reverse proxy will make PMS think that all traffic from the proxy is local if you do not.
Edit your hosts file
To trick PMS into connecting to your NGINX proxy, so NGINX can intrstruct plex.tv to route all traffic from remote clients securly back to NGINX and then on to PMS, we must make your PMS server(s) believe that the NGINX proxy is plex.tv. To learn how to edit your host file, you can reference this article.
For CentOS:
[root@pms-vm ~]# vi /etc/hosts
And add:
192.168.3.207 plex.tv
Set up your certificates
We will need two sets of certificates, one that is used as a Man In The Middle (MITM) certificate that PMS will use when connecting to the "fake" plex.tv host, and another, trusted certificate to use when external hosts connect to your system. The free certs from http://StartSSL.com have been verified to work on Android and Plex Web so far.
#####Creating the self signed certificate
First, create your MITM certificate:
[root@pms-vm ~]# mkdir -p /etc/pki/tls/certs/mitm
[root@pms-vm ~]# cd /etc/pki/tls/certs/mitm
[root@pms-vm mitm]# openssl genrsa -out MITM_CA.key 2048
Which should return:
Generating RSA private key, 2048 bit long modulus
..............................+++
..........+++
e is 65537 (0x10001)
And then run:
[root@pms-vm mitm]# openssl req -x509 -new -nodes -key MITM_CA.key -days 1024 -out MITM_CA.pem
And use the following values. Be sure to enter plex.tv as the Common Name.
You are about to be asked to enter information that will be incorporated
into your certificate request.
What you are about to enter is what is called a Distinguished Name or a DN.
There are quite a few fields but you can leave some blank
For some fields there will be a default value,
If you enter '.', the field will be left blank.
-----
Country Name (2 letter code) [XX]:US
State or Province Name (full name) []:
Locality Name (eg, city) [Default City]:
Organization Name (eg, company) [Default Company Ltd]:
Organizational Unit Name (eg, section) []:
Common Name (eg, your name or your server's hostname) []:plex.tv
Email Address []:
#####Installing the certificate into PMS
To install the certificate in PMS, you will need to append the contents of the certificate to PMS's cacerts.pem file. We recomend that you make a copy of this file before modification. Also note that you will need to repeat this step after updating PMS to a new version.
The location of the file varies depending on your operating system, and where you chose to install PMS. Here are some common locations:
| Operating System | File Location |
|---|---|
| Windows | C:\Program Files (x86)\Plex\Plex Media Server\Resources\cacert.pem |
| Linux | /usr/lib/plexmediaserver/Resources/cacert.pem |
| OS X | /Applications/Plex Media Server/Resources/cacert.pem ?? |
| NAS | /usr/lib/plexmediaserver/Resources/cacert.pem ?? |
You will need administrative or root access to edit this file.
On Windows, you can right click Notepad, select Run as Administrator, then open the cacerts.pem file from Notepad. (Hint: You'll need to change Text Documents to All Files in order to see cacert.pem)
In CentOS, set permissions and integrate into PMS:
[root@pms-vm mitm]# chmod 600 *
[root@pms-vm mitm]# cp /usr/lib/plexmediaserver/Resources/cacert.pem /usr/lib/plexmediaserver/Resources/cacert.pem.orig
[root@pms-vm mitm]# echo "" >> /usr/lib/plexmediaserver/Resources/cacert.pem
[root@pms-vm mitm]# echo "MITM" >> /usr/lib/plexmediaserver/Resources/cacert.pem
[root@pms-vm mitm]# echo "=========================" >> /usr/lib/plexmediaserver/Resources/cacert.pem
[root@pms-vm mitm]# cat MITM_CA.pem >> /usr/lib/plexmediaserver/Resources/cacert.pem
#####Installing in PMS's host OS
You will need to complete this step if you would like to access plex.tv from your PMS server. If you do NOT wish to access https://plex.tv in browsers or commands (like wget) on the PMS system, this step is not necessary.
Use Kerio's guide to installing trusted root certificates to install the self signed certificate on your PMS server's OS.
#####Set up your external certificate
Now we need to setup our external, valid certificate:
[root@pms-vm mitm]# mkdir -p /etc/pki/tls/certs/external
[root@pms-vm external]# cd /etc/pki/tls/certs/external
At this point, you should place your external, valid certificate and key here. We will call these external.cer and external.key from here out. If you are using a lower priced certificate, you will likely also have a Certificate Authority file, which we will call CA.cer. You should combine this and your external certificate into one file at this point, and set permissions:
[root@pms-vm external]# cat CA.cer > external.bundle.cer
[root@pms-vm external]# cat external.cer >> external.bundle.cer
[root@pms-vm external]# chmod 600 *
NOTE: If you wish to access https://plex.tv from the machine that PMS is installed on, you must add the self signed certificate to the trusted certificates for your PMS server's OS, and any browser that doesn't use the OS's trusted certificates list. Failure to do this will result in SSL errors in the browser due to running through the nginx proxy. If you do NOT wish to access https://plex.tv in browsers or commands on the PMS system, this step is not necessary.
Install nginx
In Ubuntu, this os as easy as installing the nginx and nginx-lua packages, but CentOS does not have a preconfigured nginx with lua available, even in EPEL. To overcome this, we will use the openresty packages from http://openresty.org/
[root@pms-vm external]# yum install gcc pcre-devel openssl-devel
[root@pms-vm external]# mkdir -p /opt/ngx
[root@pms-vm external]# cd /opt/ngx
[root@pms-vm ngx]# wget http://openresty.org/download/ngx_openresty-1.7.0.1.tar.gz
[root@pms-vm ngx]# tar xvfz ngx_openresty-1.7.0.1.tar.gz
[root@pms-vm ngx]# cd ngx_openresty-1.7.0.1
[root@pms-vm ngx_openresty-1.7.0.1]# ./configure --with-luajit
[root@pms-vm ngx_openresty-1.7.0.1]# gmake
[root@pms-vm ngx_openresty-1.7.0.1]# gmake install
Now we need to configure nginx. First, backup the original configuration and edit the file:
[root@pms-vm ngx_openresty-1.7.0.1]# cd
[root@pms-vm ~]# cd /usr/local/openresty/nginx/conf/
[root@pms-vm conf]# mv nginx.conf nginx.conf.orig
[root@pms-vm conf]# wget https://raw.githubusercontent.com/Fmstrat/plex-ssl/master/centos/conf/nginx.conf
[root@pms-vm conf]# vi nginx.conf
Make sure you replace the external hostname and two occurances of your internal IP.
Test the configuration with:
[root@pms-vm ~]# /usr/local/openresty/nginx/sbin/nginx -t
And if everything is OK, start up nginx and restart PMS:
[root@pms-vm ~]# /usr/local/openresty/nginx/sbin/nginx
[root@pms-vm ~]# service plexmediaserver restart
You can then follow the log files in /usr/local/openresty/nginx/logs to make sure everything is functioning properly
Setup your firewall
Use the following port forwarding options on your firewall.
- External port 33443 -> pms-vm:33443
You must close/remove/block any non HTTPS ports on your firewall and/or router that previously connected to your PMS server(s) over HTTP.
#Known problems
The following is a list of known issues thus far:
- Due to Plex Web's forced use of unsecure Web Sockets (ws:), instead of secure Web Sockets (wss:), Plex Web will still attempt to communicate via HTTP. If accessed via plex.tv, this could be a security issue since the Plex Web delivered by plex.tv is on http, not https, allowing the insecure web socket to attempt connection. If Plex Web is used by directly accessing your secure domain, the connection will be https, and the insecure websocket connection attempts will be blocked by the browser. Lack of web sockets impeads the functionality of Plex Web.
- Javascript on plex.tv will try to validate that a server is online or offline by requesting an image from the PMS server. Unfortunatley, it requests that image over http instead of https. To get around this, the secure proxy will detect the improper http request to an https port and forward it to an https request, but this has the side effect of potentialy opening up the security issue pointed out in issue #1. A token could be exposed.
- Plex Media Server detects if a client is local or not by checking the client's IP address. When using the secure reverse proxy, PMS will see the reverse proxy's IP address and assume the connection is local. You must turn on "Local network authentication" in PMS, else remote users could log in without authentication. Hopefully PMS will be updated to detect proxy use by looking at the request header for the client, and then mark any connection via proxy as non-local, but until then, BE CAREFUL!