railsem19_yolov5
 railsem19_yolov5 copied to clipboard
Implementing YOLOv5 on the RailSem19 dataset
Implementing YOLOv5 on the RailSem19 dataset
This repository implements multiple YOLOv5 models on the RailSem19 dataset. These implementations are focussed on the person and person-group classes.
Installation
- The code is tested on Python 3.9.9 and PyTorch 1.10 with CUDA 11.3.
- Install PyTorch by following the instructions on their website.
- Clone the railsem19_yolov5 repository
- Clone the YOLOv5 repository inside the just created
./railsem19_yolov5folder. - Follow this StackOverflow answer if you are experiencing the following error:
The paging file is too small for this operation to complete.
Make sure YOLOv5 is located in the root of the railsem19_yolov5 folder.
Models can be downloaded on the release page of the railsem19_yolov5 repository. Place *.pt models in the ./railsem19_yolov5/models folder.
Results
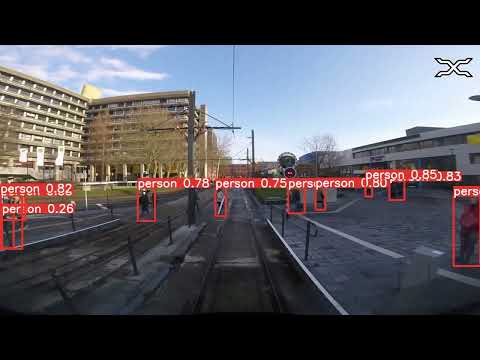

(Click on the tumbnails to watch on YouTube)
Baselines
The following baselines are achieved on the YOLOv5 models with only the person class on the rs19_person_semseg dataset:
mAP of baselines

Frames per second of baselines

Trained model
The following results are achieved on a trained YOLOv5 Small model. The model is trained on the rs19_person_semseg dataset. This dataset can be generated by running ./generate_subset_semseg.py.
mAP on trained model

Frames per second on trained model

Generating results
Experiments can be run with ./generate_results.py. Plots are generated by running ./results/analyse_baselines.py or ./results/analyse_results.py.
The following are the column headers for the generated .CSV files:
| Model | Dataset | Precision | Recall | [email protected] | [email protected];0.05;0.95 | Pre-process time | Inference time | NMS time per image |
|---|
Training
The following command starts the training of your model:
python ./yolov5/train.py --batch-size -1 --epochs 100 --data ./data/rs19_person.yaml --weights yolov5s.pt --single-cls --workers 1
Use the following if you want to run hyperparameter optimalisation:
python ./yolov5/train.py --batch-size 4 --epochs 10 --data ./data/rs19_person.yaml --weights yolov5s.pt --single-cls --workers 1 --evolve 40
See the ./train_rs19.ipynb notebook for a more detailed example.
Inference
The following command runs inference on the provided data:
python ./yolov5/detect.py --source "C:\Users\denbe\Desktop\U-OV Utrecht Tramlijn 22 Cabinerit Utrecht Centraal Centrumzijde - P R Science Park Uithoflijn_Trim.mp4" --weights "./models/yolov5s.pt" --classes 0
The following command was used to check whether images without the class person really did not contain any persons:
python ./yolov5/detect.py --source "./data/rs19_no_human" --weights "./models/trained_best.pt" --classes 0 --iou-thres 0.6 --max-det 100 --conf-thres 0.6 --save-txt --save-conf
See the ./inference_rs19.ipynb notebook for a more detailed example.
Validation
Validation can be done in two ways
1. From the command line
python ./yolov5/val.py --data "./data/rs19_person.yaml" --weights "yolov5s.pt" --batch-size 1 --task val --single-cls
2. Saving validation results
Running ./generate_results.py will do the same as above but saves the results to a .CSV file. This script will run the validation on the combination of train/val/test datasets and provided models.
Metadata
Owner
Metadata
Implementing YOLOv5 on the RailSem19 dataset