NovaShader
 NovaShader copied to clipboard
Multi-functional shader for the Particle System that supports Universal Render Pipeline (URP) of Unity.


NOVA Shader: Uber shader for Particle System
![]()
![]()
![]()
Docs (English, 日本語) | Samples (English, 日本語) | Demo (English, 日本語)
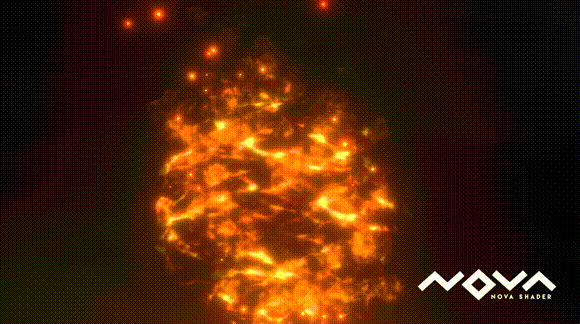
NOVA Shader is a multi-functional shader for the Particle System that supports Universal Render Pipeline (URP). General-purpose functions commonly used in visual effects are implemented so you can create high-quality effects efficiently.

Author: @Ugokashiya
It implements some distinctive features like Flow Map, Flip-Book (sequential texture animation), Dissolve, Fade, Rotation, Animated Tint Map, Emission, Distortion, and so on.
Features
For more information, please refer to the following documents, Samples and Demo.
Table of Contents
Details
-
Setup
-
Requirements
- Install
-
Requirements
-
Uber Unlit Shader
- Render Settings
- Base Map
- Tint Color
- Flow Map
- Color Correction
- Alpha Transition
- Emission
- Transparency
-
Distortion Shader
- Render Settings
- Distortion
- Flow Map
- Alpha Transition
- Transparency
-
Use with the Custom Vertex Streams
- Set up the Custom Data
- Set up the Custom Vertex Streams
- Set up the Material Property
-
Use Mesh GPU Instancing
- Enable Mesh GPU Instancing
- Set up the Custom Vertex Streams
- About Lit Shader
- Licenses
Setup
Requirements
This library is compatible with the following environments.
- Unity 2020.3 or higher
- Universal Render Pipeline
- Shader Model 3.5
Note that Shader Model 4.5 is required to use Mesh GPU Instancing. And also, if you want to use Mirror Sampling, your hardware needs to support Inline Sampler States. And if you are using 3D Texture or 2D Texture Array, the compression format must support them.
And this document assumes that you have already set up the Universal Render Pipeline. For more information about the Universal Render Pipeline, please refer to the Unity Manual
Install
To install the software, follow the steps below.
- Open the Package Manager from
Window > Package Manager -
"+" button > Add package from git URL - Enter the following
- https://github.com/CyberAgentGameEntertainment/NovaShader.git?path=/Assets/Nova

Or, open Packages/manifest.json and add the following to the dependencies block.
{
    "dependencies": {
        "jp.co.cyberagent.nova": "https://github.com/CyberAgentGameEntertainment/NovaShader.git?path=/Assets/Nova"
    }
}
If you want to set the target version, write as follows.
- https://github.com/CyberAgentGameEntertainment/NovaShader.git?path=/Assets/Nova#1.0.0
Note that if you get a message like No 'git' executable was found. Please install Git on your system and restart Unity, you will need to set up Git on your machine.
To update the version, rewrite the version as described above.
If you don't want to specify a version, you can also update the version by editing the hash of this library in the package-lock.json file.
{
  "dependencies": {
      "jp.co.cyberagent.nova": {
      "version": "https://github.com/CyberAgentGameEntertainment/NovaShader.git?path=/Assets/Nova",
      "depth": 0,
      "source": "git",
      "dependencies": {},
      "hash": "..."
    }
  }
}
Uber Unlit Shader
The Uber Unlit shader is a multifunctional shader with no lighting applied. Use this shader for particles that do not need lighting, such as glowing effects.
To use this shader, assign the Nova/Particles/UberUnlit shader to your material. The following is the description of each property that can be set from the Inspector.
Render Settings
The Render Settings control how the Material is rendered.

Render Settings
| Property Name | Description | ||
| Render Type |
You can specify the type of rendering from the following options.
If you select Cutout, the CutOff property will be displayed. When Transparent is selected, the Blend Mode property will be displayed. | ||
| CutOff |
This property is visible only when the Render Type is set to Cutout. Controls the threshold to clip semi-transparent areas. The higher this value is, the more alpha will be cropped. | ||
| Blend Mode |
This property is visible only when the Render Type is set to Transparent. You can specify the color blend method from the following options.
| ||
| Render Face |
You can specify the rendering face from the following options.
| ||
| Render Priority |
If the Render Type is the same, the one with the lower Render Priority will be drawn first. | ||
| Vertex Alpha Mode |
You can specify how to use the alpha value of the vertex color from the following options.
| ||
Base Map
Base Map controls the base color texture and its settings.

Base Map
| Property Name | Description | ||
| Mode |
You can specify the type of the Base Map from the following options.
The required texture type will change depending on the mode you selected. | ||
| Texture |
Set the Base Map. If you specify Flip Book as the Mode, you need to set Texture2DArray. And if you specify Flip Book Blending, you need to set Texture3D. | ||
| Rotation |
Set the amount of rotation of the Base Map. | ||
| Offset |
Shifts the center coordinate of rotation. | ||
| Mirror Sampling |
If true, mirrors the texture to create a repeating pattern. | ||
| Flip-Book Progress |
This property is visible only when the Mode is set to Flip Book or Flip Book Blending. The progress of the Flip-Book or Flip-Book Blending. | ||
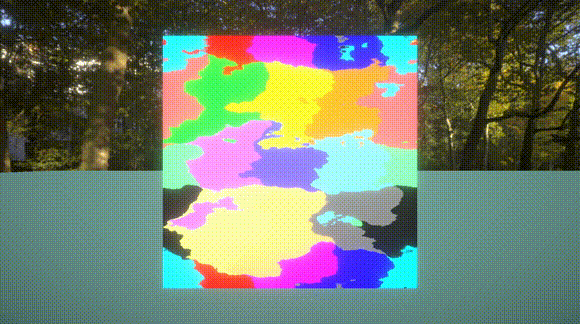
Tint Color
Tint Color controls the color to be multiplied.
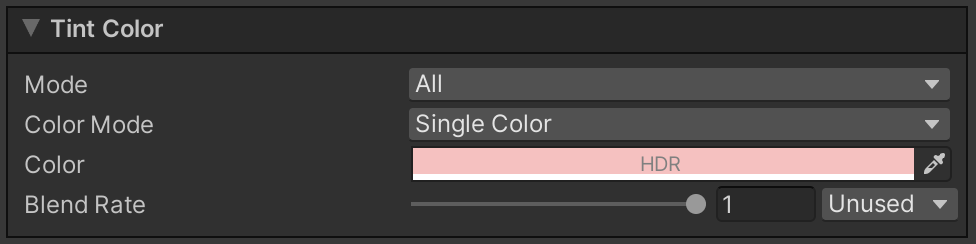
Tint Color
| Property Name | Description | ||
| Mode |
You can specify the area to apply the Tint Color from the following options.
| ||
| Progress |
This property is visible only when the Mode is set to Rim. The larger this value is, the more only the areas near the edges will be colored. | ||
| Sharpness |
This property is visible only when the Mode is set to Rim. The larger this value is, the sharper the edge of the rim will be. | ||
| Inverse |
This property is visible only when the Mode is set to Rim. If checked, reverse the range of the rim. | ||
| Color Mode |
You can specify how you set the Tint Color.
| ||
| Color |
This property is visible only when the Color Mode is set to Single Color. The color to be multiplied. | ||
| Texture |
This property is visible only when the Color Mode is set to Texture 2D or Texture 3D. The texture whose color will be multiplied. | ||
| Progress |
This property is visible only when the Color Mode is set to Texture 3D. The progress of the 3D Texture. | ||
| Blend Rate |
The color multiplication factor. If this value is zero, the color will not be applied; if it is one, the color will be multiplied as is. | ||
Flow Map
You can use the Flow Map to distort the Base Map to the specified directions.

Flow Map
| Property Name | Description | ||
| Texture |
Sets the Flow Map. The specifications are as follows.
| ||
| Intensity |
Sets the Flow Map intensity. | ||
| Targets |
Set the targets to which the flow map will be applied (multiple selections are possible).
| ||
Color Correction
Color Correction correct the colors up to this point.

Color Correction
| Property Name | Description | ||
| Mode |
You can specify how to correct the colors.
| ||
| Texture |
This property is visible only when the Mode is set to Gradient. Sets the Gradient Map. The specifications are as follows.
| ||
Alpha Transition
Alpha Transition controls the alpha value using a texture.

Alpha Transition
| Property Name | Description | ||
| Mode |
You can specify Alpha Transition Mode from the following options.
| Map Mode |
You can specify the type of the Alpha Transition Map from the following options.
The required texture type will change depending on the mode you selected. |
| Texture |
Sets the Alpha Transition Map. The specifications are as follows.
If you specify Flip Book as the Mode, you need to set Texture2DArray. And if you specify Flip Book Blending, you need to set Texture3D. Note that you need to uncheck sRGB Color in the texture import setting because the pixels will be used as values, not colors. | ||
| Flip-Book Progress |
This property is visible only when the Map Mode is set to Flip Book or Flip Book Blending. Sets the progress of Flip-Book or Flip-Book Blending. | ||
| Transition Progress |
Sets the progress of Transition. | ||
| Edge Sharpness |
This property is visible only when the Mode is set to Transition. Sets the sharpness of the edge. | ||
Emission
The Emission control how the particles are glowing.

Emission
| Property Name | Description | ||
| Mode |
You can specify the area to be glowed.
| Map Mode |
This property is visible only when the Mode is set to By Texture. You can specify the Mode of the Emission Map from the following options.
The required texture type will change depending on the mode you selected. |
| Texture |
This property is visible only when the Mode is set to By Texture. Sets the Emission Map. The specifications are as follows.
If you specify Flip Book as the Mode, you need to set Texture2DArray. And if you specify Flip Book Blending, you need to set Texture3D. Note that you need to uncheck sRGB Color in the texture import setting because the pixels will be used as values, not colors. | ||
| Flip-Book Progress |
This property is visible only when the Mode is set to By Texture and the Map Mode is set to Flip Book or Flip Book Blending. Sets the progress of Flip-Book or Flip-Book Blending. | ||
| Color Type |
You can specify the type of the emission color from the following options.
| ||
| Color |
This property is visible only when the Color Type is set to Color. Sets the emission color as HDR color. | ||
| Keep Edge Transparency |
This property is visible only when the Mode is set to Edge. If checked, the edges will not be transparent. | ||
| Gradient Map |
This property is visible only when the Color Type is set to Gradient Map. Sets the Gradient Map. The specifications are as follows.
| ||
| Intensity |
Sets the intensity of the emission. | ||
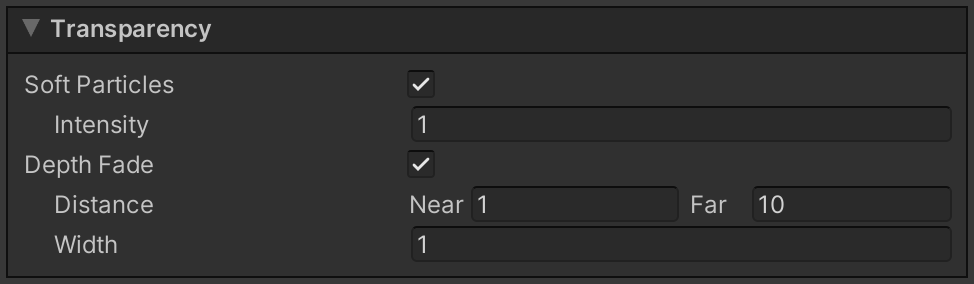
Transparency
Control the transparency in various ways.

Transparency
| Property Name | Description | ||
| Rim |
If checked, the rim will be transparent. | ||
| Progress |
Sets the progress of transparency. | ||
| Sharpness |
The larger this value is, the sharper the edge will be. | ||
| Inverse |
Inverse the transparency area. | ||
| Luminance |
If checked, areas with low brightness will be transparent. | ||
| Progress |
Sets the progress of transparency. | ||
| Sharpness |
The larger this value is, the sharper the edge will be. | ||
| Inverse |
Inverse the transparency area. | ||
| Sort Particles |
If checked, soft particles will be enabled. To use this feature, the Depth Texture in URP settings must be enabled. | ||
| Intensity |
The larger this value, the larger the transparent area. | ||
| Depth Fade |
Makes the areas near and far from the camera transparent. To use this feature, the Depth Texture in URP settings must be enabled. | ||
| Distance |
Set the transparency range. The area closer than Near and farther than Far from the camera will be transparent. | ||
| Width |
The distance from the beginning of transparency to the end of complete transparency. | ||
Distortion Shader
Using the Distortion shader, you can apply distortion effects to the screen, such as heat waves.
To use this shader, assign the Nova/Particles/Distortion shader to your material. The following is the descriptions of each property that can be set from the Inspector.
Render Settings
The Render Settings control how the Material is rendered.

Render Settings
| Property Name | Description | ||
| Render Face |
You can specify the rendering face from the following options.
| ||
Distortion
Distortion controls how it is distorted.

Distortion
| Property Name | Description | ||
| Texture |
Sets the Distortion Map. The specifications are as follows.
| ||
| Intensity |
Sets the distortion intensity. | ||
| Rotation |
Set the amount of rotation of the Distortion Map. | ||
| Offset |
Shifts the center coordinate of rotation. | ||
| Mirror Sampling |
If true, mirrors the texture to create a repeating pattern. | ||
Flow Map
You can use the Flow Map to distort the Distortion Map to the specified directions.

Flow Map
| Property Name | Description | ||
| Texture |
Sets the Flow Map. The specifications are as follows.
| ||
| Intensity |
Sets the Flow Map intensity. | ||
Alpha Transition
Alpha Transition controls the alpha value using a texture.

Alpha Transition
| Property Name | Description | ||
| Mode |
You can specify Alpha Transition Mode from the following options.
| ||
| Texture |
Sets the Alpha Transition Map. The specifications are as follows.
Note that you need to uncheck sRGB Color in the texture import setting because the pixels will be used as values, not colors. | ||
| Progress |
Sets the progress of Transition. | ||
| Edge Sharpness |
This property is visible only when the Mode is set to Transition. Sets the sharpness of the edge. | ||
Transparency
Control the transparency in various ways.
Transparency
| Property Name | Description | ||
| Rim |
If checked, the rim will be transparent. | ||
| Progress |
Sets the progress of transparency. | ||
| Sharpness |
The larger this value is, the sharper the edge will be. | ||
| Inverse |
Inverse the transparency area. | ||
| Luminance |
If checked, areas with low brightness will be transparent. | ||
| Progress |
Sets the progress of transparency. | ||
| Sharpness |
The larger this value is, the sharper the edge will be. | ||
| Inverse |
Inverse the transparency area. | ||
| Sort Particles |
If checked, soft particles will be enabled. To use this feature, the Depth Texture in URP settings must be enabled. | ||
| Intensity |
The larger this value, the larger the transparent area. | ||
| Depth Fade |
Makes the areas near and far from the camera transparent. To use this feature, the Depth Texture in URP settings must be enabled. | ||
| Distance |
Set the transparency range. The area closer than Near and farther than Far from the camera will be transparent. | ||
| Width |
The distance from the beginning of transparency to the end of complete transparency. | ||
Use with the Custom Vertex Streams
Using the Particle System's Custom Vertex Streams, you can animate the properties of the Material. In the following example, we will use the Custom Vertex Streams to rotate the texture.
Set up the Custom Data
First, set up the Particle System's Custom Data.
In this case, we have set a value that changes from 0 to 1 over time to Custom1.X.
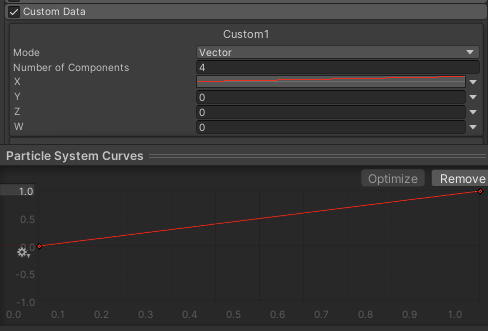
Custom Data
Set up the Custom Vertex Streams
Next, set the Custom Vertex Streams as shown below to pass Custom1.x to TEXCOORD1.x.

Custom Vertex Streams
Set up the Material Property
Next, select COORD 1X from the Rotation dropdown to use the value passed to TEXCOORD1.x as shown below.

Coord
The texture will now rotate.

Rotation
Use Mesh GPU Instancing
You can use the Particle System Mesh GPU Instancing to draw particles efficiently.
The following section describes how to use Mesh GPU Instancing for materials using this shader.
Enable Mesh GPU Instancing
To use Mesh GPU Instancing, you need to set the Render Mode of the Renderer module to Mesh.
Then, check the Enable Mesh GPU Instancing checkbox.

Enable Mesh GPU Instancing
Set up the Custom Vertex Streams
Next, set up the Custom Vertex Streams as shown below.

Custom Vertex Streams
The Custom Data section can be filled with values from other modules, such as Noise, but make sure that all of INSTANCED1.xyzw and INSTANCED2.xyzw are filled without excess or deficiency.
Now you can use Mesh GPU Instancing.
About Lit Shader
The NOVA Shader currently only provides the Unlit shader. The Lit shader is still under consideration and will be added in a future update.
Licenses
This software is released under the MIT license. You are free to use it within the scope of the license, but the following copyright and license notices are required.
- LICENSE.md
In addition, the table of contents for this document has been created using the following software
See Third Party Notices.md for more information about the license of toc-generator.
Metadata
Owner
Metadata
Multi-functional shader for the Particle System that supports Universal Render Pipeline (URP) of Unity.