Vue 依赖收集(为什么要依赖收集?如何依赖收集)
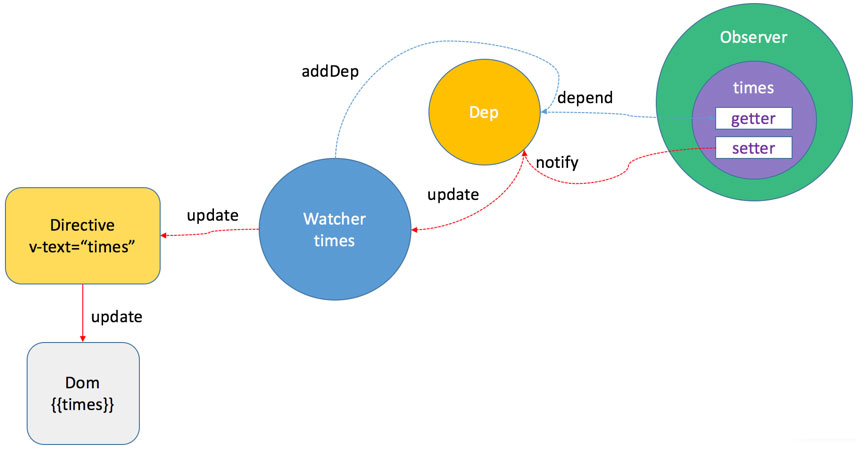
Vue2中Dep, Observer 与Watcher 之间的关系(不含patch部分)

最简单的理解
按照我原先最简单的想法,我们既然给data 进行了defineProperty设置了getter和setter,为什么我们还需要依赖收集呢?为什么要引入Dep与Watcher?
为什么要引入依赖收集
- 例子1:
new Vue({
    template:
        `<div>
            <span>text1:</span> {{text1}}
            <span>text2:</span> {{text2}}
        <div>`,
    data: {
        text1: 'text1',
        text2: 'text2',
        text3: 'text3'
    }
});
text3在实际模板中并没有被用到,然而当text3的数据被修改的时候(this.text3 = 'test')的时候,同样会触发text3的setter,按照原先想法,这会导致重新执行渲染,这显然不正确。
- 例子2:
var globalData = {
  a: 1,
  b: 2
};
new Vue({
  template:`<div>{{a+b}}</div>`,
  data: (){
    return globalData;
  }
})
当globalData.a 发生变化或者当globalData.b发生变化时,我们的视图都需要更新,所以我们要收集这个视图依赖于数据a 和 数据b。因此我们需要依赖收集。

前置知识
vue官网在线模板编译
https://cn.vuejs.org/v2/guide/render-function.html#%E6%A8%A1%E6%9D%BF%E7%BC%96%E8%AF%91
ASTNode 类型(Abstract Syntax Tree)
- ASTElement type:1
- ASTText type:2
- ASTExpression type:3
render 函数一些函数定义
- _c createElement
- _m renderStatic(渲染静态结点)
- _v createTextNode(创建文本dom)
- _s toString(转换为字符串)
VNode 结构
VNode: {
	tag: string | void; // 标签名
	data: VNodeData | void;  // 结点相关属性数据
	children: ?Array<VNode>; // 子节点
	text: string | void;  // 文本
	elm: Node | void;  // dom元素
	ns: string | void;  // 命名空间
	context: Component | void; // VNode所处Vue对象
	functionalContext: Component | void; // only for functional component root nodes
	key: string | number | void;
	componentOptions: VNodeComponentOptions | void; // VNode对象如果对应的是一个自定义组件,componentOptions保存组件相关事件、props数据等
	componentInstance: Component | void; // VNode对象如果对应的是一个自定义组件,componentInstance保存相对应的vue实例
	parent: VNode | void; // 当前自定义组件在父组件中的vnode
	raw: boolean; // contains raw HTML? (server only)
	isStatic: boolean; // 是否是静态内容
	isRootInsert: boolean; // necessary for enter transition check
	isComment: boolean; // empty comment placeholder?
	isCloned: boolean; // 是否是clone的VNode对象
	isOnce: boolean; // 是否是v-once元素的VNode对象
}
真实DOM有什么问题,为什么要去使用虚拟DOM
每个DOM上的属性多达 228 个,而这些属性有 90% 多对我们来说都是无用的。VNode 就是简化版的真实 DOM 元素,保留了我们要的属性,并新增了一些在 diff 过程中需要使用的属性,例如 isStatic。 【总结】Virtual DOM 就是一个js对象,用它来更轻量地描述DOM
入口文件查找
- 从package.json我们看到
"scripts": {
  "dev": "rollup -w -c scripts/config.js --environment TARGET:web-full-dev"
}
- 从scripts/config.js我们看到
// Runtime+compiler development build (Browser)
  'web-full-dev': {
    entry: resolve('web/entry-runtime-with-compiler.js'),
    dest: resolve('dist/vue.js'),
    format: 'umd',
    env: 'development',
    alias: { he: './entity-decoder' },
    banner
  },
- 从web/entry-runtime-with-compiler.js我们看到
import Vue from './runtime/index'
然后--> /src/core/index.js --> /src/core/instance/index.js 最终在instance/index.js里面找到Vue的构造函数
function Vue (options) {
  if (process.env.NODE_ENV !== 'production' &&
    !(this instanceof Vue)
  ) {
    warn('Vue is a constructor and should be called with the `new` keyword')
  }
  this._init(options)
}
设置情景分析
假设我们的实际场景为下面的脚本, 我们下面来分析一下
var data = {
    a:1,
    b:2
  };
  new Vue({
    el:'#app',
    template: `\
        <section>\
		        <div>{{a+b}}</div>\
		        <p>静态文本<a href="www.koala.com">考拉地址</a></p>\
		    </section>\
		        `,
    data(){
      return data;
    }
  });
_init 入口函数
Vue.prototype._init = function (options) {
  initLifecycle(vm);
  initEvents(vm);
  initRender(vm);
  callHook(vm, 'beforeCreate');
  // 注意:beforeCreate阶段完成后,我们的options被merge到了vm.$options属性上,此时是获取不到this.xxx数据的,如果我们要获取data数据需要this.$options.data()来获取
  initInjections(vm);
  // 对data进行了一些Observe 执行了defineReactive 标记1
  initState();
  initProvide(vm); // resolve provide after data/props
  callHook(vm, 'created');
  /* istanbul ignore if */
  if ("development" !== 'production' && config.performance && mark) {
    vm._name = formatComponentName(vm, false);
    mark(endTag);
    measure(("vue " + (vm._name) + " init"), startTag, endTag);
  }
  if (vm.$options.el) {
  // 对模板进行了compile 生成了render function, 调用render function 生成了vmdom
    vm.$mount(vm.$options.el);
  }
}
阶段一 initState()
function initState (vm) {
  vm._watchers = [];
  var opts = vm.$options;
  if (opts.props) { initProps(vm, opts.props); }
  if (opts.methods) { initMethods(vm, opts.methods); }
  if (opts.data) {
    initData(vm);
  } else {
    observe(vm._data = {}, true /* asRootData */);
  }
  if (opts.computed) { initComputed(vm, opts.computed); }
  if (opts.watch && opts.watch !== nativeWatch) {
    initWatch(vm, opts.watch);
  }
}
initState方法里面有调用initData,在initData方法里面最后调用了observe(data, true)。那我们来看下observe 方法
function initData (vm) {
  var data = vm.$options.data;
  data = vm._data = typeof data === 'function'
    ? getData(data, vm)
    : data || {};
  if (!isPlainObject(data)) {
    data = {};
    "development" !== 'production' && warn(
      'data functions should return an object:\n' +
      'https://vuejs.org/v2/guide/components.html#data-Must-Be-a-Function',
      vm
    );
  }
  // proxy data on instance
  var keys = Object.keys(data);
  var props = vm.$options.props;
  var methods = vm.$options.methods;
  var i = keys.length;
  while (i--) {
    var key = keys[i];
    {
      if (methods && hasOwn(methods, key)) {
        warn(
          ("Method \"" + key + "\" has already been defined as a data property."),
          vm
        );
      }
    }
    if (props && hasOwn(props, key)) {
      "development" !== 'production' && warn(
        "The data property \"" + key + "\" is already declared as a prop. " +
        "Use prop default value instead.",
        vm
      );
    } else if (!isReserved(key)) {
      proxy(vm, "_data", key);
    }
  }
  // observe data 我们重点看这里
  observe(data, true /* asRootData */);
}

function observe (value, asRootData) {
  if (!isObject(value) || value instanceof VNode) {
    return
  }
  var ob;
  if (hasOwn(value, '__ob__') && value.__ob__ instanceof Observer) {
    ob = value.__ob__;
  } else if (
    observerState.shouldConvert &&
    !isServerRendering() &&
    (Array.isArray(value) || isPlainObject(value)) &&
    Object.isExtensible(value) &&
    !value._isVue
  ) {
    // 重点看这里
    ob = new Observer(value);
  }
  if (asRootData && ob) {
    ob.vmCount++;
  }
  return ob
}

// 然后我们再看Observer 类
var Observer = function Observer (value) {
  this.value = value;
  this.dep = new Dep();
  this.vmCount = 0;
  def(value, '__ob__', this);
  if (Array.isArray(value)) {
    var augment = hasProto
      ? protoAugment
      : copyAugment;
    augment(value, arrayMethods, arrayKeys);
    this.observeArray(value);
  } else {
	// 会进入walk方法,相当于在遍历我们的value
    this.walk(value);
  }
};

Observer.prototype.walk = function walk (obj) {
  var keys = Object.keys(obj);
  for (var i = 0; i < keys.length; i++) {
	// 这边开始遍历data的key, 每一次遍历都会new Dep()
    defineReactive(obj, keys[i], obj[keys[i]]);
  }
};

// defineReactive 里面就进入了我们所熟悉的defineProperty方法
export function defineReactive (
  obj: Object,
  key: string,
  val: any,
  customSetter?: ?Function,
  shallow?: boolean
) {
  const dep = new Dep()

  const property = Object.getOwnPropertyDescriptor(obj, key)
  if (property && property.configurable === false) {
    return
  }
  // cater for pre-defined getter/setters
  const getter = property && property.get
  const setter = property && property.set

  Object.defineProperty(obj, key, {
      enumerable: true,
      configurable: true,
      get: function reactiveGetter () {
		// 这里有一点要注意,这里的getter是个闭包,所以我们每个key生成的dep都存了下来
        const value = getter ? getter.call(obj) : val
        // Dep.target 是什么呢?后面会讲
        if (Dep.target) {
          dep.depend()
          if (childOb) {
            childOb.dep.depend()
            if (Array.isArray(value)) {
              dependArray(value)
            }
          }
        }
        return value
      },
      set: function reactiveSetter (newVal) {
        const value = getter ? getter.call(obj) : val //先算出原先的值
        /* eslint-disable no-self-compare */
        if (newVal === value || (newVal !== newVal && value !== value)) {
          return
        }
        /* eslint-enable no-self-compare */
        if (process.env.NODE_ENV !== 'production' && customSetter) {
            customSetter()
        }
        if (setter) {
          setter.call(obj, newVal)
        } else {
          val = newVal
        }
        childOb = !shallow && observe(newVal) //observe(newvalue) 但是如果只是value会直接return
        dep.notify()
        // 触发dep.notify()方法 subs[i].update()
        // subs 存储的是watcher实例
      }
  })
}
阶段二 进入$mount() 这个方法里面比较重要
initState() 阶段完成以后,后面会执行到mount() 方法,这个方法比较关键我们一起来看下。
Vue.prototype._init = function (options) {
	initLifecycle(vm);
    initEvents(vm);
    initRender(vm);
    callHook(vm, 'beforeCreate');
    initInjections(vm); // resolve injections before data/props
    initState(vm);
    initProvide(vm); // resolve provide after data/props
    callHook(vm, 'created');

    /* istanbul ignore if */
    if ("development" !== 'production' && config.performance && mark) {
      vm._name = formatComponentName(vm, false);
      mark(endTag);
      measure(("vue " + (vm._name) + " init"), startTag, endTag);
    }

    if (vm.$options.el) {
      vm.$mount(vm.$options.el);
    }
}
我们先来看一下$mount方法,我们发现一开始有一段赋值,其实就是先存下来Vue上的公共mount方法,然后又重写了公共的mount方法。
const mount = Vue.prototype.$mount
Vue.prototype.$mount = function (
  el?: string | Element,
  hydrating?: boolean
): Component {
    ...
}
<!-- 源码位置:src/platforms/web/entry-runtime-with-compiler.js -->
const idToTemplate = cached(id => {
  const el = query(id)
  return el && el.innerHTML
})

const mount = Vue.prototype.$mount
Vue.prototype.$mount = function (
  el?: string | Element,
  hydrating?: boolean
): Component {
  el = el && query(el)
  const options = this.$options
  if (!options.render) {
	// 我们会进入这个地方,因为我们没有写render函数,写的是template模板
    let template = options.template
    if (template) {
      if (typeof template === 'string') {
        if (template.charAt(0) === '#') {
          ...
        }
      } else if (template.nodeType) {
        template = template.innerHTML
      } else {
        ...
      }
    } else if (el) {
      template = getOuterHTML(el)
    }

    if (template) {
       //走到这里, 进入了compileToFunctions方法 重点注意开始编译环节
      const { render, staticRenderFns } = compileToFunctions(template, {
        shouldDecodeNewlines,
        delimiters: options.delimiters
      }, this)
      options.render = render
      options.staticRenderFns = staticRenderFns
    }
  }
  return mount.call(this, el, hydrating)
}

function getOuterHTML (el: Element): string {
  if (el.outerHTML) {
    return el.outerHTML
  } else {
    const container = document.createElement('div')
    container.appendChild(el.cloneNode(true))
    return container.innerHTML
  }
}
compileToFunctions方法做了什么事情呢,我先大体的介绍一下。它的最终目的是让template字符串模板——>render function 函数。compile这个编译过程在Vue2会经历3个阶段:
- 把html生成ast语法树 (Vue 源码中借鉴 jQuery 作者 John Resig 的 HTML Parser 对模板进行解析)
- 对ast语法树进行静态优化optimize() (找到静态结点,做标记就是在ast上添加了static属性优化diff)
- 根据优化过的ast generate生成render function 字符串
var createCompiler = createCompilerCreator(function baseCompile (
  template,
  options
) {
  var ast = parse(template.trim(), options);
  if (options.optimize !== false) {
    optimize(ast, options);
  }
  var code = generate(ast, options);
  return {
    ast: ast,
    render: code.render,
    staticRenderFns: code.staticRenderFns
  }
});
var ref$1 = createCompiler(baseOptions);
var compileToFunctions = ref$1.compileToFunctions;

function createCompileToFunctionFn (compile) {
  var cache = Object.create(null);

  return function compileToFunctions (
    template,
    options,
    vm
  ) {
    options = extend({}, options);
    var warn$$1 = options.warn || warn;
    delete options.warn;
	....

    // 走到了这里
    var key = options.delimiters
      ? String(options.delimiters) + template
      : template;
    if (cache[key]) {
      return cache[key]
    }

    // 进入这里开始compile, 我们先来分析这个compile
    var compiled = compile(template, options);
	...
    var res = {};
    var fnGenErrors = [];
    res.render = createFunction(compiled.render, fnGenErrors);
    res.staticRenderFns = compiled.staticRenderFns.map(function (code) {
      return createFunction(code, fnGenErrors)
    });

    // check function generation errors.
    // this should only happen if there is a bug in the compiler itself.
    // mostly for codegen development use
    /* istanbul ignore if */
    {
      if ((!compiled.errors || !compiled.errors.length) && fnGenErrors.length) {
        warn$$1(
          "Failed to generate render function:\n\n" +
          fnGenErrors.map(function (ref) {
            var err = ref.err;
            var code = ref.code;

            return ((err.toString()) + " in\n\n" + code + "\n");
        }).join('\n'),
          vm
        );
      }
    }

    return (cache[key] = res)
  }
}
compile(template, options);会进入baseCompile方法, 我们来看下baseCompile方法里面的细节
var createCompiler = createCompilerCreator(function baseCompile (
  template,
  options
) {
  //可以看到我们大致的流程 ast->optimize->generate
  var ast = parse(template.trim(), options);
  if (options.optimize !== false) {
    optimize(ast, options);
  }
  var code = generate(ast, options);
  return {
    ast: ast,
    render: code.render,
    staticRenderFns: code.staticRenderFns
  }
});
阶段二(一) 生成ast
<section id="test">
	<div> {{a+b}} </div>
	<p>静态文本<a href="www.koala.com">考拉地址</a></p>
</section>
大致理解一下html-parser吧, html-parser 会按照下面几步进行html的解析
- 首先定义基本的ast结构
const element1 = {
    type: 1,
    tag: "section",
    attrsList: [{name: "id", value: "test"}],
    attrsMap: {id: "app"},
    parent: undefined,
    children: []
  }
2.对ast进行预处理(preTransforms) 对ast的预处理在weex中才会有,我们直接跳过。 3、 解析v-pre、v-if、v-for、v-once、slot、key、ref等指令。 4、 对ast的class 和 style中的属性进行处理 5、 解析v-bind、v-on以及普通属性 6、 根节点或v-else块等处理 7、 模板元素父子关系的建立 8、 对ast后处理(postTransforms)
最终生成的ast长下面这样:
{
    	type: 1, //element类型
		tag: "section",
        attrsList:[{
			name: "id",
			value: "test"
        }],
		attrsMap: {id: "test"},
        children:[
            {
                type: 1,
                tag: "div",
                attrsList:[],
                attrsMap:{},
                children:[{
                    type: 2,
                    expression: "_s(a+b)",
                    tokens:[{@binding: "a+b"}]
                }]},
                parent: {...},
	            plain: true
            },
            {
            	type: 3,
            	text: ""
            },
            {
            	type: 1,
            	tag: "p",
            	attrsList: [],
            	attrsMap: {},
                parent: {...},
                children:[
                    {
                        type:3,
                        text: "静态文本"
                    },
                    {
                        ...
                    }
               	]
            }
		]
}
阶段二 optimize() 静态结点标记
源码位置: src/compiler/optimizer.js
function markStatic (node: ASTNode) {
  // 通过isStatic 方法来判断node结点是否为静态结点
  node.static = isStatic(node)
  if (node.type === 1) {
    // do not make component slot content static. this avoids
    // 1. components not able to mutate slot nodes
    // 2. static slot content fails for hot-reloading
    if (
      !isPlatformReservedTag(node.tag) &&
      node.tag !== 'slot' &&
      node.attrsMap['inline-template'] == null
    ) {
      return
    }
    for (let i = 0, l = node.children.length; i < l; i++) {
      const child = node.children[i]
      markStatic(child)
      if (!child.static) {
        node.static = false
      }
    }
  }
}
看一下isStatic方法
function isStatic (node: ASTNode): boolean {
  if (node.type === 2) { // expression
    return false // 表达式肯定不是静态结点
  }
  if (node.type === 3) { // text
    return true // 文本肯定是静态结点
  }
  return !!(node.pre // v-pre 指令,此时子节点是不做编译的
    || (
    !node.hasBindings && // no dynamic bindings
    !node.if && !node.for && // not v-if or v-for or v-else
    !isBuiltInTag(node.tag) && // not a built-in 内置标签包括slot 和 component
    isPlatformReservedTag(node.tag) && // 是平台保留标签html和svg标签
    !isDirectChildOfTemplateFor(node) &&
    Object.keys(node).every(isStaticKey) // 不是template标签的直接子元素且没有包含在for循环中
  ))
}
然后我们的ast 会变成下面这样,标记了是否为静态结点和是否为静态根结点, 增加了一个static属性
{
    	type: 1, //element类型
		tag: "section",
        attrsList:[{
			name: "id",
			value: "test"
        }],
		attrsMap: {id: "test"},
        children:[
            {
                type: 1,
                tag: "div",
                attrsList:[],
                attrsMap:{},
                children:[{
                    type: 2,
                    expression: "_s(a+b)",
                    tokens:[{@binding: "a+b"}]
                }]},
                parent: {...},
	            plain: true,
	            static: false
            },
            {
            	type: 3,
            	text: "",
	            static: true
            },
            {
            	type: 1,
            	tag: "p",
            	attrsList: [],
            	attrsMap: {},
                parent: {...},
                children:[
                    {
                        type:3,
                        text: "静态文本"
                    },
                    {
                        ...
                    }
               	],
				static: true
            }
		],
		plain: false,
		static: false
}
阶段二(三) generate() 生成render function
源码位置:src/compiler/codegen/index.js 拿到ast结构以后,进入generate函数 var code = generate(ast, options);
export function generate (
  ast: ASTElement | void,
  options: CompilerOptions
) {
  // save previous staticRenderFns so generate calls can be nested
  ....
  const code = ast ? genElement(ast) : '_c("div")'
  staticRenderFns = prevStaticRenderFns
  onceCount = prevOnceCount
  // 返回的整体结构
  return {
    render: `with(this){return ${code}}`,
    staticRenderFns: currentStaticRenderFns
  }
}
重点看下genElement 方法
function genElement (el: ASTElement): string {
  if (el.staticRoot && !el.staticProcessed) {
    return genStatic(el)
  } else if (el.once && !el.onceProcessed) {
  	...
  } else {
    // component or element
    let code
    if (el.component) {
      ...
    } else {
      // 大部分进入这里,plain 代表元素上是否没有属性
      // 后面先看下genData 方法
      const data = el.plain ? undefined : genData(el)
      // 后面看下genChildren方法
      const children = el.inlineTemplate ? null : genChildren(el, true);

      code = `_c('${el.tag}' ${
        data ? `,${data}` : '' // data
      }${
        children ? `,${children}` : '' // children
      })`
    }
    // module transforms
    for (let i = 0; i < transforms.length; i++) {
      code = transforms[i](el, code)
    }
    return code
  }
}
function genData (el: ASTElement): string {
  let data = '{'
  ...
  if (el.attrs) {
    data += `attrs:{${genProps(el.attrs)}},`
  }
  ...
  data = data.replace(/,$/, '') + '}'
  ...
  return data // data 的结构是 attrs: {id: 'app'}
}

function genChildren (el: ASTElement, checkSkip?: boolean): string | void {
  const children = el.children
  if (children.length) {
    const el: any = children[0]
    // optimize single v-for
    if (children.length === 1 &&
        el.for &&
        el.tag !== 'template' &&
        el.tag !== 'slot') {
      return genElement(el)
    }
    const normalizationType = checkSkip ? getNormalizationType(children) : 0
    return `[${children.map(genNode).join(',')}]${
      normalizationType ? `,${normalizationType}` : ''
    }`
  }
}
最后生成的就是下面这个对象
{
  render: "with(this){return _c('section',{attrs:{\"id\":\"test\"}},[_c('div',[_v(_s(a+b))]),_v(\" \"),_m(0)])}",
  staticRenderFns: [
    "with(this){return _c('p',[_v(\"静态文本\"),_c('a',{attrs:{\"href\":\"www.koala.com\"}},[_v(\"考拉地址\")])])}"
  ]
}

// render 是render function 字符串
// staticRenderFns 是静态渲染函数数组
之后调用了 createFunction 方法其实就是new Function('string')。所以其实最终我们得到的是 render function
res.render = createFunction(compiled.render, fnGenErrors);
res.staticRenderFns = compiled.staticRenderFns.map(function (code) {
      return createFunction(code, fnGenErrors)
    });
options.render = render;
options.staticRenderFns = staticRenderFns;

function createFunction (code, errors) {
    try {
      return new Function(code)
    } catch (err) {
      errors.push({ err: err, code: code });
      return noop
    }
  }
然后compile结束后,我们得到render function 之后,开始执行$mount的公用方法(源码位置src/platforms/web/runtime/index.js) 其实就是调用了mountComponent方法
// 接下来进入这个方法
return mount.call(this, el, hydrating)
// public mount method
Vue.prototype.$mount = function (
  el?: string | Element,
  hydrating?: boolean
): Component {
  el = el && inBrowser ? query(el) : undefined
  // 本质是进入这个方法
  return mountComponent(this, el, hydrating)
}
阶段四 执行renderFunction 得到VNode
  export function mountComponent (
  vm: Component,
    el: ?Element,
    hydrating?: boolean
  ): Component {
    ...

  callHook(vm, 'beforeMount')
  let updateComponent
  /* istanbul ignore if */
  if (process.env.NODE_ENV !== 'production' && config.performance && mark) {
    ...
  } else {

    updateComponent = () => {
      // 重点看这里执行了render()方法生成了vnode
      vm._update(vm._render(), hydrating)
    }
  }

  // 入口:下面执行了new Watcher, 这是我们的重点入口[1]
  new Watcher(vm, updateComponent, noop, null, true /* isRenderWatcher */)
  hydrating = false

  // manually mounted instance, call mounted on self
  // mounted is called for render-created child components in its inserted hook
  if (vm.$vnode == null) {
    vm._isMounted = true
    callHook(vm, 'mounted')
  }
  return vm
  }
阶段五 进入Watcher 类
var Watcher = function Watcher (
  vm,
  expOrFn,
  cb,
  options,
  isRenderWatcher
) {
 ...
  if (typeof expOrFn === 'function') {
    this.getter = expOrFn;
  } else {
    this.getter = parsePath(expOrFn);
    if (!this.getter) {
      this.getter = function () {};
      "development" !== 'production' && warn(
        "Failed watching path: \"" + expOrFn + "\" " +
        'Watcher only accepts simple dot-delimited paths. ' +
        'For full control, use a function instead.',
        vm
      );
    }
  }
  // 重点看下这里,调用了Watcher的get方法,我们看下get方法
  this.value = this.lazy
    ? undefined
    : this.get();
};

Watcher.prototype.get = function get () {
  // 这里有个关键点
  pushTarget(this);
  var value;
  var vm = this.vm;
  try {
    value = this.getter.call(vm, vm);
  } catch (e) {
    if (this.user) {
      handleError(e, vm, ("getter for watcher \"" + (this.expression) + "\""));
    } else {
      throw e
    }
  } finally {
    // "touch" every property so they are all tracked as
    // dependencies for deep watching
    if (this.deep) {
      traverse(value);
    }
    popTarget();
    this.cleanupDeps();
  }
  return value
};
watcher 构造函数最后调用了this.get() , 首先调用了pushTarget(this)方法。这个方法把Dep.target设为this(即当前watcher实例)。然后执行了this.getter.call(vm, vm);这个this.getter 就是 this.getter = expOrFn; 即我们传入new Watcher 里面的第二个参数,updateComponent。updateComponent做了什么呢?它先执行了vm.render,然后执行了 vm. update
Watcher.prototype.get = function get () {
  pushTarget(this);
  var value;
  var vm = this.vm;
  try {
      //getter对应new Watcher时我们传入的第二个参数 new Watcher(vm, updateComponent, noop, null, true /* isRenderWatcher */)即updateComponent
    value = this.getter.call(vm, vm);
  } catch (e) {
    if (this.user) {
      handleError(e, vm, ("getter for watcher \"" + (this.expression) + "\""));
    } else {
      throw e
    }
  } finally {
    // "touch" every property so they are all tracked as
    // dependencies for deep watching
    if (this.deep) {
      traverse(value);
    }
    popTarget();
    this.cleanupDeps();
  }
  return value
};

function pushTarget (_target) {
  if (Dep.target) { targetStack.push(Dep.target); }
  Dep.target = _target;
}

updateComponent = function () {
      vm._update(vm._render(), hydrating);
    };
阶段六 调用render()生成VDom
下面进入了updateComponent方法,会先执行vm._render(), 我们来看下vm._render()调用后得到了什么。
Vue.prototype._render = function () {
    var vm = this;
    var ref = vm.$options;
    var render = ref.render;
    var _parentVnode = ref._parentVnode;

 	...
    vm.$vnode = _parentVnode;
    // render self
    var vnode;
    try {
	 // 重点看这里,其实就是执行了我们的render function
      vnode = render.call(vm._renderProxy, vm.$createElement);
    } catch (e) {
      ...
    }
    // return empty vnode in case the render function errored out
    if (!(vnode instanceof VNode)) {
      if ("development" !== 'production' && Array.isArray(vnode)) {
        warn(
          'Multiple root nodes returned from render function. Render function ' +
          'should return a single root node.',
          vm
        );
      }
      vnode = createEmptyVNode();
    }
    // set parent
    vnode.parent = _parentVnode;
    return vnode
  };
}
vnode = render.call(vm._renderProxy, vm.$createElement);这个方法的调用,相当于执行了我们之前得到的render function。并且我们知道render function 里面有with(this) 此时我们把this指向了vm, 所以按照我们的例子, s(a+b) 在执行的时候会读取到vm.a 和 vm.b 就分别进入了a 和 b 的getter。再回头看下getter函数。
所以注意这里就是Watcher 与 Dep 关联的地方,可以认为compile 是Watcher 与 Dep之间的桥梁。
Object.defineProperty(obj, key, {
    enumerable: true,
    configurable: true,
    get: function reactiveGetter () {
      var value = getter ? getter.call(obj) : val;
      // 此时Dep.target 指向this, 因为watch实例生成时调用了pushTarget(this)
      if (Dep.target) {
          // 看下dep.depend 方法
        dep.depend();
        if (childOb) {
          childOb.dep.depend();
          if (Array.isArray(value)) {
            dependArray(value);
          }
        }
      }
      return value
    },
    set: function() {...}
}

Dep.prototype.depend = function depend () {
  if (Dep.target) {
    // 调用的是watcher的addDep方法
    Dep.target.addDep(this);
  }
};
Watcher.prototype.addDep = function addDep (dep) {
  var id = dep.id;
  if (!this.newDepIds.has(id)) {
    this.newDepIds.add(id);
    this.newDeps.push(dep);
    if (!this.depIds.has(id)) {
      // 这里调用了dep的addSub方法
      dep.addSub(this);
    }
  }
};
Dep.prototype.addSub = function addSub (sub) {
  this.subs.push(sub);
};
vm.render()方法最终执行完会生成VNode, 即完成了从render function —> VNode 的过程,我们看下此时vnode的样子, 大概像下面这样
{
	    	asyncFactory: undefined,
			asyncMeta: undefined,
        	children:[
    		{tag: 'div', data: undefined, children:[VNode], text: undefined, elm: undefind ...},
			{tag: undefined, data: undefined, children:undefined, text: "", elm: undefind ...},
            {tag: 'p', data: undefined, children:[VNode, VNode], text: undefined, elm: undefind ...},
        ],
            context: vm,
            data: {
                attrs: {id: "test"}
            },
            ....
            isStatic: false,
			tag: 'section'
    	...
}
得到VNode 之后,调用vm.update 方法从VNode 生成DOM。update方法内部重点调用了patch方法,看下面。因为patch内容也比较复杂,所以此次并不讲解内部相关的具体流程,会大致看下dom创建的过程。patch方法内部大致会涉及下面3部分的处理:
- 根据vnode 创建dom
- diff 算法
- 自定义组件处理
Vue.prototype._update = function (vnode, hydrating) {
    ...
    vm.$el = vm.__patch__(
        vm.$el, vnode, hydrating, false /* removeOnly */,
        vm.$options._parentElm,
        vm.$options._refElm
      );
}
// patch方法内部通过调用createElm 来生成node
createElm(
          vnode,
          insertedVnodeQueue,
          // extremely rare edge case: do not insert if old element is in a
          // leaving transition. Only happens when combining transition +
          // keep-alive + HOCs. (#4590)
          oldElm._leaveCb ? null : parentElm$1,
          nodeOps.nextSibling(oldElm)
        );
// createElm 中主要通过下面这个方法来创建dom
 vnode.elm = vnode.ns
        ? nodeOps.createElementNS(vnode.ns, tag)
        : nodeOps.createElement(tag, vnode)

//nodeOps是什么,是一些创建dom相关的方法
import { namespaceMap } from 'web/util/index'
export function createElement (tagName: string, vnode: VNode): Element {
  const elm = document.createElement(tagName)
  if (tagName !== 'select') {
    return elm
  }
  // false or null will remove the attribute but undefined will not
  if (vnode.data && vnode.data.attrs && vnode.data.attrs.multiple !== undefined) {
    elm.setAttribute('multiple', 'multiple')
  }
  return elm
}

export function createElementNS (namespace: string, tagName: string): Element {
  return document.createElementNS(namespaceMap[namespace], tagName)
}

...
最后我们的结点生成并挂载了vnode.elm 上,打出来看下
> vnode.elm
<section>
	<div>3</div>
	<p>
		静态文本
		<a href="www.kaola.com"></a>
	</p>
</section>
接下来就会触发 insert (parent, elm, ref$$1) parent 是body, elm是上面得到的dom, 第三个参数没研究,此时elm就插入到了parent中。接下来又会回到mountComponent 接下去的方法
function mountComponent () {
    ...
    new Watcher(...)
	hydrating = false;
    if(vm.$vnode == null){
    	vm._isMounted = true;
        callHook(vm, 'mounted'); //触发了mounted钩子
    }
    return vm;
}
当data更新
当我们data的值发生了变化的时候,会进入setter函数。
set: function reactiveSetter (newVal) {
      var value = getter ? getter.call(obj) : val;
      /* eslint-disable no-self-compare */
      if (newVal === value || (newVal !== newVal && value !== value)) {
        return
      }
      /* eslint-enable no-self-compare */
      if ("development" !== 'production' && customSetter) {
        customSetter();
      }
      if (setter) {
        setter.call(obj, newVal);
      } else {
        val = newVal;
      }
      childOb = !shallow && observe(newVal);
      // 进入dep.notify 通知watcher
      dep.notify();
}
Dep.prototype.notify = function notify () {
  // stabilize the subscriber list first
  var subs = this.subs.slice();
  for (var i = 0, l = subs.length; i < l; i++) {
    subs[i].update();
  }
};
Watcher.prototype.update = function update () {
  /* istanbul ignore else */
  if (this.lazy) {
    this.dirty = true;
  } else if (this.sync) {
    this.run();
  } else {
    // 进入这里 这个方法最终会进入watcher.prototype.run 方法
    queueWatcher(this);
  }
};

Watcher.prototype.run = function run () {
  if (this.active) {
    // 这里会调用this.get, 之前有讲过this.get里面会调用updateComponent,所以又会走到
    //  vm._update(vm._render(), hydrating);这个方法重新更新视图了
    var value = this.get();
    if (
      value !== this.value ||
      // Deep watchers and watchers on Object/Arrays should fire even
      // when the value is the same, because the value may
      // have mutated.
      isObject(value) ||
      this.deep
    ) {
      // set new value
      var oldValue = this.value;
      this.value = value;
      if (this.user) {
        try {
          this.cb.call(this.vm, value, oldValue);
        } catch (e) {
          handleError(e, this.vm, ("callback for watcher \"" + (this.expression) + "\""));
        }
      } else {
        this.cb.call(this.vm, value, oldValue);
      }
    }
  }
};
Watcher.prototype.get = function get () {
  // 这里有个关键点
  pushTarget(this);
  var value;
  var vm = this.vm;
  try {
	// 注意this.getter = expFunction
    value = this.getter.call(vm, vm);
  } catch (e) {
    if (this.user) {
      handleError(e, vm, ("getter for watcher \"" + (this.expression) + "\""));
    } else {
      throw e
    }
  } finally {
    // "touch" every property so they are all tracked as
    // dependencies for deep watching
    if (this.deep) {
      traverse(value);
    }
    popTarget();
    this.cleanupDeps();
  }
  return value
};
所以我们此时就理解了整个Observer,Dep 与Watcher之间的关系

参考文献
1.Vue2.0 源码阅读:模板渲染 2.compile—优化静态内容 3.深入vue2.0底层思想——模板渲染 4.Vue2 源码漫游(二) 5.Vitual DOM 的内部工作原理