Sublime way to paint tabs
@srd-software I want to get prototype of painting tabs like Sublime Text (ST) does. pls download it. open file 'Theme - Default.sublime-package'. (On Linux: /opt/sublime_text/Packages). see PNG pics inside this ZIP file:
[email protected]
[email protected]
[email protected]
light/[email protected]
- mask for entire tab
- mask for top edge (maybe for user colored tabs?)
- shadow
- border above tab
now we need the prototype which takes similar png's and paints nice tab using them. tab must be colored with any user-defined color. (problem: I dunno how to mix the colored rectangle + mask, I dunno how ST makes nice gray borders).
for me, it is the better way than our themes.

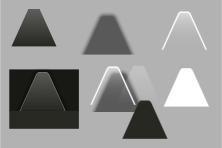
The tabs in ST do look good!...I looked at the ST PNGs and then put them into my graphics program on separate levels so I could move the elements around and adjust the PNGs. I'm still not sure how they are doing what they are doing, but here's my guess. I think ST uses the layers in the order below (I turned off the top highlight as I can't see how to use it yet):
Tab border shadow
The gray borders appear to be the natural effect of the [email protected] image's alpha spilling over on top of the border behind it. I think they are manipulating the color of the [email protected] in code to match the text editor area. In the graphics program I had to create 2 tab layer images, one the color of the ST editor, and one that was white with a linear transparency so it's slightly solid at top, transparent at bottom to try and replicate what may be going on inside the ST code. I think they achieve this in code when they set the [email protected] color.
I was able to replicate the ST images as vector shapes, so I could make different shapes and gradients as needed. However, I would recommend for testing purposes to use the existing ST images so you know for sure that we are not fighting some issue in the images I create. Once the ST images work, then I can create some new ones to plug in place once it's working.
PNG elements:
Composited elements:

FYI, I'll be here for a couple of hours this morning. After that I'll be out for a few hours so if I don't get back to you in a timely manner it's because we are not home. I'll check back on all this when I return.
OK. I wish I knew exactly how they are colorizing and then compositing their images. Makes sense the way they do it though. The PNGs give them the tab shapes and gradients, and then they apply whatever color (probably only to the main tab image, i.e., [email protected]) in code. That way you only have one small set of images per theme to deal with. Their main tab image, [email protected], only seems to have alpha around the edges, so my guess is they do a color replacement on the main color in that image leaving the alpha channel intact.
Yes , they replace white color with current color, maybe by looping through Pixels[n,m]
What really baffles me is what they are doing with the highlighted border image ([email protected]):

The one on the left that I made is what I'd expect to see; here's a couple of simple composites using that one:

Or this:

A simple composite of the one on the right ([email protected]) gives this:

But the one with that white border is apparently what they use somehow. I can't figure out what they are doing with that (due to that border). Dropping it out somehow? Combining it with the one in the "dark" folder?
Maybe they replace white pixels in [email protected] as well, leaving the gradient part alone. Maybe they can target only white color (255)?
Also, I wonder how are they stretching the basic image(s) to the width needed without distortion? Or maybe they cut it up in code?
Border pic- maybe they replace white pixels to border color (gray), then paint result over the tab
Yes, that all agrees with what I figured they had to be doing given the images we see in the Theme - Default.sublime-package file. So, process (in code) might be:
- Replace white color in tab and edge of border in copies of the source PNGs
Then, with the shadow, and recolored tab and recolored border copies:
- Copy pos 0 to mid-point: Left
- Copy mid-point to width: Right
- Take a vertical piece several pixels wide from mid point: Center (stretch to needed width)
- From these create TabShadowTemp, TabImageTemp, TabBorderTemp PNG images of proper total width
Then with these new resized and recolored temp images:
- Composite (merge): TabShadowTemp, TabImageTemp and TabBorderTemp PNGs to new final TabImage
Now you'd have a good final image to use with:
- MouseDown: store X and Y in global var MouseDownPos: TPoint;
- MouseOver: Use MouseDownPos.X and X from MouseOver to move the image (optional)
Alexey, I put a test project together in delphi. It's in a repository called png overlay test. It's not a prototype but it may give you some ideas for this.
I saw it, nice helper functions, but the shadow is not painted below the tab (Delphi 10.3), and not sure I can do this in Laz png code
Maybe check out Graphics32 in sourceforge? Looks like it may have what you need and is both delphi and lazarus...