home-assistant-tplink-router
 home-assistant-tplink-router copied to clipboard
Home Assistant component for TP-Link router administration with sensors, button reboot, switches and device tracking.
Tp-Link router integration for Home Assistant
Home Assistant component for TP-Link router administration based on the TP-Link Router API
See Supported routers
Components
Events
- tplink_router_new_device: Fired when a new device appears in your network
- tplink_router_device_offline: Fired when a device becomes offline
- tplink_router_device_online: Fired when a device becomes online
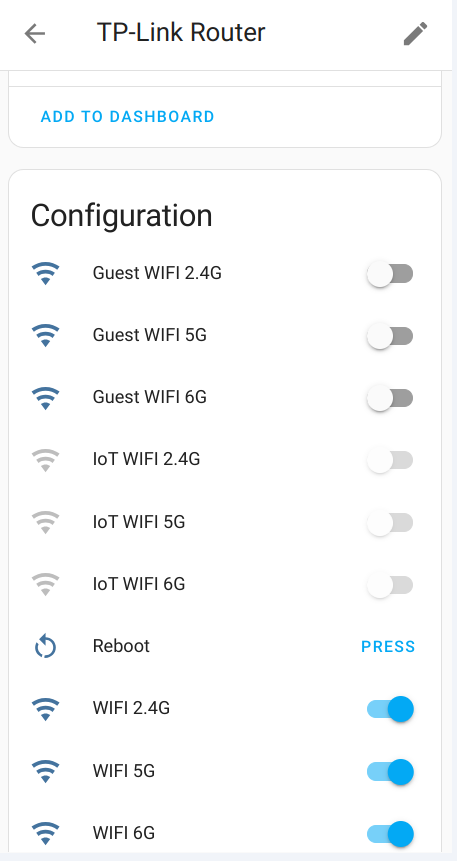
Switches
- Router Reboot
- 2.4Ghz host wifi Enable/Disable
- 5Ghz host wifi Enable/Disable
- 6Ghz host wifi Enable/Disable
- 2.4Ghz guest wifi Enable/Disable
- 5Ghz guest wifi Enable/Disable
- 6Ghz guest wifi Enable/Disable
- 2.4Ghz IoT wifi network Enable/Disable
- 5Ghz IoT wifi network Enable/Disable
- 6Ghz IoT wifi network Enable/Disable
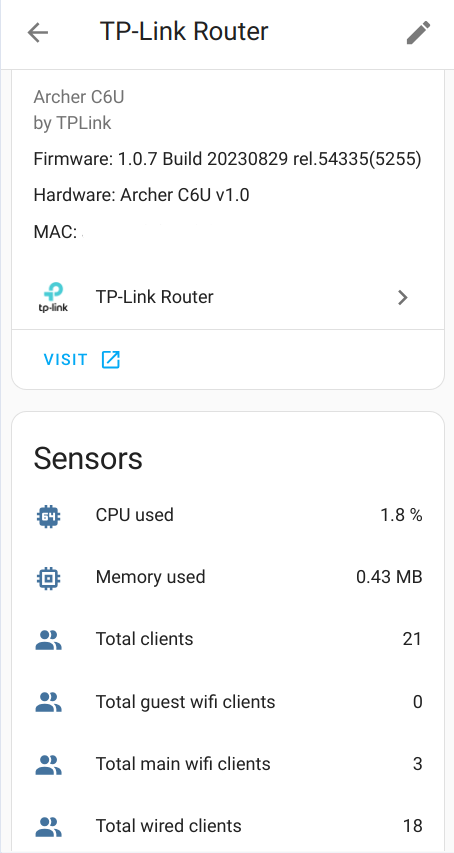
Sensors
- Total amount of wired clients
- Total amount of IoT clients
- Total amount of host wifi clients
- Total amount of guest wifi clients
- Total amount of all connected clients
- CPU used
- Memory used
Device Tracker
- Track connected to router devices by MAC address with connection information
To find your device - Go to Developer tools and search for your MAC address - you’ll find sensor like device_tracker.YOUR_MAC or device_tracker.YOUR_PHONE_NAME.
It will also fire Home Assistant event when a device connects to router
Notification
To receive notifications of appearing a new device in your network, or becoming device online\offline add following lines to your configuration.yaml file:
automation:
  - alias: "New network device"
    trigger:
      platform: event
      event_type: tplink_router_new_device
    action:
      service: notify.mobile_app_<device_name>
      data:
        content: >-
          New device appear {{ trigger.event.data.hostname }} with IP {{ trigger.event.data.ip_address }}
All available fields in trigger.event.data:
- hostname
- ip_address
- mac_address
- connection
- band
- packets_sent
- packets_received
Installation
HACS (recommended)
Have HACS installed, this will allow you to update easily.

- Go to the Hacs->Integrations.
- Add this repository (https://github.com/AlexandrErohin/home-assistant-tplink-router) as a custom repository
- Click on
+ Explore & Download Repositories, search forTP-Link Router. - Search for
TP-Link Router. - Navigate to
TP-Link Routerintegration - Press
DOWNLOADand in the next window also pressDOWNLOAD. - After download, restart Home Assistant.
Manual
- Locate the
custom_componentsdirectory in your Home Assistant configuration directory. It may need to be created. - Copy the
custom_components/tplink_routerdirectory into thecustom_componentsdirectory. - Restart Home Assistant.
Configuration
TP-Link Router is configured via the GUI. See the HA docs for more details.
The default data is preset already.
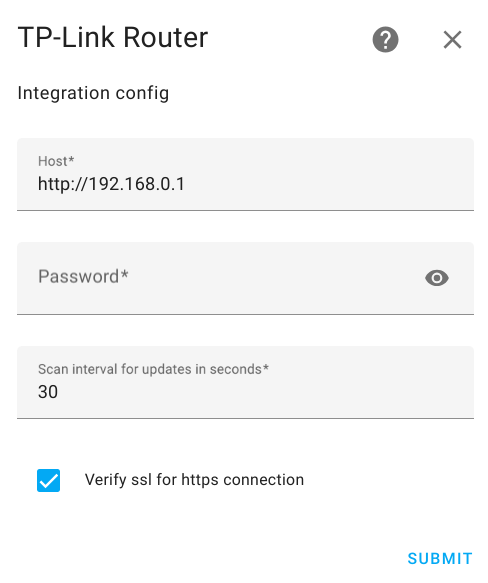
- Go to the Settings->Devices & services.
- Click on
+ ADD INTEGRATION, search forTP-Link Router. - Fill Password.
- Click
SUBMIT
NOTE!
- If you use
httpsconnection to your router you may get errorcertificate verify failed: EE certificate key too weak. To fix this - unsetVerify ssl - Use Local Password which is for Log In with Local Password
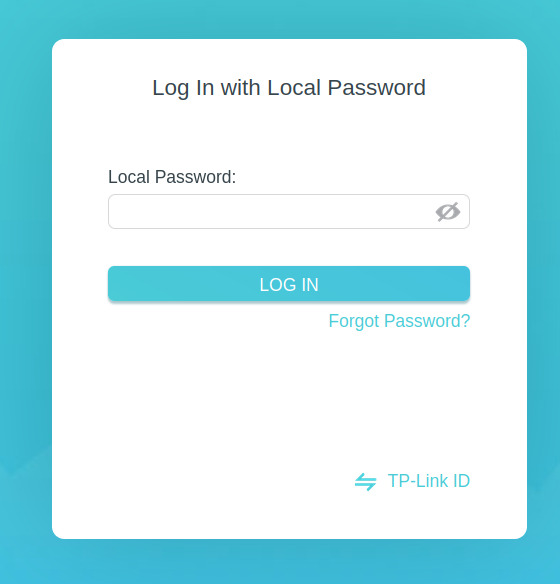
- If you got error -
You need to use web encrypted password instead. Check the documentation!Read web encrypted password - The TP-Link Web Interface only supports upto 1 user logged in at a time (for security reasons, apparently). So you will be logged out from router web interface when the integration updates data
Web Encrypted Password
If you got error - You need to use web encrypted password instead. Check the documentation!
- Go to the login page of your router. (default: 192.168.0.1).
- Type in the password you use to login into the password field.
- Click somewhere else on the page so that the password field is not selected anymore.
- Open the JavaScript console of your browser (usually by pressing F12 and then clicking on "Console").
- Type
document.getElementById("login-password").value; - Copy the returned value as password and use it.
Edit Configuration
You may edit configuration data like:
- Router url
- Password
- Scan interval
- Verify https
To do that:
- Go to the Settings->Devices & services.
- Search for
TP-Link Router, and click on it. - Click on
CONFIGURE - Edit the options you need and click
SUBMIT
Supported routers
Fully tested Hardware Versions
- Archer A7 V5
- Archer AX10 v1.0
- Archer AX12 v1.0
- Archer AX20 v1.0
- Archer AX21 v1.20
- Archer AX23 v1.0
- Archer AX50 v1.0
- Archer AX53 v2
- Archer AX55 v1.0
- Archer AX55 V1.60
- Archer AX72 V1
- Archer AX73 V1
- Archer AX75 V1
- Archer AXE75 V1
- Archer AX3000 V1
- Archer AX6000 V1
- Archer AX11000 V1
- Archer C1200 v2.0 (You need to use web encrypted password)
- Archer C2300 v1.0 (You need to use web encrypted password)
- Archer C6 v2.0
- Archer C6 v3.0
- Archer C6U v1.0
- Archer C7 v5.0
- Archer MR200 v5
- Archer MR200 v5.3
- Archer MR600 v1
- Archer MR600 v3
- Archer VR900v
- Deco M4 2.0
- Deco M4R 2.0
- Deco M5
- Deco M9 Pro
- Deco P7
- Deco X20
- Deco X60
- Deco X90
- Deco XE75 2.0
- TL-WA3001 v1.0
- TL-MR105
- TL-MR6400 v5
- TL-MR6400 v5.3
Not fully tested Hardware Versions
- AD7200 V2
- Archer A6 (V2 and V3)
- Archer A9 V6
- Archer A10 (V1 and V2)
- Archer A20 (V1, V3)
- Archer C7 V4
- Archer C8 (V3 and V4)
- Archer C9 (V4 and V5)
- Archer C59 V2
- Archer C90 V6
- Archer C900 V1
- Archer C1200 V3
- Archer C1900 V2
- Archer C2300 (V1, V2)
- Archer C4000 (V2 and V3)
- Archer C5400 V2
- Archer C5400X V1
- TD-W9960 v1
- TL-WR1043N V5
Please let me know if you have tested integration with one of this or other model. Open an issue with info about router's model, hardware and firmware versions.
Adding Support For More Models
Guidelines CONTRIBUTING.md
Metadata
Owner
Metadata
Home Assistant component for TP-Link router administration with sensors, button reboot, switches and device tracking.