Gigabyte-Z490-Vision-G-Hackintosh-OpenCore
 Gigabyte-Z490-Vision-G-Hackintosh-OpenCore copied to clipboard
OpenCore EFI for running macOS on the Gigabyte Z490 Visison G with an Intel i9 10850K Processor. Supported macOS: Mojava to Tahoe
Gigabyte Z490 Vision G Hackintosh OpenCore
![]()
![]()
![]()
![]()
![]()
![]()
![]()

TABLE of CONTENTS (click to reveal)
- About
- Build Info
- System Specs
- BIOS Settings
- OpenCore Details
- EFI Folder Structure
- About included ACPI Tables
- Disabled Kexts
- Installation
- Installing macOS
- EFI Install Guide for OpenCore
- Post-Install
- Optimizing CPU Power Management (recommended)
- Strengthen Security (recommended)
- Calculating a Scan Policy (optional)
- Patching-in NVIDIA Kepler Drivers
- Changing Themes
- CPU Benchmark
- Credits and Thank yous
About
EFI folder for the Gigabyte Z490 Vision G mainboard I've been working on and refining since September 2020. It's based on Dortania's OpenCore Install Guide and analysis of an .ioreg file from a real iMac20,1. I've dumped the system DSDT, analyzed it and added missing components and features via SSDT Hotpatches from Daliansky's "OC-Little" Repo to get it as close to a real Mac as possible. USB Ports are mapped via ACPI, so no USBPort kext is required. I think this is the most sophisticated Z490 Vision G EFI folder available on Github.
This is a genuine Z490 Vision G EFI, built from scratch. Unlike most pseudo Z490 Vision G EFIs posted on Forums and Repos, which are either based on generically patched DSDTs by Olarila/MaLDon (stay away from those!) or on SchmockLords EFI for the Z490 Vision D, which contains unnecessary DeviceProperties for Tunderbolt, an I219 Ethernet Controller and on-board WiFi/BT. My EFI Folder doesn't contain any of this junk.
Tested successfully with macOS Mojave, Catalina, Big Sur and Monterey.
NOTE: For best results, read and follow the install instruction carefully and thoroughly.
| :warning: Issues related to macOS Monterey/Ventura |
|---|
| The Intel I225-V Ethernet Controller doesn't work in macOS 12+ by default. You need a fix. |
| 600/700-series Nvidia Cards require Geforce Kepler Patcher or OpenCore Legacy Patcher. |
Build Info
System Specs
| Component | Details |
|---|---|
| Board | Gigabyte Z490 Vision G. BIOS: F21. F5 or newer is required to disable CFG Lock. Otherwise enable Kernel Quirk AppleXcpmCfgLock |
| CPU | Intel Core i9 10850K (Comet Lake) |
| RAM | 32 GB DDR4 2400 Crucial Ballistix Sport LT |
| iGPU | Intel UHD 630 (Headless). Use this Framebuffer Patch if you want to use it for driving a display. |
| GPU | Saphire RX580 Nitro+ (4 GB) |
| Audio | Realtek® ALC1220-VB (Layout-id: 17) |
| Ethernet (on-board) | Intel I225-V 2.5GbE. Compatible with macOS 10.15.7 and newer. Requires flashing a custom Firmware for macOS Monterey |
| Ethernet (PCIe) | Intel PRO/1000 PT Dual Port Server Adapter (any macOS). Currently unused. |
BIOS Settings
Click to reveal

- Tweaker [TAB]
- Extreme Memory Profile (XMP): Enabled (if supported by RAM)
- Advanced CPU Settings
- VT-d: Enabled
- Intel Speed Shit: Enabled
- Settings [TAB]
- Platform Power
- Platform Power Management: Disabled
- ErP: Enabled (so USB Power turns off, after PC is shut down)
- IO Ports
- Internal Graphics: enabled (if CPU has integrated graphics). NOTE: The config.plist uses dGPU for Display(s) and iGPU for computational tasks only by default. If you want to use the iGPU to drive a display you need a different Framebuffer Patch (see "EFI Install Instructions" for details).
- OnBoard LAN Controller: Enabled
- Audio Controller: Enabled (if On-Board Sound Card is used)
- Above 4G Decoding: Enabled
- Re-Size BAR Support: Disabled
- IOAPIC 24-119 Entries: Enabled
- Super IO Configuration
- Serial Port: Disabled
- USB Configuration
- Legacy USB Support: Disabled
- XHCI Hand-off: Enabled
- Network Stack Configuration
- Network Stack: Disabled
- Platform Power
- Boot [TAB]
- CFGLock: Disabled (only available on newer BIOS versions)
- Windows 10 Features: Windows 10
- CSM: Disabled (to get rid of legacy code from
DSDT)
OpenCore Details
| Setting | Details |
|---|---|
| SMBIOS | iMac20,2. For i5/i7 CPUs, use iMac20,1. SMBIOS data needs to be generated. I use OCAT for this. |
| macOS Compatibility | macOS 10.14 up to 13.0 beta (10.14 requires iMac19,1 config) |
| OpenCanopy | Enabled |
| Boot Chime | No |
| FileVault | Optional |
| SIP | Disabled. Adjust csr-active-config to your needs. |
| SecureBootModel | j185f. For iMac20,1, use j185. :warning: Set to Disabled if you are usting a Kepler GPU and want to install/run macOS Monterey. |
| USB Port Mapping | Yes, via ACPI. |
EFI Folder Structure
Click to reveal
EFI
├── BOOT
│   └── BOOTx64.efi
└── OC
    ├── ACPI
    │   ├── DMAR.aml
    │   ├── SSDT-AWAC-ARTC.aml
    │   ├── SSDT-DMAC.aml
    │   ├── SSDT-EC-USBX.aml
    │   ├── SSDT-FWHD.aml
    │   ├── SSDT-I225V.aml
    │   ├── SSDT-PLUG.aml
    │   ├── SSDT-PMC.aml
    │   ├── SSDT-PORTS.aml
    │   ├── SSDT-RX580.aml
    │   ├── SSDT-SBUS-MCHC.aml
    │   └── SSDT-XSPI.aml
    ├── Drivers
    │   ├── HfsPlus.efi
    │   ├── OpenCanopy.efi
    │   ├── OpenRuntime.efi
    │   └── ResetNvramEntry.efi
    ├── Kexts
    │   ├── AGPMInjector.kext
    │   ├── AppleALC.kext
    │   ├── CPUFriend.kext
    │   ├── CPUFriendDataProvider.kext
    │   ├── FeatureUnlock
    │   ├── Lilu.kext
    │   ├── NVMeFix.kext
    │   ├── RestrictEvents
    │   ├── SMCProcessor.kext
    │   ├── SMCSuperIO.kext
    │   ├── VirtualSMC.kext
    │   └── WhateverGreen.kext
    ├── OpenCore.efi
    ├── Resources (NOTE: removed files of sub-folders from tree view to reduce clutter)
    │   ├── Font
    │   ├── Image
    │   │   ├── Acidanthera
    │   │   │   ├── Chardonnay
    │   │   │   ├── GoldenGate
    │   │   │   └── Syrah
    │   │   ├── Blackosx
    │   │   │   └── BsxM1
    │   │   └── velickovicdj
    │   │  	└── EnterTwilight
    │   └── Label
    ├── config.plist
    └── config_iMac19,1.plist
About included ACPI Tables
My EFI Folder contains additional ACPI Tables besides the usual, which you won't find in the OpenCore Install Guide. Some of them are board-specific, some of them are modified versions of the regular tables, some are just cosmetic (and therefore disabled by default).
Here's what the extra tables do:
- DMAR (optional): DMAR replacement table without Reserved Memory Regions. Useful in cases where 3rd party LAN/Wifi/BT cards won't work when the Intel I225-V controller is enabled (macOS Big Sur and newer).
- SSDT-AWAC-ARTC: Special variant of
SSDT-AWAC.Disables AWAC Clock and enables RTC as ARTC instead. Also disables legacyHPETdevice. - SSDT-PORTS: OS-agnostic USB Port Mapping Table for the Z490 Vision G. No additional USB Port kext or quirks are required. Since the USB ports are mapped via ACPI they will work in any version of macOS. Check this pdf for a detailed list of mapped ports.
- SSDT-DMAC (optional): Adds a fake Direct Memory Access Controller to the device tree of I/O Registry. Disabled by default since it's cosmetic.
- SDT-FWHD (optional): Adds fake Firmware Hub Device (FWHD) to I/O Registry. Used by almost every intel-based Mac. Disabled by default since it's cosmetic.
- SSDT-PMC (optional): Adds fake Apple-exclusive
PCMRDevice to ACPI. Required for 300-series mainboards but optional on 400-series and newer. Disabled. - SSDT-RX580 (disabled) → Improves Metal Performance on Radeon RX580 cards. See the test results
- SSDT-XSPI (optional, enabled): Adds PCH SPI Controller to IORegistry as
XSPI. So it's not a fake device but probably only a cosmetic change.
NOTE: More info about additional ACPI Tables can be found on my OC Little Repo
Disabled Kexts
The following Kexts are disabled by default since I don't know which CPU, GPU, Hard Disk and SMBIOS you will be using:
AGPMInjector.kext→ Injects Apple Graphics Power Management for the GPU into I/O RegistryCPUFriend.kextandCPUFriendDataProvider.kext. Create your own DataProvider kext using CPUFriendFriend, replace the existing one and enable bothNVMeFix.kext: recommended for all 3rd party NVMe SSD drivesFeatureUnlock: see comments for detailsRestrictEvents: Only required when usingMacPro7,1SMBIOS. Needsrevpatch=autoboot-arg to disable Warning about unpopulated RAM slots.
Installation
Installing macOS
Coming from Windows/Linux: If you are on Windows or Linux, follow the guide provided by Dortania. NOTE: No support from my end for issues related to UBS Installers created in Windows or Linux!
Coming from macOS: If you already have access to macOS, you can either download macOS from the App Store or use ANYmacOS instead. It's a hassle-free app than can download any macOS from High Sierra up to Monterey and create a USB Installer as well.
EFI Install Guide for OpenCore
- Download latest OC EFI Release and unpack it
- Select the config of your choice and rename it to
config.plist - Open
config.plistwith OCAT and adjust the following parameters according to your hardware and software configuration:- Change
csr-active-configbased on the macOS version to disable SIP (when using GeForce Kepler Patcher, you have to disable SIP):- For Big Sur and newer:
67080000(0x867)EF0F0000(0xFEF) if you need to completely disable SIP (required for GeForce Kepler Patcher)
- For Mojave/Catalina:
EF070000(0x7EF) - For High Sierra:
FF030000(0x3FF)
- For Big Sur and newer:
- If you want to use the Intel UHD 630 integrated graphics to drive a display, do the following in
DeviceProperties>Add:- Disable
PciRoot(0x0)/Pci(0x2,0x0)(put##in front of it) - Enable
#PciRoot(0x0)/Pci(0x2,0x0)(delete the#)
- Disable
- Change
- Getting the Intel(R) I225-V Ethernet Controller to work: read this
- Generate SMBIOS data for iMac20,1 or iMac20,2.
- Save the
config.plist - Copy the EFI Folder to a FAT32 formatted USB Stick
- Reboot from USB Stick
- Perform an NVRAM Reset (hit Space Bar to reveal Tools)
- Boot macOS
- If your system boots successfully, mount your ESP and copy over the EFI Folder to you HDD/SSD and reboot.
- Continue with Post-Install!
:warning: IMPORTANT
- Using csr-active-config
EF0F0000also disables incremental system updates on macOS 11 and newer. So everytime an update is available, the full installer will be downloaded. To avoid this, either enable SIP temporarily from the OpenCore GUI or use67080000instead. - AMD GPUs may require additional
boot-args. Check WhateverGreen's documentation for details.
Post-Install
Optimizing CPU Power Management (recommended)
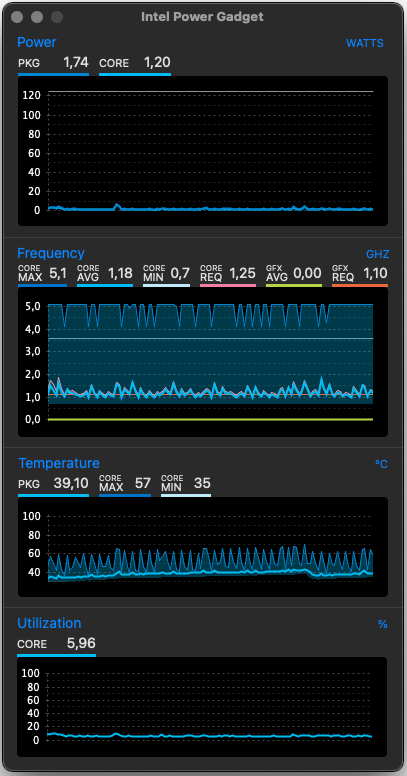
You can follow my guide to use CPUFriendFriend to generate a CPUFriendDataProvider.kext which works alongside CPUFriend.kext to optimize CPU Power Management for a more efficient performance. Have a look at the CPU behavior using Intel Power Gadget. The CPU idle frequency should be lower after adding the kexts:
Screenshot (click to reveal)
Strengthen Security (recommended)
Once you got macOS running, you should change the following settings to make your system more secure:
- Change
csr-active-configto00000000to enable System Integrity Protection (SIP) - Under
UEFI/APFS, changeMinDateandMinVersionfrom-1(disabled) to the correct values for the macOS version you are using. A list with the correct values for can be found here. - Change
SecureBootModelfromDisabledtoj185(for iMac20,1) orj185f(for iMac20,2).
:warning: You should have a working backup of your EFI folder on a FAT32 formatted USB flash drive since changing these settings can prevent the system from booting. You may have to disable them for installing macOS Monterey if you have issues.
NOTES
SecureBootModelis only applicable to macOS Catalina and newer.- Since SMBIOS
iMac20,xis for an iMac with a T2 Security Chip, you won't be notfied about System Updates ifSecureBootModelisDisabled. To workaround this either select the correctSecureBootModelfor your SMBIOS or enable the following Patches in the config.plist:- Skip Board ID check (→ Booter/Patch)
- Reroute HW_BID to OC_BID (→ Booter/Patch)
- Force IOGetVMMPresent (→ Kernel/Patch)
- Reroute kern.hv_vmm_present patch (1) (→ Kernel/Patch)
- Reroute kern.hv_vmm_present patch (2) (→ Kernel/Patch)
Calculating a Scan Policy (optional)
The items displayed in the Boot Picker Menu are based on a combination of bits representing supported devices (SATA, NVME, USB, etc.) and file systems (APFS, HFS, NTFS, etc.). There are 24 bits which can be turned on and off to modify what's displayed in the Boot Picker. The combination of selected bits create what's called the ScanPolicy. It's located under Misc > Security in the config.plist. The default value of my EFI is 0 (everything). Although this is great for compatibility, it will also display EFI Folders on drives which are not the boot drive as well.
To change the ScanPolicy to your liking, you can make use of this online calculator: https://oc-scanpolicy.vercel.app/. I am using 2687747 for example which hides EFI Folders and NTFS Drives. If I need windows I just boot it from the BIOS Boot Menu (F12).
:warning: IMPORTANT: Calculating a wrong ScanPolicy can lead to the Boot Picker being empty, so you can't boot into macOS. So make sure you have a working Backup of your EFI folder.
Patching-in NVIDIA Kepler Drivers
Apple removed support for NVIDIA GeForce Cards from macOS Monterey beta 7. So users of GPUs from the Kepler family need to patch them back in in post-install using Geforce-Kepler-Patcher.
Requirements
- Set
Misc/Security/SecureBootModeltoDisabled - Set
csr-active-configtoEF0F0000
Changing Themes
Besides the included themes from Acidanthera which provide the standard macOS look and feel, I've added 2 additional ones: BsxM1 (default) and EnterTwilight. To change them, do the following:
- Open
config.plist - Go to Misc > Boot and change
PickerVariantto:Blackosx\BsxM1orvelickovicdj\EnterTwilight - Save and reboot
To revert these changes, enter Acidanthera\GoldenGate as PickerVariant and change the Flavour of the NVRAM Reset Tool back to Auto.
NOTE: For more config tips and tricks, you can check out this.
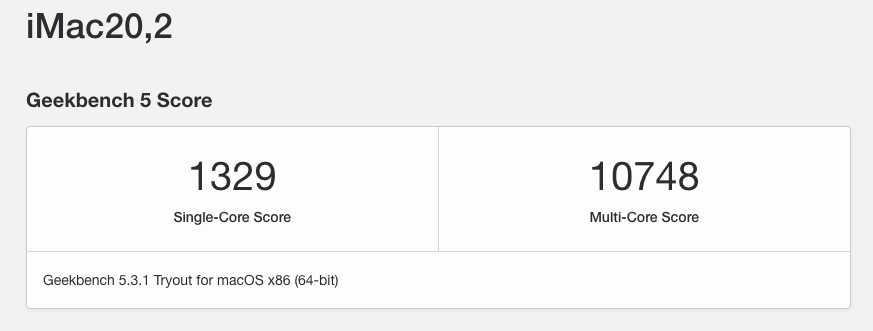
CPU Benchmark
Credits and Thank yous
- Acidanthera and Team for the OpenCore Bootloader
- Dortania for OpenCore Install Guide
- Corpnewt for SSDTTime, GenSMBIOS and ProperTree
- daliansky for OC Little ACPI Hotpatch Collection
- SL-Soft for Kext Updater and ANYmacOS
- Chris1111 for GeForce Kepler Patcher
- jsassu20 for MacDown Markdown Editor