wazuh-documentation
 wazuh-documentation copied to clipboard
[SSO] Considering adding a new section for the configuration of ODFE and different SAML providers
Hello team,
Opendistro has many security features that we may consider to add as a guide in our documentation.
Introduction
In this guide, you can find some instructions to configure Single Sign On in Kibana using several Identity Providers (IdP) and the Open Distro for Elasticsearch Security plugin.
The guide assumes you already have an Open Distro installation. You can find instructions to install Open Distro for Elasticsearch in the Open Distro documentation: https://opendistro.github.io/for-elasticsearch-docs/docs/install/
The IdP covered are:
- Okta
- Azure Active Directory
- PingOne
- Jumpcloud
Required parameters
We will need to know some parameters to make the configurations:
idp.metadata_url: URL to a XML file that contains metadata information about the application configured on the IdP side. It's used instead ofidp.metadata_fileidp.metadata_file: XML File that contains the Metadata information about the application configured on the IdP side. It's used instead ofidp.metadata_urlidp.entity_id: Entity ID of the Identity Provider.sp.entity_id: Entity ID of the Service Provider.kibana_url: URL to access Kibana.roles_key: The attribute in the SAML assertion where the roles/groups are sent.exchange_key: The key that will be used to sign the assertions.
Identity Providers
Okta
Okta
Web: https://www.okta.com/
Steps list:
1- Create an account in Okta. Request a free trial if you don't have a paid license. 2- Create a new user. This step can be skipped if you are just testing, you can use your Okta admin user for the example. 3- Create a new group. 4- Add the new user to the new group. 5- Create a new app. Configure the SAML settings while you create the app. 6- Add the new app to the new group. 7- Note the necessary parameters from the new app's SAML settings. 8- Configure Open Distro security configuration files. 9- Run the Open Distro security admin script to apply the changes made to the configuration files. 10- Configure the Kibana configuration file. 11- Restart Kibana. 12- Test the configuration.
Detailed steps:
1- Create an account in Okta. Request a free trial if you don't have a paid license.
2- Create a new user. This step can be skipped if you are just testing, you can use your Okta admin user for the example.
Go to Directory → People


3- Create a new group.
Go to Directory → Groups and add a group.


The name you give to your group will be used in the configuration. It will be our backend_roles in roles_mapping.yml.
4- Add the new user to the new group.
Go to Directory → Groups → your group. Click on Manage People. Add your user and save the changes.

5- Create a new app. Configure the SAML settings while you create the app.
Go to Applications → Applications and click on Add Aplication and then Create New App.


In the Create a New Application Integration window, select Web platform and SAML 2.0 sign-on method:

We will be sent to the application configuration. The name of the example application is wazuh-odfe-app:

As Single sign on URL, write <kibana_url>/_opendistro/_security/saml/acs (put the correct values in your case). As Audience URI (SP Entity ID) write wazuh-saml. This wazuh-saml will be the sp.entity_id in our Open Distro configuration.
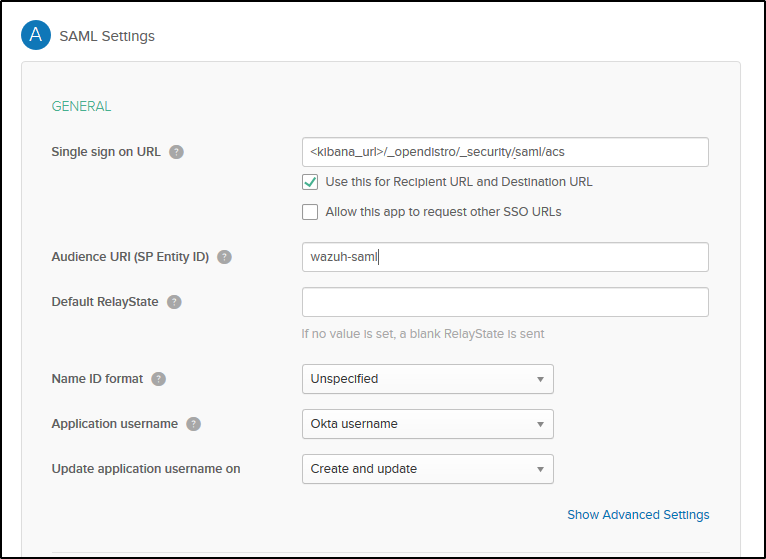
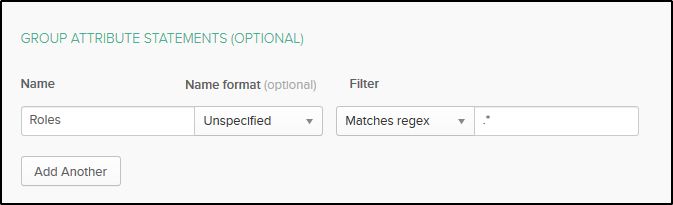
In the Group Attribute Statements section, we will put Roles as the name. Roles will be our roles_key parameter in the Open Distro configuration. In value, select Matches regex and type .*:
6- Add the new app to the new group.
Go to Directory → Groups → your group. Click on Manage Apps. Add your app and save the changes.
7- Note the necessary parameters from the new app's SAML settings.
The parameters we already have are:
sp.entity_idroles_keykibana_url
To have the remaining parameters we need to go to Applications → Applications → your app → Sign On.
Copy the Identity Provider metadata URL. It will be the idp.metadata_url:

Now, in the same page, click on View Setup Instructions. Copy the Identity Provider Issuer URL, it will be our idp.entity_id.
The X.509 Certificate will be our exchange_key:

This information can also be found in the metadata XML file.
8- Configure Open Distro security configuration files.
We will need to configure some files in /usr/share/elasticsearch/plugins/opendistro_security/securityconfig/. The files we will configure are config.yml, roles_mapping.yml, roles.yml and internal_users.yml
- config.yml
Under the authc section, we have to include a saml_auth_domain configuration similar to the following:
          saml_auth_domain:
            http_enabled: true
            transport_enabled: true
            order: 1
            http_authenticator:
              type: saml
              challenge: true
              config:
                idp:
                  metadata_url: https://....okta.com/app/.../sso/saml/metadata
                  entity_id: http://www.okta.com/...
                sp:
                  entity_id: wazuh-saml
                kibana_url: https://<kibana_url>
                roles_key: Roles
                exchange_key: '...'
            authentication_backend:
              type: noop
The order should be lower than the one in basic_internal_auth_domain.
- internal_users.yml
We will create a user:
wazuh_admin:
  hash: $2y$12$gddqUUijvzAx/QFunvdNzeu3gN/VU7hwtz.QL4Rywwg9crog1wAvG
  reserved: no
  backend_roles:
  - "admin"
  description: "Wazuh admin user"
- roles.yml
We will create a role for our user. In my case, the role is service_wazuh_admin_role and has full privileges:
service_wazuh_admin_role:
  reserved: true
  index_permissions:
    - index_patterns:
      - "*"
      allowed_actions:
      - "*"
  tenant_permissions:
    - tenant_patterns:
      - "*"
      allowed_actions:
      - kibana_all_write
  cluster_permissions:
    - "*"
- roles_mapping.yml
We will map our user to the role that we created and the role that we have in Okta:
service_wazuh_admin_role:
  reserved: true
  users:
  - "wazuh_admin"
  backend_roles:
  - "<group_name>"
Replace <group_name> with the name you gave to your group in Step 3.
9- Run the Open Distro security admin script to apply the changes made to the configuration files.
If we want these configuration files to take effect, we have to run the security admin script. This configuration will be stored in an internal index.
bash /usr/share/elasticsearch/plugins/opendistro_security/tools/securityadmin.sh -f /usr/share/elasticsearch/plugins/opendistro_security/securityconfig/<file>.yml -icl -key /usr/share/elasticsearch/config/<cert_key>.pem -cert /usr/share/elasticsearch/config/<cert>.pem -cacert /usr/share/elasticsearch/config/<ca_cert>.pem -h <ES_IP_or_hostname> -nhnv
We have to run the previous command (modifying the values in brackets) for all the configuration files.
10- Configure the Kibana configuration file.
We have to add these two lines in kibana.yml:
opendistro_security.auth.type: "saml"
server.xsrf.whitelist: ["/_opendistro/_security/saml/acs/idpinitiated", "/_opendistro/_security/saml/acs", "/_opendistro/_security/saml/logout"]
11- Restart Kibana.
12- Test the configuration.
Go to your Kibana URL and log in with your Okta account.
Azure Active Directory
Azure Active Directory
Web: https://portal.azure.com/ Note that you will have to request a free trial at least to make the configuration. You can do it in the process.
Steps list:
1- Create a Microsoft account or use your own one if you already have one.
2- Go to https://portal.azure.com/ and sign in with your Microsoft account.
3- Create an app in Azure Active Directory:
4- Create a role for your application.
5- Assign a user to the app.
6- Configure Single sign-on.
7- Note the necessary parameters.
8- Configure Open Distro security configuration files.
9- Run the Open Distro security admin script to apply the changes made to the configuration files.
10- Configure the Kibana configuration file.
11- Restart Kibana.
12- Test the configuration.
Detailed steps:
1- Create a Microsoft account or use your own one if you already have one.
2- Go to https://portal.azure.com/ and sign in with your Microsoft account.
3- Create an app in Azure Active Directory:
Go to Azure Active Directory → Enterprise applications and create a new application:


Select Integrate any other application you don't find in the gallery. Give a name to your application and click Add. I named my application wazuh-sso, but the name will not be used in the configuration.
4- Create a role for your application.
Go back to Azure Active Directory and click on App registrations:

Select your new app and click Manifest.

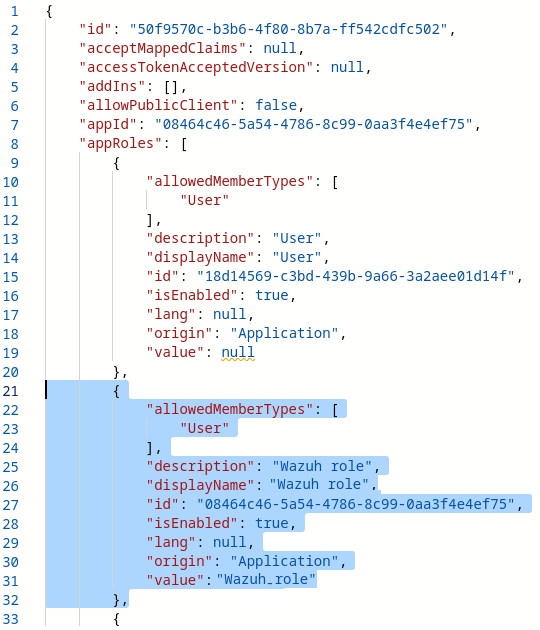
Add a new role to your application's Manifest:
		{
			"allowedMemberTypes": [
				"User"
			],
			"description": "Wazuh role",
			"displayName": "Wazuh_role",
			"id": "<application_id>",
			"isEnabled": true,
			"lang": null,
			"origin": "Application",
			"value": "Wazuh_role"
		},
description: can be any value that you want.idshould be your application's ID. You can find it in the application's overview menu or at the top of the Manifest in the fieldappId.valuewill define the name of the role. In this case,Wazuh_rolewill be our value for the role to be mapped on the roles_mapping.yml file.displayNameshould be the same asvalue.
Don't forget to save the changes.
5- Assign a user to the app.
In Azure Active Directory, go to Enterprise applications → your application → Assign users and groups (or Users and Groups in the pannel to the left):

Assign your user and select the role we created in Manifest.

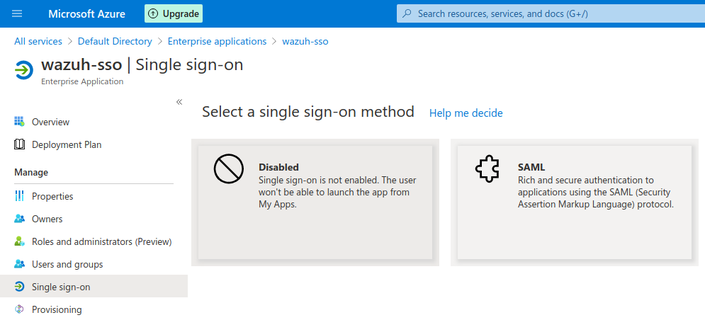
6- Configure Single sign-on.
Go to Enterprise applications → your application → Set up single sign on -> SAML

- In Step 1
Basic SAML Configuration, setwazuh-samlasIdentifier (Entity ID)andhttps://<kibana_url>/_opendistro/_security/saml/acsasReply URL (Assertion Consumer Service URL).

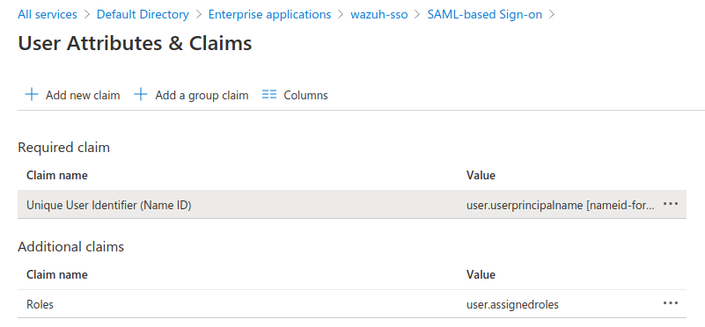
- In Step 2
User Attributes & Claims, clickAdd new claim. SelectRolesas the name anduser.assignedrolesasSource attribute. This claim will be mapped withroles_keyon the Open Distro configuration.
7- Note the necessary parameters.
Still in the same menu Enterprise applications → your application → Single sign-on, let's note some parameters we will need in the Open Distro configuration.
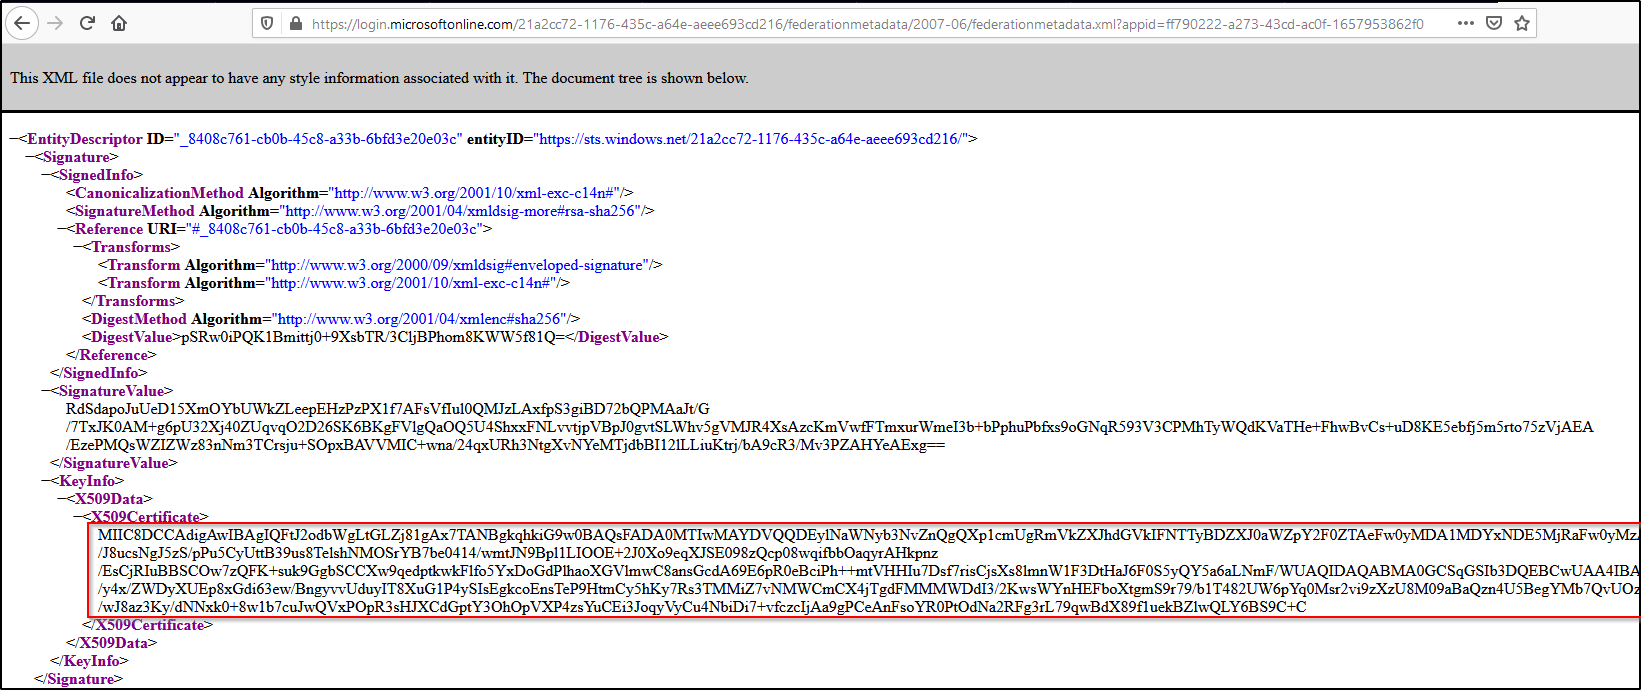
- In Step 3
SAML Signing Certificate,App Federation Metadata Urlwill be ouridp.metadata_url. Go to the metadata URL using your web browser and note theX509Certificate. It will be ourexchange_key:
- In Step 4
Set up <your application>, theAzure AD Identifierwill be ouridp.entity_id.
8- Configure Open Distro security configuration files.
We will need to configure some files in /usr/share/elasticsearch/plugins/opendistro_security/securityconfig/. The files we will configure are config.yml, roles_mapping.yml.
- config.yml
Under the authc section, we have to include a saml_auth_domain configuration similar to the following:
          saml_auth_domain:
            http_enabled: true
            transport_enabled: false
            order: 1
            http_authenticator:
              type: saml
              challenge: true
              config:
                idp:
                  metadata_url: https://login.microsoftonline.com/...
                  entity_id: https://sts.windows.net/...
                sp:
                  entity_id: wazuh-saml
                kibana_url: https://<kibana_url>
                roles_key: Roles
                exchange_key: '...'
            authentication_backend:
              type: noop
In order for this to work we should also change the challenge: true of the basic_internal_auth_domain to challenge: false. The roles_key should be the same value that we used on step 6.2.
- roles_mapping.yml
We will map the role that we have in Azure AD to the admin role on Elasticsearch. In my case, Wazuh_role:
all_access:
  reserved: false
  backend_roles:
  - "admin"
  - "Wazuh_role"
  description: "Maps admin to all_access"
9- Run the Open Distro security admin script to apply the changes made to the configuration files.
If we want these configuration files to take effect, we have to run the security admin script. This configuration will be stored in an internal index.
bash /usr/share/elasticsearch/plugins/opendistro_security/tools/securityadmin.sh -f /usr/share/elasticsearch/plugins/opendistro_security/securityconfig/<file>.yml -icl -key /usr/share/elasticsearch/config/<cert_key>.pem -cert /usr/share/elasticsearch/config/<cert>.pem -cacert /usr/share/elasticsearch/config/<ca_cert>.pem -h <ES_IP_or_hostname> -nhnv
We have to run the previous command (modifying the values in brackets) for all the configuration files.
10- Configure the Kibana configuration file.
We have to add these two lines in kibana.yml:
opendistro_security.auth.type: "saml"
server.xsrf.whitelist: ["/_opendistro/_security/saml/acs/idpinitiated", "/_opendistro/_security/saml/acs", "/_opendistro/_security/saml/logout"]
11- Restart Kibana.
12- Test the configuration.
PingOne
PingOne
Web: https://www.pingidentity.com/
Steps list:
1- Create an account in Ping Identity. Request a free trial if you don't have a paid license.
2- Go to https://console.pingone.com/ and sign in with your Ping Identity account.
3- Create an app in Connections
4- Create a group and assign users
5- Activate application and note the necessary parameters.
6- Configure Open Distro security configuration files.
7- Run the Open Distro security admin script to apply the changes made to the configuration files.
8- Configure the Kibana configuration file.
9- Restart Kibana.
10- Test the configuration.
Detailed steps:
1- Create an account in Ping Identity. Request a free trial if you don't have a paid license.
2- Go to https://console.pingone.com/ and sign in with your Ping Identity account.
3- Create an app in Connections
Go to Connections -> Applications -> Add Application. Select Web App and then SAML -> Configure


Give a name to your application and click Next. I named my application wazuh-sso, but the name will not be used in the configuration.
Select Manually Enter on the Provide App Metadata

Add the proper configuration:
ACS URLS: https://<kibana_url>/_opendistro/_security/saml/acs
ENTITY ID: wazuh-saml
SLO ENDPOINT: https://<kibana_url>/
SLO BINDING: HTTP Redirect
ASSERTION VALIDITY DURATION: 3600 (for 1 hour token validity)
VERIFICATION CERTIFICATE (OPTIONAL): Load a PUBLIC CERTIFICATE that corresponds to the PRIVATE KEY that is going to be used on the sp.signature_private_key_filepath of the config.yml ODFE configuration file. This is necessary as all the logout requests must be signed
On the Next configuration page Attribute Mapping select ADD ATTRIBUTE with the following configuration:
Group Names = Roles

Save & Close
4- Create a group and assign users
Go to Identities -> Groups -> +
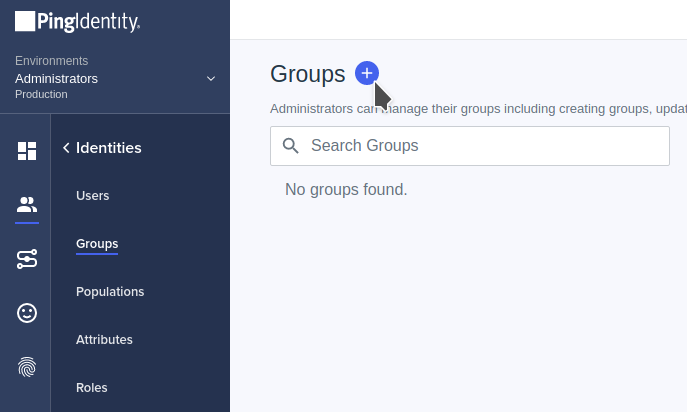
Select the name of the Group, in this case Role (this corresponds with the value that we are going to use on the roles_mapping.yml ODFE configuration file).
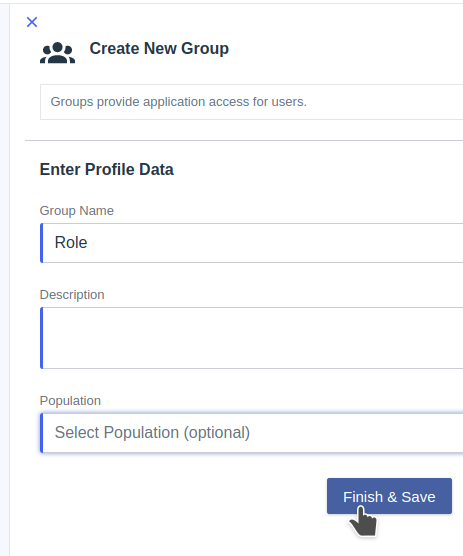
Finish & Save
Now open the created Group and go to Members -> Add Members Manually

Add all the members that you want to use to login to Kibana.
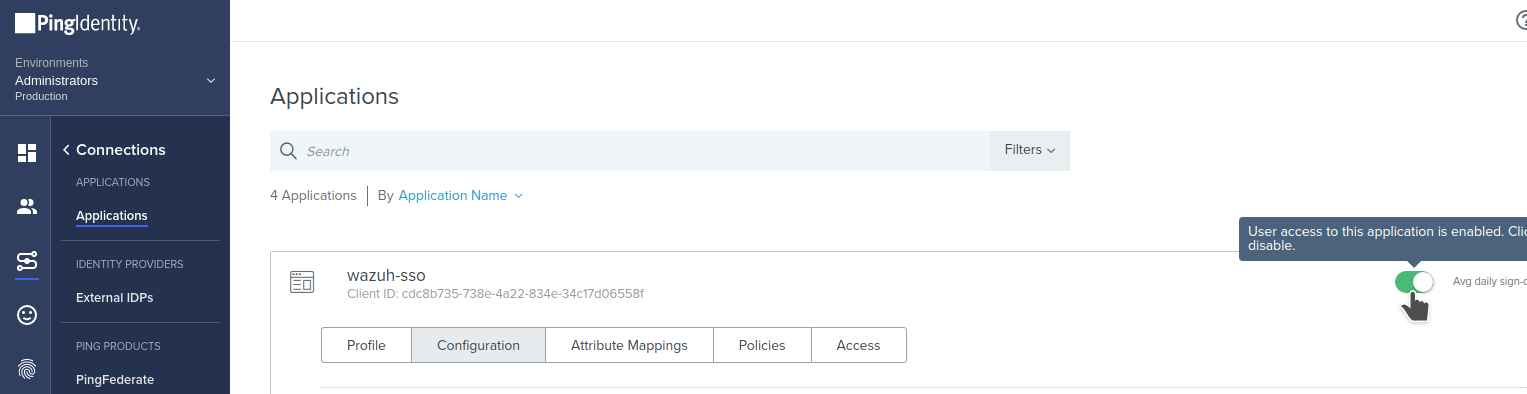
**5- Activate application and note the necessary parameters.
Go to Connections -> Applications and click on the enablement control for the application.
Now we should take note of the following parameters to use on the next step:
ISSUER ID : it'll be on the form https://auth.pingone.com/....
IDP METADATA URL
If you open IDP METADATA URL you'll find the X509Certificate section will be our exchange_key:
6- Configure Open Distro security configuration files.
We will need to configure some files in /usr/share/elasticsearch/plugins/opendistro_security/securityconfig/. The files we will configure are config.yml, roles_mapping.yml.
- config.yml
Under the authc section, we have to include a saml_auth_domain configuration similar to the following:
          saml_auth_domain:
            http_enabled: true
            transport_enabled: false
            order: 1
            http_authenticator:
              type: saml
              challenge: true
              config:
                idp:
                  metadata_url: IDP METADATA URL
                  entity_id: ISSUER ID
                sp:
                  entity_id: wazuh-saml
                  signature_private_key_filepath: PRIVATE_KEY
                  forceAuthn: true
                kibana_url: https://<kibana_url>
                roles_key: Roles
                exchange_key: 'X509Certificate'
            authentication_backend:
              type: noop
In order for this to work we should also change the challenge: true of the basic_internal_auth_domain to challenge: false
- roles_mapping.yml
We will map the Group that we have in PingOne to the admin role on Elasticsearch. In my case, Role:
all_access:
  reserved: false
  backend_roles:
  - "admin"
  - "Role"
  description: "Maps admin to all_access"
7- Run the Open Distro security admin script to apply the changes made to the configuration files.
If we want these configuration files to take effect, we have to run the security admin script. This configuration will be stored in an internal index.
bash /usr/share/elasticsearch/plugins/opendistro_security/tools/securityadmin.sh -f /usr/share/elasticsearch/plugins/opendistro_security/securityconfig/<file>.yml -icl -key /usr/share/elasticsearch/config/<cert_key>.pem -cert /usr/share/elasticsearch/config/<cert>.pem -cacert /usr/share/elasticsearch/config/<ca_cert>.pem -h <ES_IP_or_hostname> -nhnv
We have to run the previous command (modifying the values in brackets) for all the configuration files.
8- Configure the Kibana configuration file.
We have to add these two lines in kibana.yml:
opendistro_security.auth.type: "saml"
server.xsrf.whitelist: ["/_opendistro/_security/saml/acs/idpinitiated", "/_opendistro/_security/saml/acs", "/_opendistro/_security/saml/logout"]
9- Restart Kibana.
10- Test the configuration.
Web: https://workspace.google.com/
Steps list:
1- Create an account in Google Workspace. Request a free trial if you don't have a paid license.
2- Go to https://admin.google.com/ac/apps/unified and sign in with your Google Admin account.
3- Create and app with Add custom SAML app
4- Turn ON acces for everyone
5- Define attribute for users
6- Configure Open Distro security configuration files.
7- Run the Open Distro security admin script to apply the changes made to the configuration files.
8- Configure the Kibana configuration file.
9- Restart Kibana.
10- Test the configuration.
Detailed steps:
1- Create an account in Google Workspace. Request a free trial if you don't have a paid license.
2- Go to https://admin.google.com/ac/apps/unified and sign in with your Google Admin account.
3- Create and app with Add custom SAML app
Go to Add App -> Add custom SAML app. Enter an App name and Continue

We should take note of the following parameters to use on the ODFE configuration:
Entity ID
Select DOWNLOAD METADATA and keep this file. It will need to be uploaded to some web server (or store it on a specific folder to access it locally by the server) in order to use it on the ODFE configuration file

After this, select Continue.
Add the proper configuration:
ACS URL: https://<kibana_url>/_opendistro/_security/saml/acs
ENTITY ID: wazuh-saml
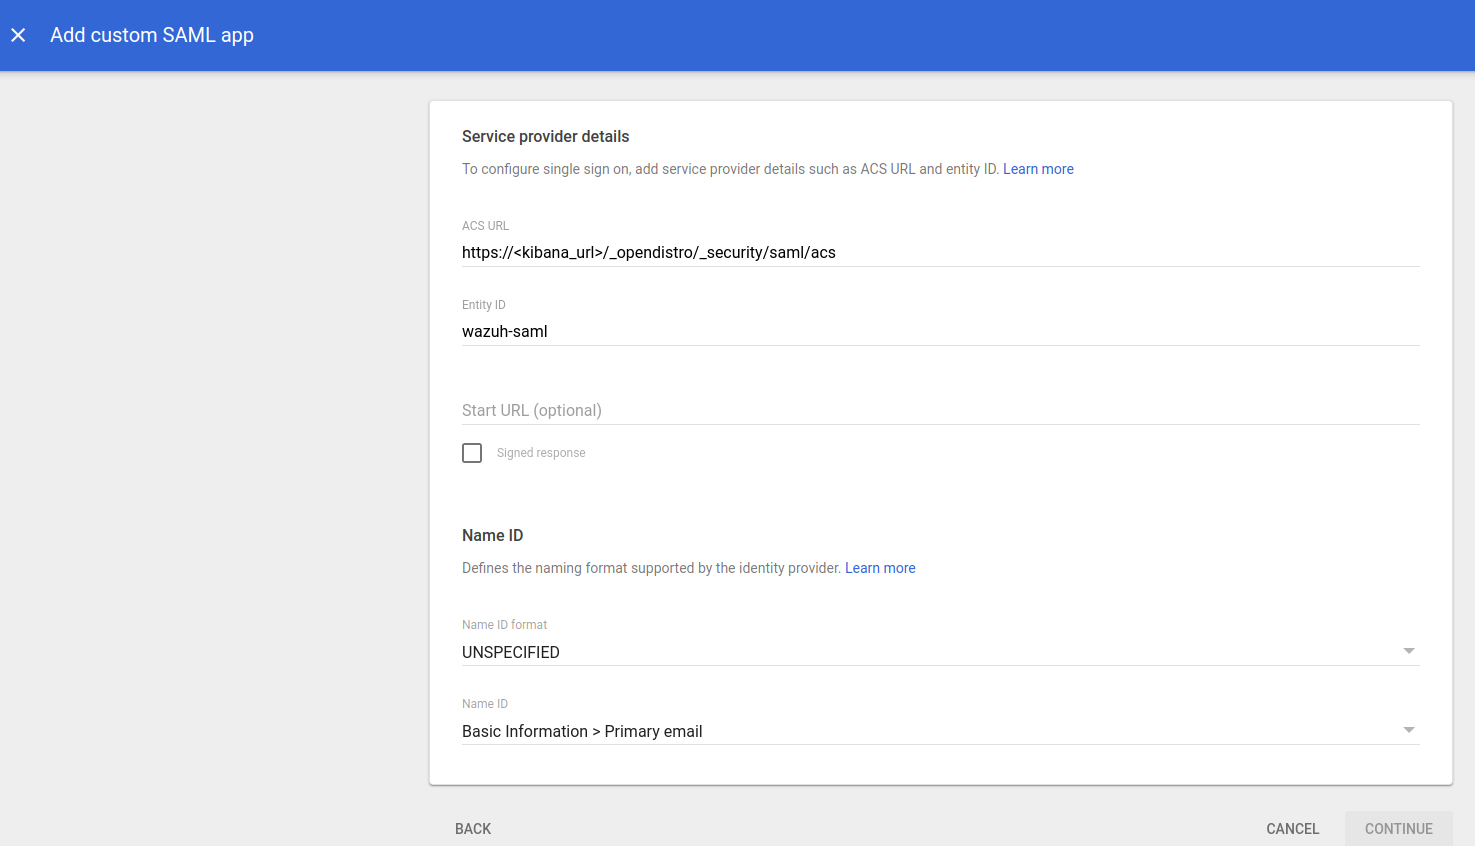
The rest remains as default, select CONTINUE
Google doesn't support sending the Group membership attribute as part of the SAML Assertion (as the other Identity Providers do) so in this example we are going to use Department as the attribute that will matched against the Elasticsearch role. In this case the Departmentattribute will be stored as Roles:
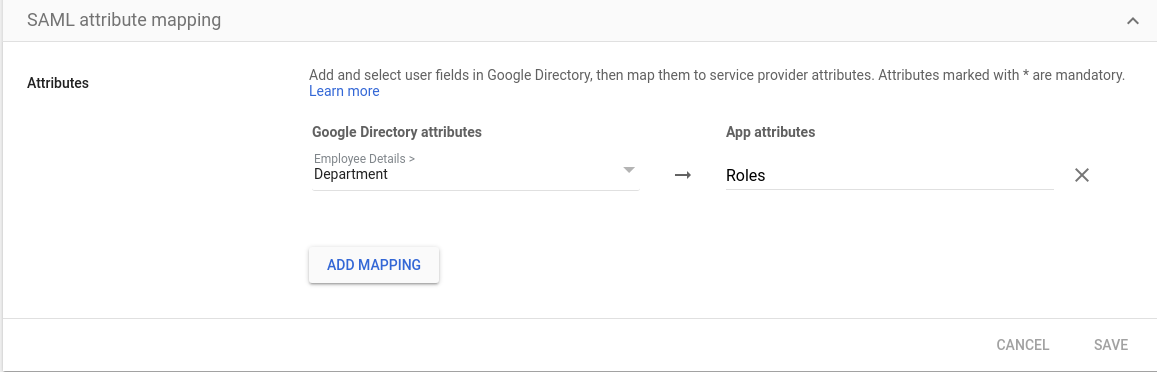
Select FINISH.
4- Turn ON acces for everyone
Select you recently create app and go into User access

Select ON for everyone and Save
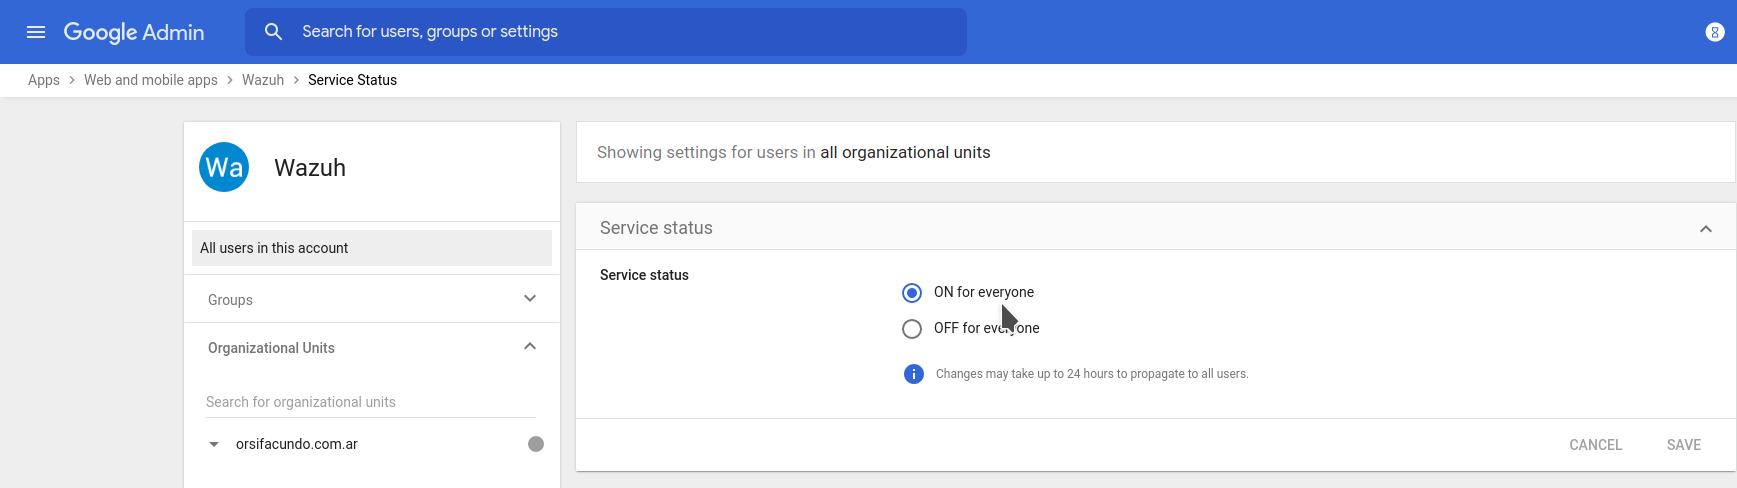
You can also control the App access through Groups (not covered on this guide).
5- Define attribute for users
Go to Directory -> Users

Select a user and go to User information then edit Employee information
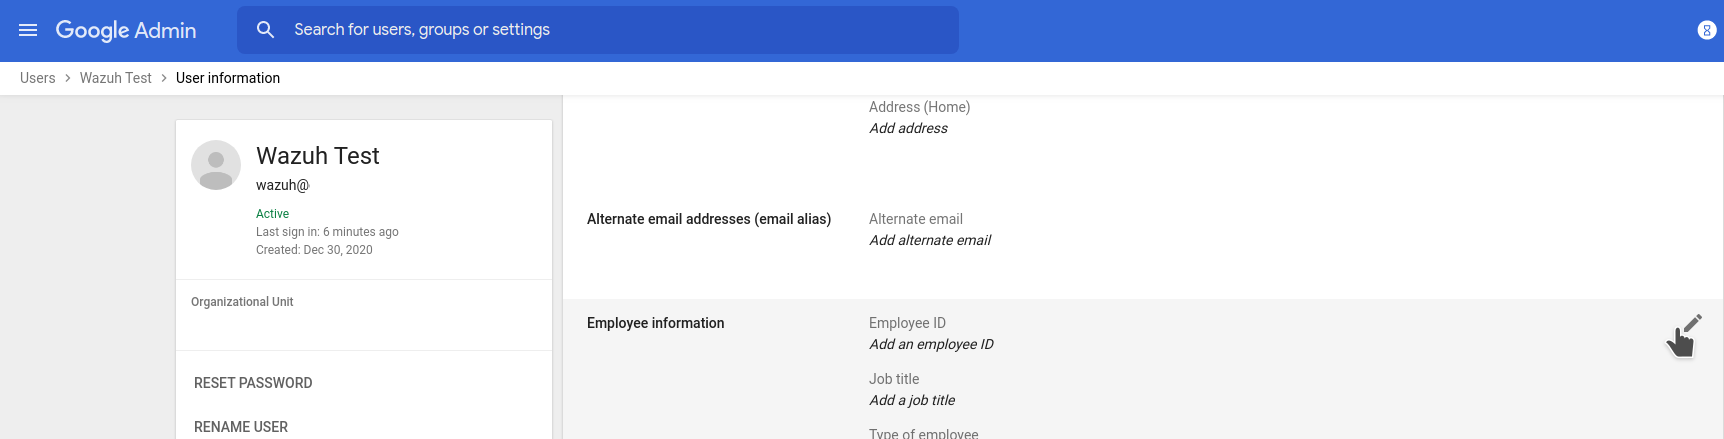
Add a value on Department in this example Wazuh_access and Save

6- Configure Open Distro security configuration files.
We will need to configure some files in /usr/share/elasticsearch/plugins/opendistro_security/securityconfig/. The files we will configure are config.yml, roles_mapping.yml.
- config.yml
Under the authc section, we have to include a saml_auth_domain configuration similar to the following:
          saml_auth_domain:
            http_enabled: true
            transport_enabled: false
            order: 1
            http_authenticator:
              type: saml
              challenge: true
              config:
                idp:
                  metadata_url: DOWNLOADED METADATA URL
                  entity_id: ENTITY ID
                sp:
                  entity_id: wazuh-saml
                kibana_url: https://<kibana_url>
                roles_key: Roles
                exchange_key: 'X509Certificate'
            authentication_backend:
              type: noop
Note: the parameter metadata_url can be changed by metadata_file and use a local path where the downloaded metadata files is going to be stored.
In order for this to work we should also change the challenge: true of the basic_internal_auth_domain to challenge: false
- roles_mapping.yml
We will map the Department attribute value that we have in Google to the admin role on Elasticsearch. In my case, Wazuh_access:
all_access:
  reserved: false
  backend_roles:
  - "admin"
  - "Wazuh_access"
  description: "Maps admin to all_access"
7- Run the Open Distro security admin script to apply the changes made to the configuration files.
If we want these configuration files to take effect, we have to run the security admin script. This configuration will be stored in an internal index.
bash /usr/share/elasticsearch/plugins/opendistro_security/tools/securityadmin.sh -f /usr/share/elasticsearch/plugins/opendistro_security/securityconfig/<file>.yml -icl -key /usr/share/elasticsearch/config/<cert_key>.pem -cert /usr/share/elasticsearch/config/<cert>.pem -cacert /usr/share/elasticsearch/config/<ca_cert>.pem -h <ES_IP_or_hostname> -nhnv
We have to run the previous command (modifying the values in brackets) for all the configuration files.
8- Configure the Kibana configuration file.
We have to add these two lines in kibana.yml:
opendistro_security.auth.type: "saml"
server.xsrf.whitelist: ["/_opendistro/_security/saml/acs/idpinitiated", "/_opendistro/_security/saml/acs", "/_opendistro/_security/saml/logout"]
9- Restart Kibana.
10- Test the configuration.
Jumpcloud
Jumpcloud
Web: https://jumpcloud.com/
Steps list:
1- Create an account in Jumpcloud. Request a free trial if you don't have a paid license. 2- Create a new user. This step can be skipped if you are just testing, you can use your Jumpcloud admin user for the example. 3- Create a new group and assign the user 4- Create a new app. Configure the SAML settings while you create the app. 5- Note the necessary parameters from the new app's SAML settings. 6- Configure Open Distro security configuration files. 7- Run the Open Distro security admin script to apply the changes made to the configuration files. 8- Configure the Kibana configuration file. 9- Restart Kibana. 10- Test the configuration.
Detailed steps:
1- Create an account in Jumpcloud. Request a free trial if you don't have a paid license.
2- Create a new user. This step can be skipped if you are just testing, you can use your Jumpcloud admin user for the example.
Go to User Management -> Users -> (+) -> Manual user entry

3- Create a new group and assign the user
Go to User Management -> User Groups -> (+)

The name you give to your group will be used in the configuration. It will be our backend_roles in roles_mapping.yml.
Then go to the Users tab and select the newly created user.

Save the changes.
4- Create a new app. Configure the SAML settings while you create the app.
Go to SSO -> (+) -> Custom SAML App

Complete the SSO tab with the appropriate information


IdP Entity ID: wazuh (this will be the idp.entity_id in our Open Distro configuration)
SP Entity ID: wazuh-saml (this will be the sp.entity_id in our Open Distro configuration)
ACS URL: https://<kibana_url>/_opendistro/_security/saml/acs
Check Sign Assertion
Check Declare Redirect Endpoint
Check include group attribute and add Roles as the attribute
The rest of the options have the default values.
On the User Groups tab select the Group created previously
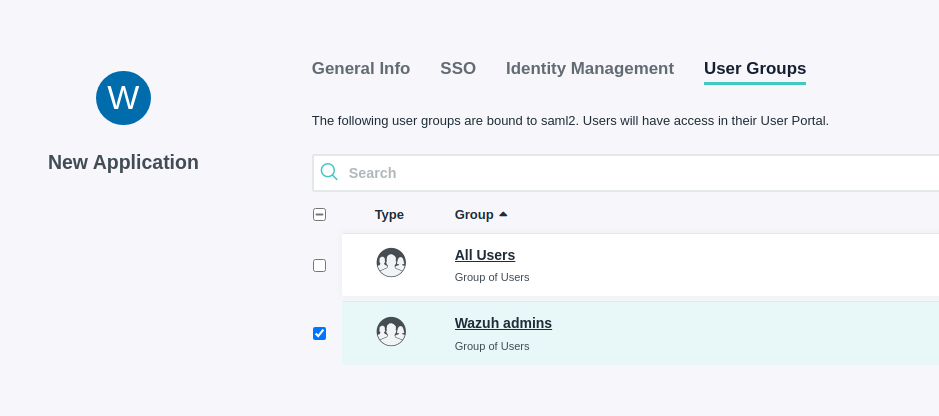
Click Activate
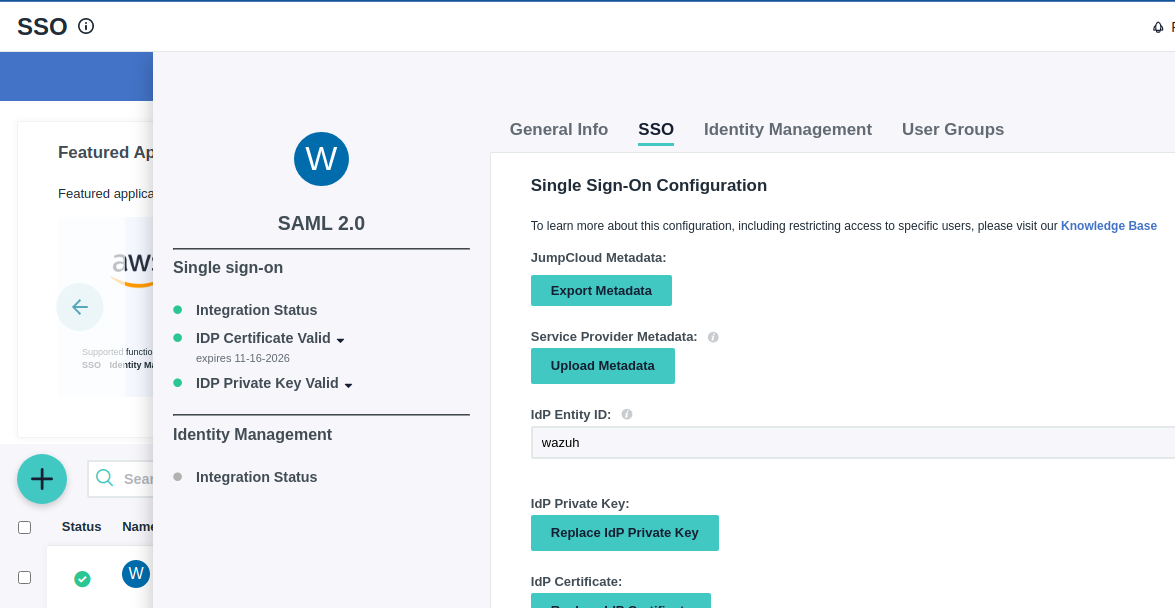
5- Note the necessary parameters from the new app's SAML settings.
Open the recently created application and go to the SSO tab, select Export Metadata
6- Configure Open Distro security configuration files.
We will need to configure some files in /usr/share/elasticsearch/plugins/opendistro_security/securityconfig/. The files we will configure are config.yml and roles_mapping.yml
- config.yml
Under the authc section, we have to include a saml_auth_domain configuration similar to the following:
          saml_auth_domain:
            http_enabled: true
            transport_enabled: true
            order: 1
            http_authenticator:
              type: saml
              challenge: true
              config:
                idp:
                  metadata_file:
                  entity_id: wazuh
                sp:
                  entity_id: wazuh-saml
                kibana_url: https://<kibana_url>
                roles_key: Roles
                exchange_key: '...'
            authentication_backend:
              type: noop
The order should be lower than the one in basic_internal_auth_domain.
- roles_mapping.yml
We will map our user to the role that we created and the role that we have in Jumpcloud:
all_access:
  reserved: false
  backend_roles:
  - "admin"
  - "Wazuh admins"
  description: "Maps admin to all_access"
7- Run the Open Distro security admin script to apply the changes made to the configuration files.
If we want these configuration files to take effect, we have to run the security admin script. This configuration will be stored in an internal index.
bash /usr/share/elasticsearch/plugins/opendistro_security/tools/securityadmin.sh -f /usr/share/elasticsearch/plugins/opendistro_security/securityconfig/<file>.yml -icl -key /usr/share/elasticsearch/config/<cert_key>.pem -cert /usr/share/elasticsearch/config/<cert>.pem -cacert /usr/share/elasticsearch/config/<ca_cert>.pem -h <ES_IP_or_hostname> -nhnv
We have to run the previous command (modifying the values in brackets) for all the configuration files.
8- Configure the Kibana configuration file.
We have to add these two lines in kibana.yml:
opendistro_security.auth.type: "saml"
server.xsrf.whitelist: ["/_opendistro/_security/saml/acs/idpinitiated", "/_opendistro/_security/saml/acs", "/_opendistro/_security/saml/logout"]
9- Restart Kibana.
10- Test the configuration.
Troubleshooting
- If something is wrong, you will get an error, commonly
samlAuthErrororsamlConfigError. The best way to troubleshoot this is to look at the SAML response. Open the web browser's Dev Tools (F12), go to theNetworkmenu and try to log in Kibana. Just before the error, you will probably see a POST request that contains the SAML response. It is in base64, so you will need to decode it and beautify the resultant XML.
Base64 decoder: https://www.base64decode.org/ XML formatter: https://www.freeformatter.com/xml-formatter.html
You can check the SAML response and see if something like the Roles configuration is missing.
SAML Tracer is a browser extension that can also be used in order to obtain the SAML assertion already decoded:
- For Chrome: https://chrome.google.com/webstore/detail/saml-tracer/mpdajninpobndbfcldcmbpnnbhibjmch?hl=en
- For Firefox: https://addons.mozilla.org/en-US/firefox/addon/saml-tracer/
- Enable debug logs. Open the file /etc/elasticsearch/log4j2.properties and add the following lines:
logger.token.name = com.amazon.dlic.auth.http.saml.Token
logger.token.level = debug
- Run Elasticsearch or Kibana in debug mode.
More information
https://opendistro.github.io/for-elasticsearch-docs/docs/security/configuration/saml/
Can someone elaborate under "details" for 9- Run the Open Distro security admin script to apply the changes made to the configuration files.
Hi team!
We will add instructions for SSO login using "onelogin" IDP application
Website: [https://www.onelogin.com]
Steps list:
1- Create an account in onelogin. Request a free trial if you don't have a paid license.
2-Add the onelogin extension in your browser
3- Create a new user. This step can be skipped if you are just testing, you can use your onelogin admin user for the example.
4- Create a new app using the "SAML Custom Connector (Advanced)" template. Configure the SAML settings while you create the app.
5- Add the created user to the new app.
6-Get the metada.xml file and X.509 certificate from the application
7- Configure Open Distro security configuration files.
8- Run the Open Distro security admin script to apply the changes made to the configuration files.
9- Configure the Kibana configuration file.
10- Change the logout configuration in Kibana
11- Restart Kibana.
12- Test the configuration.
Detailed steps:
**1- Create an account in onelogin. Request a free trial if you don't have a paid license.
**2-Add the onelogin extension in your browser
**3- Create a new user. This step can be skipped if you are just testing, you can use your onelogin admin user for the example.
Login to onelogin web console, select "Administration" >> "Users" >> "New User"

On the created user complete the mandatory fields and include also the field that we will use to send to Kibana as external role (Backend role) and map to Kibana roles. In this example, we use the field "Department":

**4- Create a new app using the "SAML Custom Connector (Advanced)" template. Configure the SAML settings while you create the app.
Go to "Applications" tab >> "Applications" and the click on "Add app"

Select the "SAML Custom Connector (Advanced)" application.
In "Info" we selected the name "Wazuh"
Go to "Configuration" tab and fill the information in red rectangles:


Go to "Parameters" tab and click on "+" to add a new parameter to the app:

In our example, we named the new parameter as "Roles", the we have to select the value "Department" and "Include in SAML assertion"

The rest of the app configuration is left as default.
**5- Add the created user to the new app
Go to "Users" and select the created user. Go to "Applications" and click on "+" to add a new application:

**6-Get the metada_onelogin.xml file and X.509 certificate from the application
Go to "Applications" tab >> "Applications" and then select the "Wazuh" app. Click on "More Actions" and then select "SAML Metadata"

Save the file as XML or open it, select all and save it in XML format. This will be our idp.metadata_file in Opendistro_security configuration. The idp.entity_id will be value of Issuer URL in SSO tab of the "Wazuh" app:

The sp.entity_id is the Audience (EntityID) in the "Configuration" tab of the "Wazuh" app:

The roles_key is the name of the parameter added in the "Wazuh" app. In our example is "Roles"
Finally, to obtain the exchange_key go to SSO tab of the "Wazuh" app and select "View Details" in "X.509 Certificate". Copy the blob of the certificate excluding the -----BEGIN CERTIFICATE----- and -----END CERTIFICATE----- lines:

**7- Configure Open Distro security configuration files.
We will need to configure some files in /usr/share/elasticsearch/plugins/opendistro_security/securityconfig/. The files we will configure are config.yml and roles_mapping.yml
- config.yml:
...
saml_auth_domain2:
         http_enabled: true
         transport_enabled: true
         order: 1
         http_authenticator:
           type: saml
           challenge: true
           config:
             idp:
               metadata_file: "/usr/share/elasticsearch/plugins/opendistro_security/securityconfig/metadata_onelogin.xml"
               entity_id: "https://app.onelogin.com/saml/metadata/xxxxxxx"
             sp:
               entity_id: wazuh-saml
             kibana_url: https://<kibana_ip>
             roles_key: Roles
             exchange_key: 'X.509 Certificate'
        authentication_backend:
           type: noop
...
- roles_mapping.yml:
---
# In this file users, backendroles and hosts can be mapped to Open Distro Security roles.
# Permissions for Opendistro roles are configured in roles.yml

_meta:
  type: "rolesmapping"
  config_version: 2

# Define your roles mapping here

## Demo roles mapping

all_access:
  reserved: false
  backend_roles:
  - "admin"
  - "wazuh"
  - "wazuh-admin"
  description: "Maps admin to all_access"
...
**8- Run the Open Distro security admin script to apply the changes made to the configuration files.
/usr/share/elasticsearch/plugins/opendistro_security/tools/securityadmin.sh -cd /usr/share/elasticsearch/plugins/opendistro_security/securityconfig/ -nhnv -cacert /etc/elasticsearch/certs/root-ca.pem -cert /etc/elasticsearch/certs/admin.pem -key /etc/elasticsearch/certs/admin-key.pem -h localhost -icl
**9- Configure the Kibana configuration file.
We have to add these two lines in kibana.yml:
opendistro_security.auth.type: "saml"
server.xsrf.whitelist: ["/_opendistro/_security/saml/acs/idpinitiated", "/_opendistro/_security/saml/acs", "/_opendistro/_security/saml/logout"]
**10- Change the logout configuration in Kibana - /usr/share/kibana/plugins/opendistroSecurityKibana/server/auth/types/saml/routes.js
...
    this.router.get({
      path: `/logout`,
      validate: false
...
**11- Restart Kibana.
# systemtl restart kibana
**12- Test the configuration.
Go to your Kibana URL and log in with your onelogin account. Test also the logout.
Hi - not all the filepaths line up in the instructions above as they are for an outdated version of Wazuh but for the most part I was able to figure it out (ex. /usr/share/elasticsearch/plugins/opendistro_security/securityconfig/ became /usr/share/wazuh-indexer/plugins/opensearch-security/securityconfig).
However, I am not able to figure out the equivalent file to kibana.yml in step 10 of the Okta instructions, can someone point me in the right direction? Thanks!
Hi @ryangniadek, the document is currently being reworked and it will be updated to match the new version of wazuh very soon. Kibana.yml is now opensearch_dashboards.yml, you can find this in this path /etc/wazuh-dashboard/opensearch_dashboards.yml . Step 10 should look like this
opensearch_security.auth.type: "saml"
server.xsrf.whitelist: ["/_plugins/_security/saml/acs", "/_plugins/_security/saml/logout", "/_opendistro/_security/saml/acs", "/_opendistro/_security/saml/logout", "/_opendistro/_security/saml/acs/idpinitiated"]
In step 9, what is the updated paths for the following certs:
/usr/share/elasticsearch/config/<cert_key>.pem /usr/share/elasticsearch/config/<cert>.pem
/usr/share/elasticsearch/config/<ca_cert>.pem
@ryangniadek
/etc/wazuh-indexer/certs/admin-key.pem /etc/wazuh-indexer/certs/admin.pem /etc/wazuh-indexer/certs/root-ca.pem
There's an updated guide here that will be of help
Is it possible to get the default login form with a "Login with SAML" button?