processing-android-capture
 processing-android-capture copied to clipboard
Published
20 hours ago •
 onlylemi
AndroidCapture For Processing
AndroidCapture For Processing
中文版介绍
This library tries to transfer data between Processing and Android.
I make a android app to capture the real-time video from "Android Camera" and the real-time data from "Android Sensor" through the socket to the server (processing server) with WiFi. The users use this lib to get phone camera frame and sensors data in processing, then can do some interesting things.
Welcome to try it and if there is a problem, please contact me or new a issues.
Android App
- RRPO: https://github.com/onlylemi/AndroidCapture. develope in IntelliJ IDEA.
- TEST: Meilan Note2 and
android5.1
Installation
- Lib Download the latest library release and follow the steps described in the Processing wiki.
- Android Configuration
- download and install APK to your mobile phone
- open this software and slide out from the left side of the screen. You will see the configuration view. And click
Setting IP, then inputthe local address of your computer. You must ensure that your mobile phone and your computer in the same Wifi.
local address of your computer
Folder
- android-apk
android phone client app in it. DOWNLOAD - examples
There are some primitive examples in it. The users download them and load
.jarfile in the project. The.jarfile is set the named'code'folder. - library
The
AndroidProcessingForProcessing.jarfile in it. - src The source code of this lib in it.
Examples
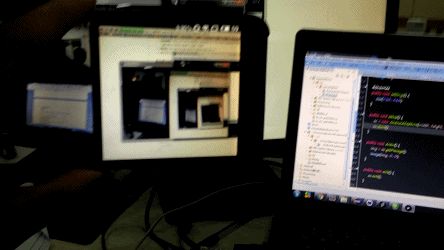
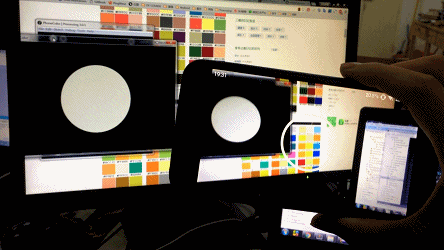
Android Camera:
- The users use the
getCameraImage()function to get android client phone camera frame and it will return aPImageobject in processing. - The users use the
getColor()function to get color from android phone camera and it return aintobject.
- A primitive example to get phone camera image
import com.onlylemi.processing.android.capture.*;

AndroidCamera ac;
PImage img;

void setup() {
  size(720, 480);
  ac = new AndroidCamera(width, height, 30);
  ac.start();
}

void draw() {
  // get android camera frame
  img = ac.getCameraImage();
  image(img, 0, 0);
}
--
- A primitive example to get the middle color of phone camera
import com.onlylemi.processing.android.capture.*;

AndroidCamera ac;

void setup() {
  size(720, 480);

  ac = new AndroidCamera(width, height, 20);
  ac.start();
}

void draw() {
  background(0);
  translate(width / 2, height / 2);

  // get color from android camera
  int c = ac.getColor();
  fill(c);
  ellipse(0, 0, 300, 300);
}
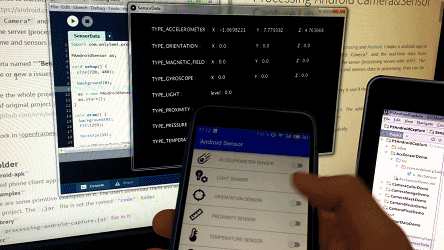
Android Sensor:
There is a class named AndroidSensor in this lib. And there are 8 sensors from android phone. The users get sensor type in class named SensorType.
- SensorType.TYPE_ACCELEROMETER
- SensorType.TYPE_LIGHT
- SensorType.TYPE_ORIENTATION
- SensorType.TYPE_PROXIMITY
- SensorType.TYPE_TEMPERATURE
- SensorType.TYPE_PRESSURE
- SensorType.TYPE_GYROSCOPE
- SensorType.TYPE_MAGNETIC_FIELD
- a example to get android sensor values
import com.onlylemi.processing.android.capture.*;

AndroidSensor as;

void setup() {
  size(720, 480);
  background(0);

  as = new AndroidSensor(0);
  as.start();
}

void draw() {
  background(0);
  fill(255);
  textSize(15);

  text(SensorType.TYPE_ACCELEROMETER + " : ", 60, 50);
  float[] values1 = as.getAccelerometerSensorValues();
  //float[] values1 = as.getSensorValues(SensorType.TYPE_ACCELEROMETER);
  text("X : " + values1[0], 250, 50);
  text("Y : " + values1[1], 400, 50);
  text("Z : " + values1[2], 550, 50);

  text(SensorType.TYPE_ORIENTATION + " : ", 60, 100);
  float[] values2 = as.getOrientationSensorValues();
  //float[] values2 = as.getSensorValues(SensorType.TYPE_ORIENTATION);
  text("X : " + values2[0], 250, 100);
  text("Y : " + values2[1], 400, 100);
  text("Z : " + values2[2], 550, 100);

  text(SensorType.TYPE_MAGNETIC_FIELD + " : ", 60, 150);
  float[] values3 = as.getMagneticFieldSensorValues();
  //float[] values3 = as.getSensorValues(SensorType.TYPE_MAGNETIC_FIELD);
  text("X : " + values3[0], 250, 150);
  text("Y : " + values3[1], 400, 150);
  text("Z : " + values3[2], 550, 150);

  text(SensorType.TYPE_GYROSCOPE + " : ", 60, 200);
  float[] values4 = as.getGyroscopeSensorValues();
  //float[] values4 = as.getSensorValues(SensorType.TYPE_GYROSCOPE);
  text("X : " + values4[0], 250, 200);
  text("Y : " + values4[1], 400, 200);
  text("Z : " + values4[2], 550, 200);

  text(SensorType.TYPE_LIGHT + " : ", 60, 250);
  float values5 = as.getLightSensorValues();
  //float values5 = as.getSensorValues(SensorType.TYPE_LIGHT)[0];
  text("level : " + values5, 250, 250);

  text(SensorType.TYPE_PROXIMITY + " : ", 60, 300);
  float values6 = as.getProximitySensorValues();
  //float values6 = as.getSensorValues(SensorType.TYPE_PROXIMITY)[0];
  text("distance : " + values6, 250, 300);

  text(SensorType.TYPE_PRESSURE + " : ", 60, 350);
  float values7 = as.getPressureSensorValues();
  //float[] values7 = as.getSensorValues(SensorType.TYPE_PRESSURE);
  text("pressure : " + values7, 250, 350);

  text(SensorType.TYPE_TEMPERATURE + " : ", 60, 400);
  float values8 = as.getTemperatureSensorValues();
  //float values8 = as.getSensorValues(SensorType.TYPE_TEMPERATURE);
  text("temperature : " + values8, 250, 400);
}
--
- a example to use android sensor values
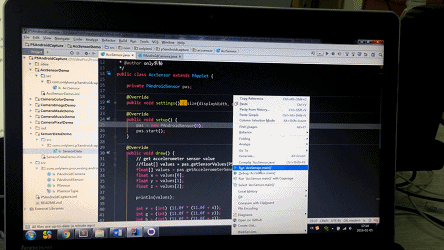
import com.onlylemi.processing.android.capture.*;

AndroidSensor as;

void setup() {
  size(720, 480);

  background(0);

  as = new AndroidSensor(0);
  as.start();
}

void draw() {
  // get accelerometer sensor value
  //float[] values = as.getSensorValues(SensorType.TYPE_ACCELEROMETER);
  float[] values = as.getAccelerometerSensorValues();
  float x = values[0];
  float y = values[1];
  float z = values[2];

  println(values);

  int r = (int) (11.0f * (11.0f + x));
  int g = (int) (11.0f * (11.0f + y));
  int b = (int) (11.0f * (11.0f + z));

  // background
  noStroke();
  fill(r, g, b, 25);
  rect(0, 0, width, height);

  // 3 circles
  float x1 = ((int) (width / 20 * (9.5f + (1.0f) * y)));
  float y1 = ((int) (height / 12 * (x + 6.0f)));
  fill(255, 0, 0);
  ellipse(x1, y1, 100, 100);

  float x2 = ((int) (width / 20 * (9.5f + (-1.0f) * x)));
  float y2 = ((int) (height / 12 * (y + 6.0f)));
  fill(0, 255, 0);
  ellipse(x2, y2, 100, 100);

  float x3 = ((int) (width / 20 * (9.5f + (1.0f) * x)));
  float y3 = ((int) (height / 12 * (y + 6.0f)));
  fill(0, 0, 255);
  ellipse(x3, y3, 100, 100);
}