WiFiBox
 WiFiBox copied to clipboard
Packet Monitor with Waterfall Plot using ESP32


:notebook_with_decorative_cover: Table of Contents
- About the Project
- Pictures
- Features
- Getting Started
- Schematic
- Installation
- Usage
- Contributing
- License
- Contact
:star2: About the Project
The traffic values in the channel specified from 1 to 14 are received and displayed with the help of ESP32, and TFT Lcd. graphically in the form of incoming traffic at any time will show with Waterfall Plot.
:camera: Pictures

:dart: Features
- Scan 2.4Ghz band
- Received Packets will show with Waterfall Plot.
- Ability to choose the desired channel from 14 channels
:toolbox: Getting Started
We use st7735 Tft Lcd with ESP32. Also, I used a MicroSwitch in order to change 802.11 channels.
- TFT Lcd st7735
- ESP32
- Micro Switch

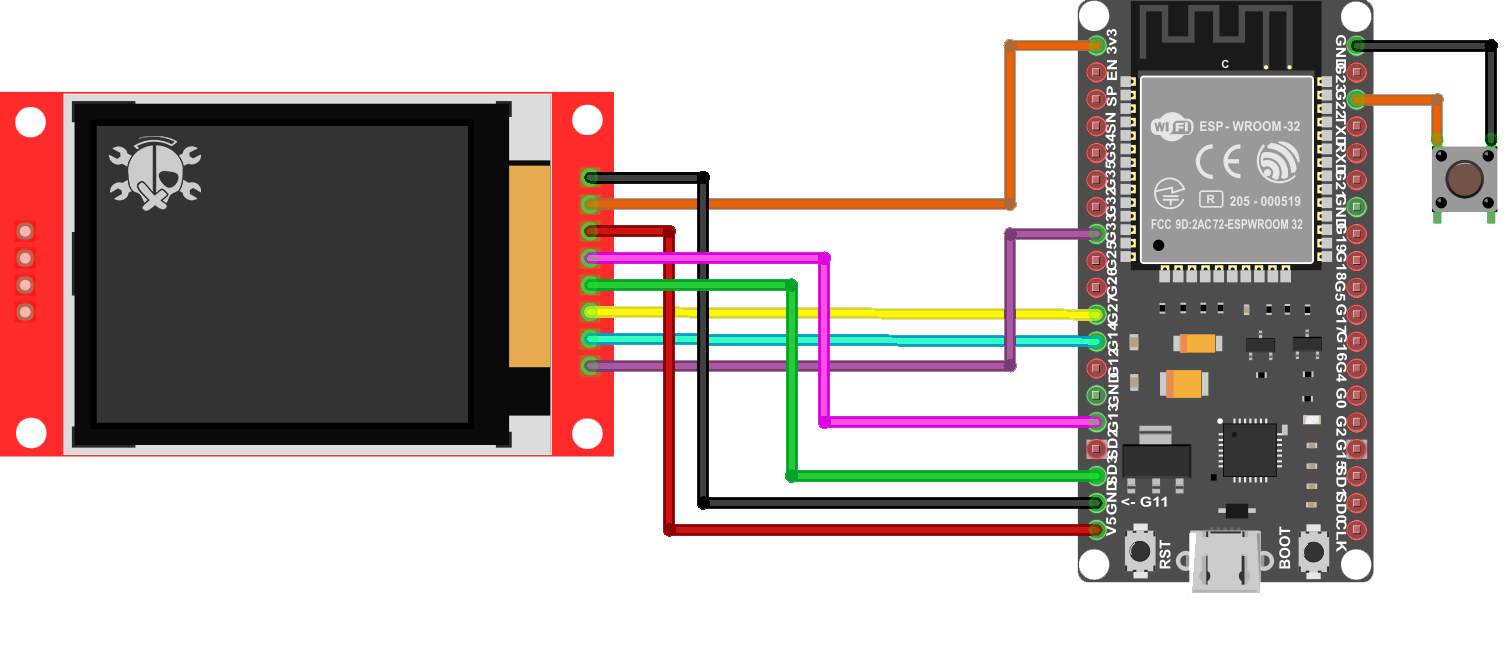
:electric_plug: Schematic
Make the connections according to the table and schematic below.
- ESP32 and st7735 tft LCD.
| ESP32 | TFT Lcd |
|---|---|
| 14 | CS |
| 33 | RST |
| 27 | DC |
| 18 | CLK |
| 23 | DIN |
| 5V | VCC |
| 3V3 | LED |
| GND | GND |
- Arduino and Micro Switch.
| ESP32 | Micro Switch |
|---|---|
| 22 | - |
- Complete Schematic
:gear: Installation
Before uploading the code you need to install ESP32 in your Arduino IDE
- In Arduino IDE, go to File > Preferences
- Enter URLs Additional Boards Manager URLs field. Then, click the “OK”
https://dl.espressif.com/dl/package_esp32_index.json
Then you need to install the required library in Arduino IDE. Follow these steps:
- Follow this path Sketch> Include Library> Manage Libraries
- Search for Adafruit_ST7735
- Install the library
:eyes: Usage
After uploading the code, According to the channel selected by you, the packet monitor will display the received traffic.

:wave: Contributing
:warning: License
Distributed under the MIT License. See LICENSE.txt for more information.
:handshake: Contact
CiferTech - @twitter - [email protected]
Project Link: https://github.com/cifertech/WiFiBox