dotsh
 dotsh copied to clipboard
A fast dotfiles and system configuration installer optimized for Gitpod and power users
Introduction
This is a wannabe asynchronous dotfiles installer intended for use on Gitpod and locally. Batteries included!
Highlights:
- Dotfiles
install.shexecutes in under 1 seconds, thus your IDE starts quick nomatter how many things you configure/install. - Tight integration with
tmux(replaces Gitpod tasks and VSCode terminal-UI), optimized for plain SSH based workflow.- Launch gitpod workspaces automatically inside a local terminal emulator via
ssh://to skip all the manual steps to SSH from your terminal emulator (i.e manually copying the ssh command and running it on the terminal).
- Launch gitpod workspaces automatically inside a local terminal emulator via
- Features live testing of dotfiles within your existing Gitpod workspace itself so that you can prototype quickly.
- Works both locally and on Gitpod.
- Uses your favorite shell on Gitpod task-terminals while perseving bash/posix compatibility with the task scripts.
How to use on Gitpod
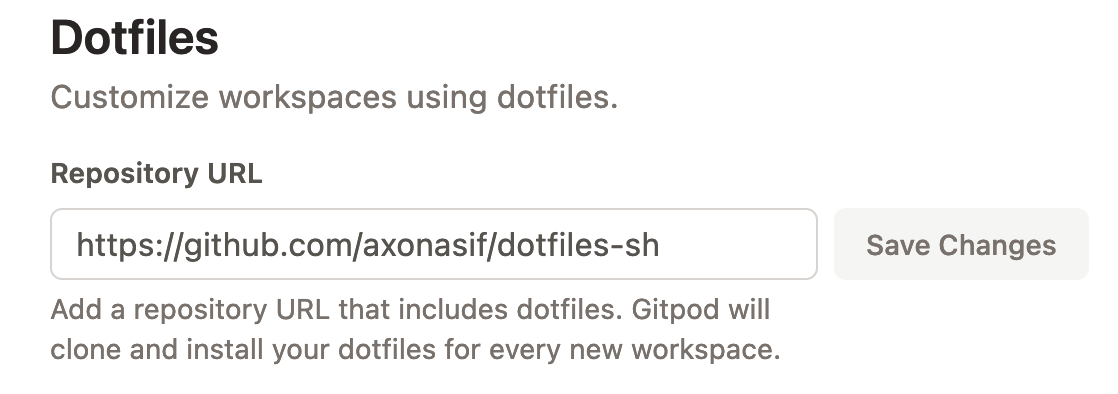
If you want to quickly try it out, simply put https://github.com/axonasif/dotfiles-sh on your preferences.
Later if you feel like performing advanced customizations, fork this repo and then you can then use it on preferences for Gitpod. By default it will apply my raw dotfiles tree from https://github.com/axonasif/dotfiles.public . If you wish to use your own raw dotfiles tree, you can either set DOTFILES_PRIMARY_REPO or modify it here.
Learn more about using dotfiles on Gitpod at https://www.gitpod.io/docs/config-dotfiles
How it works on Gitpod
A brief overview:
├── Gitpod clones this repo and executes `install.sh` from $HOME/.dotfiles
│   ├── Asynchronously executes instructions inside `install.sh`
│   │   ├── Installs some system/userland packages
│   │   ├── Creates symlinks from your dotfiles sources to `$HOME/` while following `.dotfilesignore` via a helper function
│   │   ├── Installs CLIs such as `gh`, `gcloud` and auto-logins into them along several other tools
│   │   ├── Process Gitpod workspace persisted shell histories
|   |   ├── Takes over how Gitpod starts the task-terminals and replaces them with `tmux` windows instead
├── Gitpod starts the IDE process
└── Logs are saved to $HOME/.dotfiles.log
Customizing
Ideally it should be easy to understand and customize this repo since I tried my best to make the code very modular and self-explanatory. Take a look inside the entrypoint /src/main.sh to tweak stuff as per your needs, such as commenting out any function on /src/main.sh to disable that particular thing.
How to compile
Run the following command:
bashbox build --release
How to live test changes
dotfiles-sh mimics a minimal a process of how Gitpod starts a workpsace and initalizes dotfiles in it. This way we can quickly test out our dotfiles without having to:
- commit+push the changes
- create new workspaces each time after that
which was a very annoying and time consuming process.
There is a custom package script defined inside the Bashbox.sh called live. You can execute it like so:
bashbox live
And it will test out your new dotfiles changes inside the existing workspace without affecting it. Sounds fun, right!?
How to automatically launch Gitpod workspaces inside your local terminal emulator
As you may already know, Gitpod will automatically launch your Desktop-VSCode for you if you selected to use it. However that's not the case for plain SSH based workflow yet (Related: https://github.com/gitpod-io/gitpod/issues/9323).
Although, since Gitpod is pretty scriptable and modular, it's possible to handle this ourselves until this has been polished out in the Gitpod side.
TBD, more to write here....
How to handle automatic port forwarding in on your SSH tmux session
TBD...
Tweak behavior via environment variables
For Gitpod, you can set these on https://gitpod.io/variables with */* as the scope.
Currently there are a few variables which can alter the behavior of dotfiles-sh on the fly:
DOTFILES_NO_VSCODE
Defaults to
false.
Setting this to
truewill cause it to kill VSCode so that you can claim back your memory and CPU usage 😜
DOTFILES_SPAWN_SSH_PROTO
Defaults to
true.
Setting this to
falsewill cause it to skip launching your local terminal emulator via thessh://protocol.
DOTFILES_PRIMARY_REPO
Defaults to https://github.com/axonasif/dotfiles.public
Setting this will change the primary dotfiles tree that
dotfiles-shwill apply on$HOME.
You can also define a local path instead of a URL. (i.e
DOTFILES_PRIMARY_REPO=/some/filesystem/dir)
DOTFILES_DEFAULT_SHELL
Defaults to
/usr/bin/fish(this is planned, not implemented yet).
This is the shell that our
tmuxsession will use.
Helper functions
These are some functions that you can use if you wish to do some advanced customization on your own.
vscode::add_settings
This let's you easily add settings to the Gitpod workspace VSCode instance. Settings added via this function will not be synced and is scoped to the applied workspaces only.
Usage example:
- Via stdin:
vscode::add_settings <<-'JSON'
{
	"terminal.integrated.profiles.linux": {
		"tmuxshell": {
			"path": "bash",
			"args": [
				"-c",
				"tmux new-session -ds main 2>/dev/null || :; if cpids=$(tmux list-clients -t main -F '#{client_pid}'); then for cpid in $cpids; do [ $(ps -o ppid= -p $cpid)x == ${PPID}x ] && exec tmux new-window -n \"vs:${PWD##*/}\" -t main; done; fi; exec tmux attach -t main"
			]
		}
	},
	"terminal.integrated.defaultProfile.linux": "tmuxshell"
}
JSON
Live usage example can be seen here.
- Via file:
vscode::add_settings /path/to/file.json
dotfiles::initialize
Automatically clone and symlink from a remote dotfiles repository tree. It also cleans up broken symlinks from previous apply (useful when used on local PC). You can ignore symlinking files by specifying their paths on a .dotfilesignore on the repo root of your dotfiles raw tree.
Usage:
REPO="your-repo-link/path-here" dotfiles::initialize [target-dir]
REPO= accepts URL or local path. (Defaults to https://github.com/axonasif/dotfiles.public)
REPO= and target-dir is optional.
target-dir is the directory/folder where symlinks will be applied from the cloned repo. (Defaults to $HOME)
If you wish to apply the symlinks to a different directory for example:
REPO="your-repo-link/path-here" dotfiles::initialize "/root/.local/very/deep/location";
Live examples of it's usage can be found on this file
await::until_true
await::until_true <cmd>;
Simple wrapper for awaiting a command to return true
Live usage example can be found here.
await::for_file_existence
await::for_file_existence <file_path>;
Await for a file to appear in the filesystem.
Live usage example can be found here.
await::for_vscode_ide_start
await::for_vscode_ide_start;
Await for the Gitpod VSCode window to appear.
Live usage example can be found here.
await::create_shim
await::create_shim /usr/bin/something_fancy
Let's say we're intalling a tool called tmux but since it's asynchronously installed so if an user tries to execute it before it exists, they'll get an error. In order to avoid such a problem we can place an wrapper script at tmux's absolute path using await::create_shim, that way the wrapper script as tmux will await for the actual command to appear in the filesystem and switch(exec) to it if someone executes tmux on their terminal before the actual tmux binary/program gets fully installed. In other words, if you invoke tmux on your terminal, the wrapper script at /usr/bin/tmux will sleep() until it finds that it itself was overwritten and the actual tmux binary was installed at /usr/bin/tmux.
Now, there is another problem, let's say you used await::create_shim /usr/bin/tmux while tmux is being installed in the background asynchronously. What if you also need to install/configure additional tmux plguins/customizations from your dotfiles installation script but the user tried to run tmux before you installed the additional customization. In this case, tmux would start up without your customization during the process you may perform the customizations in the background. There is a solution to that. Here's an example below:
# Install tmux asynchronously in the background
sudo apt install tmux & disown;

# Create the awaiting shim for any user execution before apt fully installs tmux, notice the extra `KEEP=true`
KEEP=true await::create_shim /usr/bin/tmux;

## Extra tmux customization/configuration part
git clone --filter=tree:0 https://github.com/tmux-plugins/tpm "$HOME/.tmux/plugins/tpm";
# This script has to execute `tmux` internally multiple times
# But we need it to hit the actual tmux binary but not the wrapper shim script,
# however the wrapper shim script will recognize that it's being called from inside the dotfiles installation script
# and thus it will let us to execute the actual binary of `tmux`
bash "$HOME/.tmux/plugins/tpm/scripts/install_plugins.sh";

# After we're done customizing internally, get rid of the wrapper shim script
# and let everyone directly hit the actual `tmux` binary.
CLOSE=true await::create_shim /usr/bin/tmux;
A live usage of KEEP=true await::create_shim can be seen here.
await::signal
Let's you await between multiple async commands.
Example:
In function foo we have:
function foo() {
	await::signal get boo_is_cool; # Blocks execution until signal is received

	echo "Now we can proceeed!";

	# More commands below...
}
In function boo we have:
function boo() {
	# Let's run some random commands
	sudo apt install shellcheck;

	await::signal send boo_is_cool; # Sends the singal to any awaiting client so that they can continue execution
}